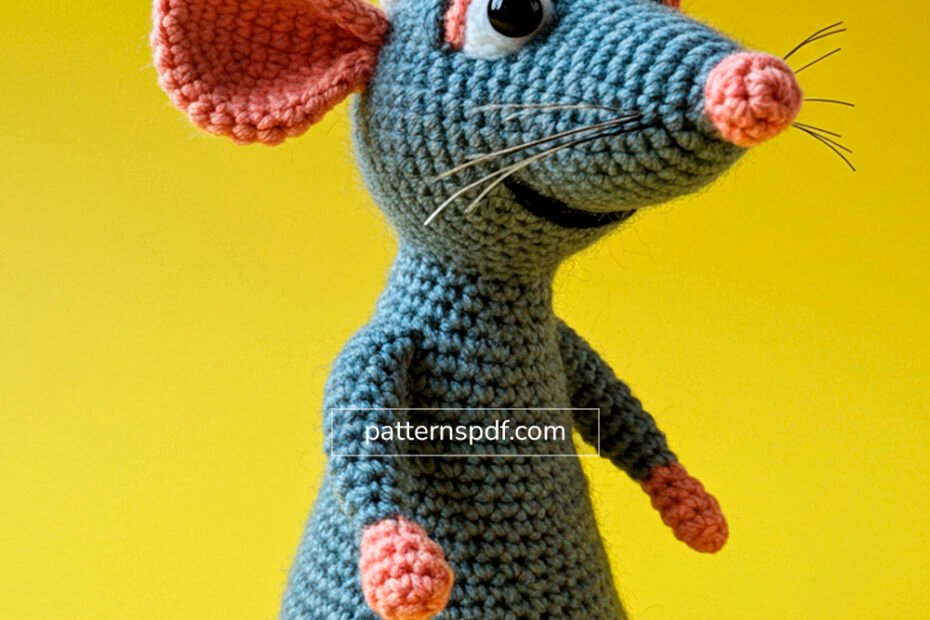
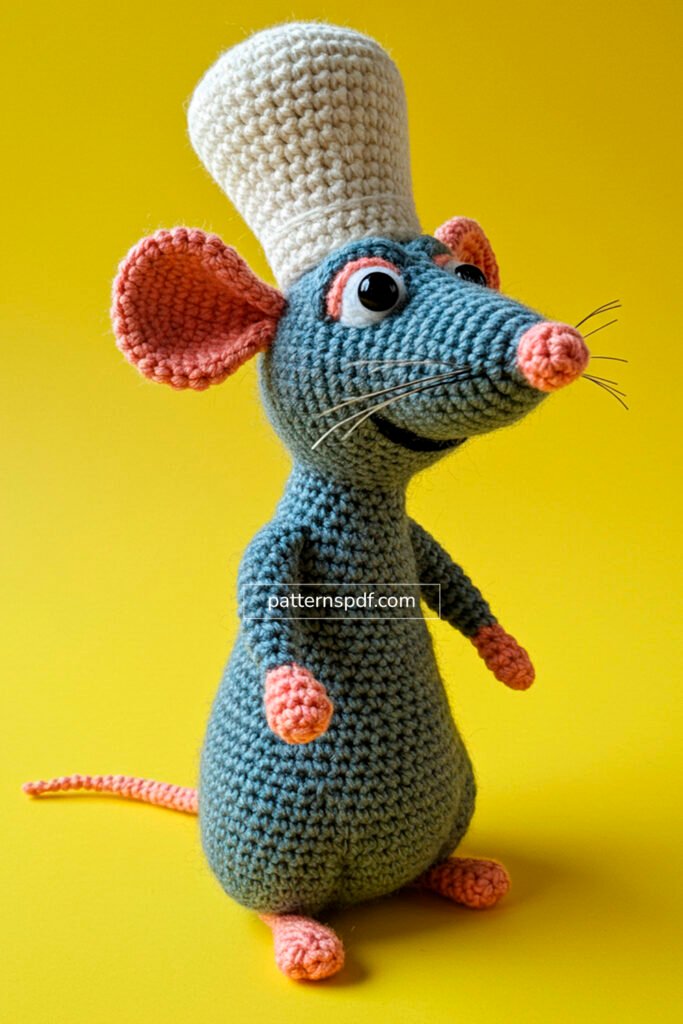
Remy Ratatouille Amigurumi brings the magic of the beloved Pixar chef to life in a charming, handcrafted form. This delightful crocheted rendition perfectly captures Remy’s essence, from his signature chef’s hat to his inquisitive snout and expressive eyes. The attention to detail in this amigurumi is remarkable, featuring his characteristic blue-grey fur, delicate pink ears and paws, and a long, slender tail. Standing proudly with his chef’s toque, this crocheted Remy is a testament to the artisan’s skill, making it an irresistible piece for fans of the movie, collectors of unique amigurumi, or anyone who appreciates the whimsical side of culinary art.
Remy Ratatouille Amigurumi: Tips for Your Amigurumi Project
Recreating Remy through crochet offers a wonderfully engaging project for amigurumi enthusiasts. While the exact pattern specifics are not provided, observing the image reveals the intricate shaping and color work involved. The body and head appear to be worked in a continuous spiral of single crochet, forming his slender, upright posture. The large, expressive ears, delicate paws, and long tail require careful shaping and attachment, likely involving separate pieces crocheted in rows or small rounds. The chef’s hat, a key distinguishing feature, would be a separate, structured piece, possibly worked in a slightly firmer stitch or with added support to maintain its shape. Embracing color changes for his distinct features, along with embroidering his whiskers and smile, will truly bring this culinary genius to life, allowing crocheters to savor the joy of crafting their own tiny chef.
Remy Ratatouille Amigurumi Pattern: Crochet Your Own Culinary Companion!
Skill Level: Intermediate
Finished Size: Approximately [X] inches / [Y] cm tall (when made with specified yarn and hook).
Materials:
Worsted weight yarn in:
Blue-Grey (main body, head, limbs)
Light Pink (ears, paws, tail)
White (chef’s hat, eye whites)
Black (pupils, smile)
Crochet hook: [Hook Size, e.g., 3.0mm (D) or 3.5mm (E)] – adjust as needed to achieve tight stitches without gaps.
Stitch marker
Tapestry needle
Polyester fiberfill for stuffing
Wire for whiskers (thin craft wire or fishing line) OR Black embroidery floss for embroidered whiskers
Scissors
Abbreviations (US Crochet Terms):
MR: Magic Ring
ch: chain
sc: single crochet
inc: single crochet increase (2 sc in one stitch)
dec: single crochet decrease (sc2tog)
sl st: slip stitch
FO: Fasten off
st(s): stitch(es)
[…] : repeat instructions in brackets
(…) : stitch count at the end of the round/row
BLO: Back Loop Only
Important Notes:
This pattern is worked in continuous rounds unless otherwise specified. Use a stitch marker to mark the first stitch of each round.
Stuff pieces firmly as you go, unless stated otherwise, to maintain shape.
Gauge is not critical for this project, but consistent tension will ensure a neat finish and good proportions.
Color changes should be made on the last pull-through of the previous stitch for a cleaner transition.
PATTERN INSTRUCTIONS
Head (Blue-Grey Yarn)
Round 1: 6 sc in MR. (6)
Round 2: [Inc] x6. (12)
Round 3: [Sc, inc] x6. (18)
Round 4: [2 sc, inc] x6. (24)
Round 5: [3 sc, inc] x6. (30)
Round 6: [4 sc, inc] x6. (36)
Rounds 7-12: Sc in each st around. (36) – Adjust for desired head height.
FO, leaving a long tail for sewing. Stuff lightly.
Nose (Light Pink Yarn)
Round 1: 4 sc in MR. (4)
Round 2: [Inc] x4. (8)
FO, leaving a long tail. Flatten and shape into an oval.
Outer Ears (Make 2 – Blue-Grey Yarn)
Round 1: 6 sc in MR. (6)
Round 2: [Inc] x6. (12)
Round 3: [Sc, inc] x6. (18)
Round 4: [2 sc, inc] x6. (24)
FO, do not stuff.
Inner Ears (Make 2 – Light Pink Yarn)
Round 1: 6 sc in MR. (6)
Round 2: [Inc] x6. (12)
Round 3: [Sc, inc] x6. (18)
FO, do not stuff.
Arms (Make 2 – Start with Light Pink Yarn)
Round 1: 6 sc in MR. (6)
Round 2: Sc in each st around. (6)
Change to Blue-Grey Yarn.
Rounds 3-10: Sc in each st around. (6) – Adjust for desired arm length.
FO, leaving a long tail for sewing. Stuff lightly or not at all.
Legs (Make 2 – Start with Light Pink Yarn)
Round 1: 6 sc in MR. (6)
Round 2: [Inc] x6. (12)
Round 3: Sc in each st around. (12)
Change to Blue-Grey Yarn.
Rounds 4-10: Sc in each st around. (12) – Adjust for desired leg length.
FO, leaving a long tail for sewing. Stuff firmly.
Tail (Light Pink Yarn)
Ch 25. (Adjust chain length for desired tail length)
Row 1: Sc in 2nd ch from hook, sc in each ch across. (24)
FO, leaving a long tail for sewing. Do not stuff.
Chef’s Hat (White Yarn)
Round 1: 6 sc in MR. (6)
Round 2: [Inc] x6. (12)
Round 3: [Sc, inc] x6. (18)
Round 4: [2 sc, inc] x6. (24)
Round 5: [3 sc, inc] x6. (30)
Round 6: [4 sc, inc] x6. (36)
Rounds 7-10: Sc in each st around. (36) – Adjust for top of hat height.
Round 11: Sc in BLO around. (36) – This creates a ridge for the brim.
Rounds 12-14: Sc in each st around. (36)
FO, leaving a long tail for sewing. Lightly stuff the top dome.
Eyes (Make 2 – Start with White Yarn)
Round 1: 6 sc in MR. (6)
Round 2: [Inc] x6. (12)
FO, leaving a long tail for sewing.
Assembly:
Attach Head to Body: Sew the head to the body, centering it. Stuff firmly before closing.
Assemble Ears: Place an Inner Ear (pink) on top of an Outer Ear (blue-grey). Using the tail from the pink piece, sew them together, folding the base slightly to give them shape.
Attach Ears: Sew the assembled ears to the sides of the head, towards the top.
Attach Snout: Pin the snout to the lower-middle part of the head. Sew securely.
Attach Nose: Sew the pink nose piece onto the tip of the snout.
Attach Eyes: Pin the white eye circles to the head, above the snout and evenly spaced. Sew securely.
Embroider Features (Black Yarn):
Pupils: Embroider small black circles onto the center of the white eye pieces.
Smile: Embroider a small, curved smile below the snout.
Whiskers:
Option 1 (Wire): Cut 4-6 pieces of thin craft wire (approx. 2-3 inches long). Insert them into the snout on either side of the nose, securing with a dab of glue on the inside if desired. Trim to desired length.
Option 2 (Embroidered): Use black embroidery floss (multiple strands) to embroider 2-3 straight lines on each side of the snout.
Attach Arms: Sew the arms to the sides of the body, just below the neck seam.
Attach Legs: Sew the legs to the bottom of the body, ensuring Remy can stand.
Attach Tail: Sew the tail to the back of the body, at the base.
Attach Chef’s Hat: Position the chef’s hat on top of Remy’s head, slightly tilted back as in the image. Sew securely around the brim.
Weave in all remaining loose ends securely.
Copyright and Selling:
This pattern is for personal use only.
Please do not sell, distribute, or reproduce this pattern in any form, in whole or in part.
You may sell finished items made from this pattern, but please give credit to [Your Name/Pattern Name] as the designer.