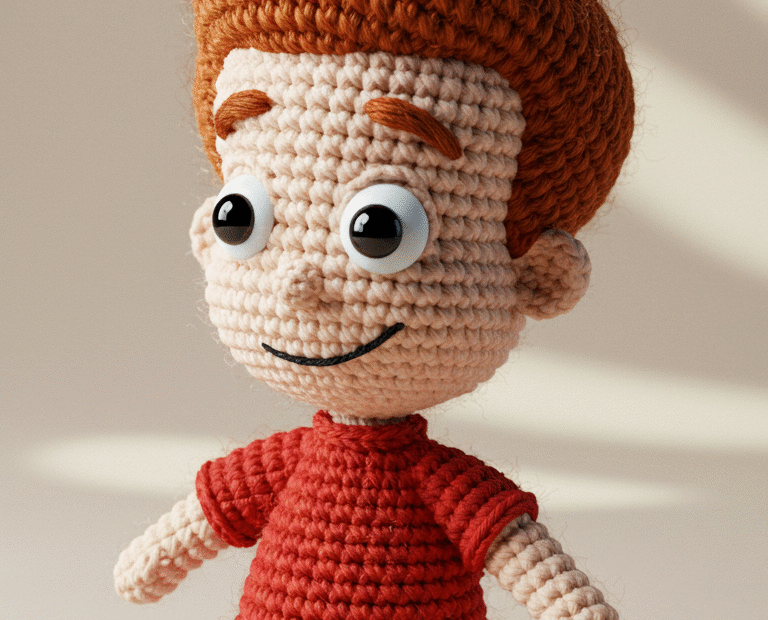
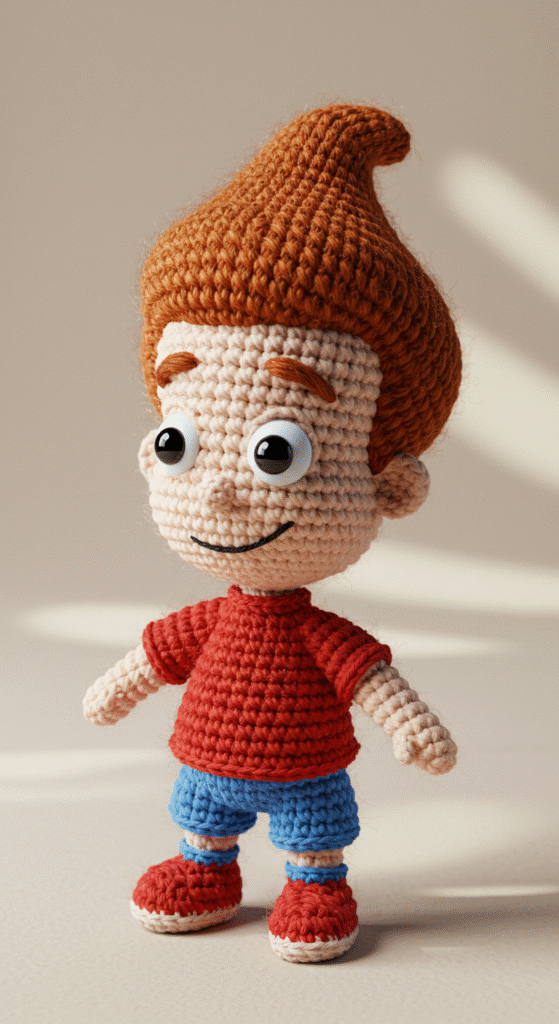
Jimmy Neutron Amigurumi perfectly captures the boy genius from Jimmy Neutron: Boy Genius in an adorable, handcrafted form. This delightful crocheted rendition features Jimmy’s most iconic trait: his towering, swirl of orange hair, meticulously replicated in yarn. His cheerful, intelligent expression, complete with his large, inquisitive eyes and slight smile, is instantly recognizable. Dressed in his classic red t-shirt and blue shorts, every detail, from his small ears to his signature shoes, is carefully crafted. This charming Jimmy Neutron amigurumi is more than just a toy; it’s a nostalgic piece of animated brilliance, ideal for display or gifting to a fellow fan of science and adventure.
Crafting Your Jimmy Neutron Amigurumi
For those eager to recreate this lovable protagonist, embarking on a Jimmy Neutron Amigurumi project offers a rewarding and fun challenge. While a specific pattern isn’t provided, observing the image reveals the intricate shaping and color work involved. The head and body are likely worked in continuous rounds of single crochet, forming his standard amigurumi proportions. The true artistic challenge lies in perfecting his iconic hair, which appears to be a separate, structured piece designed to mimic his distinctive upward swirl. Color changes for his red shirt, blue shorts, and two-toned shoes are essential for accuracy. With careful attention to detail and a love for the character, crocheters can bring this brilliant inventor to life, stitch by ingenious stitch.
Jimmy Neutron Amigurumi Pattern: Crochet Your Boy Genius!
Skill Level: Intermediate
Finished Size: Approximately [X] inches / [Y] cm tall (when made with specified yarn and hook).
Materials:
Worsted weight yarn in:
Light Beige/Skin Tone (head, ears, arms)
Orange/Ginger (hair)
Red (shirt, shoes)
Blue (shorts)
White (shoe laces/soles)
Black (pupils, smile, eyebrows)
Crochet hook: [Hook Size, e.g., 3.0mm (D) or 3.5mm (E)] – adjust as needed to achieve tight stitches without gaps.
Stitch marker
Tapestry needle
Polyester fiberfill for stuffing
Safety eyes: [Size, e.g., 9mm or 10mm round]
Scissors
Optional: Small piece of cardboard or plastic for shoe soles (for stability)
Abbreviations (US Crochet Terms):
MR: Magic Ring
ch: chain
sc: single crochet
inc: single crochet increase (2 sc in one stitch)
dec: single crochet decrease (sc2tog)
sl st: slip stitch
FO: Fasten off
st(s): stitch(es)
[…] : repeat instructions in brackets
(…) : stitch count at the end of the round/row
BLO: Back Loop Only
FLO: Front Loop Only
Important Notes:
This pattern is worked in continuous rounds unless otherwise specified. Use a stitch marker to mark the first stitch of each round.
Stuff pieces firmly as you go, unless stated otherwise, to maintain shape.
Gauge is not critical for this project, but consistent tension will ensure a neat finish and good proportions.
Color changes should be made on the last pull-through of the previous stitch for a cleaner transition.
PATTERN INSTRUCTIONS
Head (Light Beige/Skin Tone Yarn)
Round 1: 6 sc in MR. (6)
Round 2: [Inc] x6. (12)
Round 3: [Sc, inc] x6. (18)
Round 4: [2 sc, inc] x6. (24)
Round 5: [3 sc, inc] x6. (30)
Round 6: [4 sc, inc] x6. (36)
Round 7: [5 sc, inc] x6. (42)
Rounds 8-15: Sc in each st around. (42)
Round 16: [5 sc, dec] x6. (36) – Insert safety eyes between Rounds [12 and 13], approximately [8-10] stitches apart.
FO, leaving a long tail. Weave the tail through the front loops of the remaining 6 stitches and pull tight to close. Weave in end.
Hair (Orange/Ginger Yarn)
Hair Base (to fit head):
Round 1: 6 sc in MR. (6)
Round 2: [Inc] x6. (12)
Round 3: [Sc, inc] x6. (18)
Round 4: [2 sc, inc] x6. (24)
Round 5: [3 sc, inc] x6. (30)
Round 6: [4 sc, inc] x6. (36)
Round 7: [5 sc, inc] x6. (42)
Round 8: Sc in each st around. (42)
Continue for height/swirl (work in rows or short rounds):
Row 9 (working short rows): Sc in next 10 st, turn.
Row 10: Sc in 10 st, turn. Repeat for 2-3 more rows.
Next Round (to form the curl): Sc in next 8 st, dec, sc in next 8 st, dec. (Adjust this section with inc/dec to create the upward swirl as seen in the image).
This section is tricky and requires trial and error to get the exact swirl. You might need to add more ch/sl st rows to create additional “strands” or shape.
FO, leaving a long tail for sewing. Stuff lightly to maintain shape if needed.
Ears (Make 2 – Light Beige/Skin Tone Yarn)
Round 1: 6 sc in MR. (6)
Round 2: Sc in each st around. (6)
FO, leaving a long tail for sewing. Pinch flat and do not stuff.
Body / Shirt / Shorts (Start with Blue Yarn for Shorts)
Make 2 Legs first:
Round 1: 6 sc in MR. (6)
Round 2: [Inc] x6. (12)
Rounds 3-6: Sc in each st around. (12) – Adjust for desired leg length before shoes.
FO for first leg. Do NOT FO for second leg.
Join Legs:
Round 7: Ch 2 from second leg, join with sl st to any stitch on first leg. Sc in 12 st on first leg, sc in 2 ch, sc in 12 st on second leg, sc in 2 ch. (28)
Rounds 8-10: Sc in each st around. (28) – Adjust for short height.
Change to Red Yarn (for Shirt).
Round 11: Sc in BLO around. (28) – This creates a cleaner line for the shirt.
Rounds 12-20: Sc in each st around. (28) – Adjust for shirt length.
Rounds 2-10: Sc in each st around. (6) – Adjust for desired arm length.
FO, leaving a long tail for sewing. Stuff lightly, leaving the top open.
Shoes (Make 2 – Start with Red Yarn)
Chain 6.
Round 1: Sc in 2nd ch from hook, 3 sc, 3 sc in last ch. Working down other side of ch: 4 sc. (11)
Round 2: Inc, 3 sc, inc x3, 3 sc, inc x2. (17)
Round 3: Sc in BLO around. (17) – Creates a defined sole.
Round 4: [Sc, dec] x5, 2 sc. (12)
Round 5: [Dec] x6. (6)
FO, leaving a long tail for sewing. Stuff lightly.
White Soles/Laces: Using White yarn, sl st or sc into the FLO of Round 2 for the bottom sole detail. Embroider small “laces” or a horizontal line on the top front of the shoe as seen in the image.
Assembly:
Attach Head to Body: Sew the body opening to the head opening.
Attach Hair: Pin the hair piece onto the head, ensuring the large swirl is positioned correctly. Sew securely all around the base and any points that need to be fixed for shape.
Attach Ears: Sew the small ears to the sides of the head, mostly hidden by the hair, as seen in the image.
Attach Arms: Sew the arms to the sides of the red shirt.
Attach Shoes: Sew the red and white shoes to the bottom of the blue legs. If using cardboard/plastic for soles, insert before closing the shoe.
Embroider Facial Features (Black Yarn):
Eyebrows: Embroider thin, slightly curved eyebrows above the safety eyes.
Smile: Embroider a small, curved smile below the eyes.
Weave in all remaining loose ends securely.
Copyright and Selling:
This pattern is for personal use only.
Please do not sell, distribute, or reproduce this pattern in any form, in whole or in part.
You may sell finished items made from this pattern, but please give credit to [Your Name/Pattern Name] as the designer.