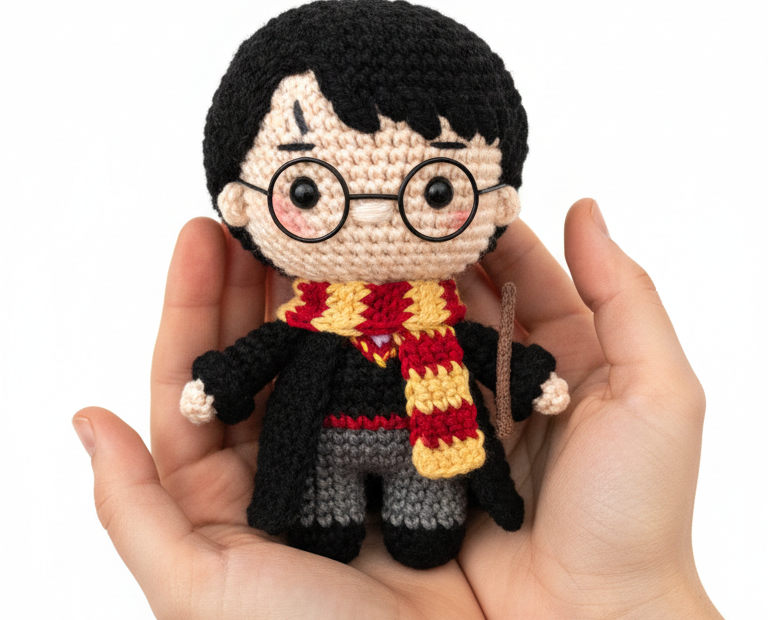
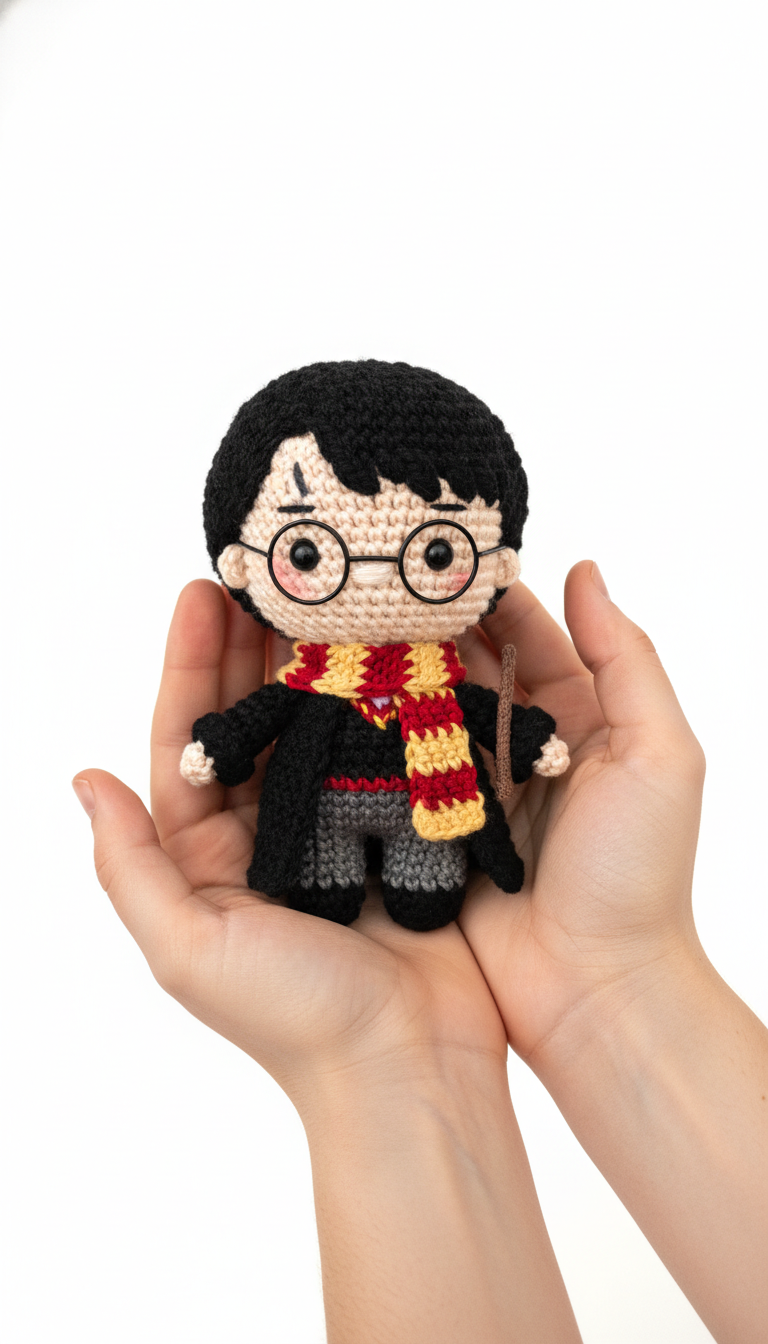
Step into the magical world of witchcraft and wizardry with this enchanting crochet Harry Potter amigurumi pattern! Perfect for fans of all ages, this detailed guide will help you craft your very own chibi wizard doll. Imagine the joy of bringing this iconic character to life with your own hands, from his signature glasses and scar to his Gryffindor scarf. Let’s get crocheting and add a touch of magic to your collection!
Conjure Up Some Magic with Your Own Hand-Crocheted Wizard
There’s something truly special about creating a beloved character with your own two hands. This Harry Potter amigurumi isn’t just a toy; it’s a testament to your crafting skill and a delightful piece of fandom art. Whether you’re making it for a fellow Potterhead, a magical nursery decoration, or simply to add a whimsical touch to your desk, this pattern offers a rewarding experience. It’s a charming gift that will be cherished by any fan.
Crochet Pattern: Crochet Harry Potter Amigurumi Pattern: Craft Your Own Wizard Doll
Materials
Worsted weight yarn in: Black, Beige (skin tone), Dark Grey, Dark Red, Yellow, Brown
2.5mm or 3.0mm crochet hook (or size suitable for yarn)
6mm safety eyes (2)
Polyester fiberfill for stuffing
Tapestry needle
Stitch markers
Scissors
Black embroidery thread (for glasses and scar)
Pink embroidery floss (for cheeks)
Abbreviations
MR = Magic Ring
sc = single crochet
inc = increase (2 sc in next stitch)
dec = decrease (single crochet 2 stitches together)
sl st = slip stitch
ch = chain
FO = Fasten off
FLO = Front Loop Only
BLO = Back Loop Only
(X) = total stitches in round
Instructions
Head (Beige yarn)
R1: 6 sc in MR (6)
R2: 6 inc (12)
R3: (1 sc, inc) x 6 (18)
R4: (2 sc, inc) x 6 (24)
R5: (3 sc, inc) x 6 (30)
R6: (4 sc, inc) x 6 (36)
R7-R13: 36 sc (7 rounds)
Insert safety eyes between R9 and R10, about 6 stitches apart. Embroider glasses around eyes and the lightning bolt scar with black embroidery thread. Embroider pink blush on cheeks with pink floss.
R14: (4 sc, dec) x 6 (30)
R15: (3 sc, dec) x 6 (24)
R16: (2 sc, dec) x 6 (18)
Start stuffing firmly.
R17: (1 sc, dec) x 6 (12)
FO, leave a long tail for sewing.
Legs (Make 2 – start with Black yarn)
R1: 6 sc in MR (6)
R2: 6 inc (12)
R3: BLO 12 sc (12)
R4: 12 sc (12)
Change to Dark Grey yarn.
R5-R10: 12 sc (6 rounds)
FO first leg. Do not FO second leg.
Body (Continue from second leg, using Dark Grey yarn)
Join legs: Ch 1, attach to first leg with sc. Work 12 sc around first leg, 1 sc in ch-1 space, 12 sc around second leg, 1 sc in ch-1 space. (26)
R1-R5: 26 sc (5 rounds)
Change to Dark Red yarn.
R6-R7: 26 sc (2 rounds)
R8: (4 sc, dec) x 4, 2 sc (22)
R9: (3 sc, dec) x 4, 2 sc (18)
Stuff the body firmly.
R10: (1 sc, dec) x 6 (12)
R11: 6 dec (6)
FO, close hole.
Arms (Make 2 – start with Black yarn)
R1: 6 sc in MR (6)
R2-R7: 6 sc (6 rounds)
Change to Beige yarn.
R8-R9: 6 sc (2 rounds)
Lightly stuff the hand part only. FO, leave long tail for sewing.
Hair Cap (Black yarn)
R1: 6 sc in MR (6)
R2: 6 inc (12)
R3: (1 sc, inc) x 6 (18)
R4: (2 sc, inc) x 6 (24)
R5: (3 sc, inc) x 6 (30)
R6: (4 sc, inc) x 6 (36)
R7-R10: 36 sc (4 rounds)
Sl st, FO, leave long tail for sewing.
Robe (Black yarn)
Back Panel: Ch 11. R1: Sc in 2nd ch from hook, sc in next 9 ch. Ch 1, turn. (10) R2-R10: Sc across. Ch 1, turn. (10) FO.
Front Panels (Make 2): Ch 5. R1: Sc in 2nd ch from hook, sc in next 3 ch. Ch 1, turn. (4) R2-R10: Sc across. Ch 1, turn. (4) FO.
Scarf (Red and Yellow yarn)
Ch 35 (or desired length).
R1-R3: (Red) Sc in 2nd ch from hook, sc across. Ch 1, turn. (34)
R4-R6: (Yellow) Sc across. Ch 1, turn. (34)
R7-R9: (Red) Sc across. Ch 1, turn. (34)
R10-R12: (Yellow) Sc across. Ch 1, turn. (34)
R13-R15: (Red) Sc across. Ch 1, turn. (34)
FO. Weave in ends.
Wand (Brown yarn)
Ch 6. Sl st into first ch to form a ring.
R1: 6 sc into ring. (6)
R2-R10: 6 sc (9 rounds). (6)
Sl st to join, FO, leave a tail for sewing.
Assembly
1. Sew head to body.
2. Sew arms to the sides of the body, positioning them so they hang naturally.
3. Sew the hair cap to the head, shaping the fringe as seen in the image.
4. Assemble the robe: Sew the front panels to the back panel at the shoulders to create a V-neck opening. Sew the side seams, leaving armholes. Place the robe onto the doll, aligning it with the red shirt, and stitch it in place.