Get ready to spread some festive cheer with this charming Amigurumi Christmas Tiger! This detailed pattern will guide you through creating your very own striped feline friend, complete with a tiny Santa hat and a cozy scarf. Perfect for holiday decorations, a unique gift, or just adding a touch of playful warmth to your home, this tiger is sure to bring a smile to everyone’s face.
Craft Your Own Festive Feline Companion
There’s nothing quite like the joy of a handmade gift or decoration, and this Christmas tiger embodies that spirit perfectly. Crafted with love and a bit of yarn, this amigurumi project allows you to create a personalized, cuddly companion that captures the magic of the season. Its adorable expression and festive accessories make it an instant favorite for all ages.
Crochet Pattern: Roar into the Holidays: Adorable Amigurumi Christmas Tiger Pattern!
Materials
Orange yarn (DK/Sport weight)
White yarn (DK/Sport weight)
Black yarn (DK/Sport weight)
Red yarn (DK/Sport weight)
2.5mm crochet hook (or size suitable for your yarn)
6mm safety eyes
Polyester fiberfill for stuffing
Yarn needle
Stitch markers
Scissors
Abbreviations
MR: Magic Ring
sc: Single Crochet
inc: Increase (2 sc in one stitch)
dec: Decrease (sc 2 stitches together)
sl st: Slip Stitch
ch: Chain
FO: Fasten Off
Instructions
Work in continuous rounds unless otherwise specified. Use a stitch marker to mark the beginning of each round.
Head (Orange yarn)
R1: MR 6 sc (6)
R2: 6 inc (12)
R3: (1 sc, 1 inc) x6 (18)
R4: (2 sc, 1 inc) x6 (24)
R5: (3 sc, 1 inc) x6 (30)
R6-R10: 30 sc (5 rounds)
Insert safety eyes between R8 and R9, about 5-6 stitches apart.
R11: (3 sc, 1 dec) x6 (24)
R12: (2 sc, 1 dec) x6 (18)
Start stuffing the head firmly.
R13: (1 sc, 1 dec) x6 (12)
R14: 6 dec (6)
FO, close the remaining hole with a yarn needle.
Muzzle (White yarn)
R1: MR 6 sc (6)
R2: 6 inc (12)
R3: (1 sc, 1 inc) x6 (18)
R4: 18 sc
FO, leaving a long tail for sewing. Lightly stuff before completely sewing onto the head.
Body (Orange yarn, then White, then Orange)
R1: MR 6 sc (6)
R2: 6 inc (12)
R3: (1 sc, 1 inc) x6 (18)
R4: (2 sc, 1 inc) x6 (24)
R5: (3 sc, 1 inc) x6 (30)
R6-R8: 30 sc (3 rounds)
Change to White yarn.
R9-R11: 30 sc (3 rounds)
Change back to Orange yarn.
R12-R14: 30 sc (3 rounds)
Stuff the body firmly.
R15: (3 sc, 1 dec) x6 (24)
R16: (2 sc, 1 dec) x6 (18)
FO, leaving a long tail for sewing.
Arms (Make 2, Orange yarn)
R1: MR 6 sc (6)
R2: 6 inc (12)
R3-R7: 12 sc (5 rounds)
Lightly stuff the end.
R8: 6 dec (6)
FO, leave a long tail for sewing. Flatten the opening.
Legs (Make 2, Orange yarn)
R1: MR 6 sc (6)
R2: 6 inc (12)
R3: (1 sc, 1 inc) x6 (18)
R4-R7: 18 sc (4 rounds)
Stuff the foot end firmly.
R8: (1 sc, 1 dec) x6 (12)
R9: 6 dec (6)
FO, leave a long tail for sewing. Flatten the opening.
Ears (Make 2)
Outer Ear (Orange yarn):
R1: MR 6 sc (6)
R2: (1 sc, 1 inc) x3 (9)
R3: (2 sc, 1 inc) x3 (12)
R4: 12 sc
FO, leave a long tail for sewing.
Inner Ear (White yarn): (Optional, can also embroider or use felt)
Ch 4. Sc in 2nd ch from hook, sc in next 2 ch (3 sc). Ch 1, turn.
Dec, 1 sc (2 sc). Ch 1, turn.
Dec (1 sc).
FO, leave tail for sewing.
Tail (Orange yarn, with Black)
R1: MR 6 sc (6)
R2-R6: 6 sc (5 rounds)
Change to Black yarn.
R7-R8: 6 sc (2 rounds)
Change back to Orange yarn.
R9-R10: 6 sc (2 rounds)
Lightly stuff. FO, leave a long tail for sewing.
Santa Hat
Hat Cone (Red yarn)
R1: MR 6 sc (6)
R2: 6 sc
R3: (1 sc, 1 inc) x3 (9)
R4: 9 sc
R5: (2 sc, 1 inc) x3 (12)
R6: 12 sc
R7: (3 sc, 1 inc) x3 (15)
R8: 15 sc
R9: (4 sc, 1 inc) x3 (18)
R10: 18 sc
Brim (White yarn)
R11: (1 sc, 1 inc) x9 (27)
R12: 27 sc. sl st to join.
FO, weave in ends.
Make a small white pom-pom and sew it to the tip of the red cone.
Scarf (Red yarn)
Ch 4.
Row 1: Sc in 2nd ch from hook and in each ch across (3 sc). Ch 1, turn.
Rows 2-Approx 40: 3 sc. Ch 1, turn. (Continue until scarf reaches desired length to wrap around the neck, approx 15-20cm).
FO, weave in ends.
Assembly and Embellishments
1. Attach Head to Body: Sew the head to the body securely.
2. Attach Muzzle: Sew the muzzle to the lower part of the head, lightly stuffing it before closing the seam completely.
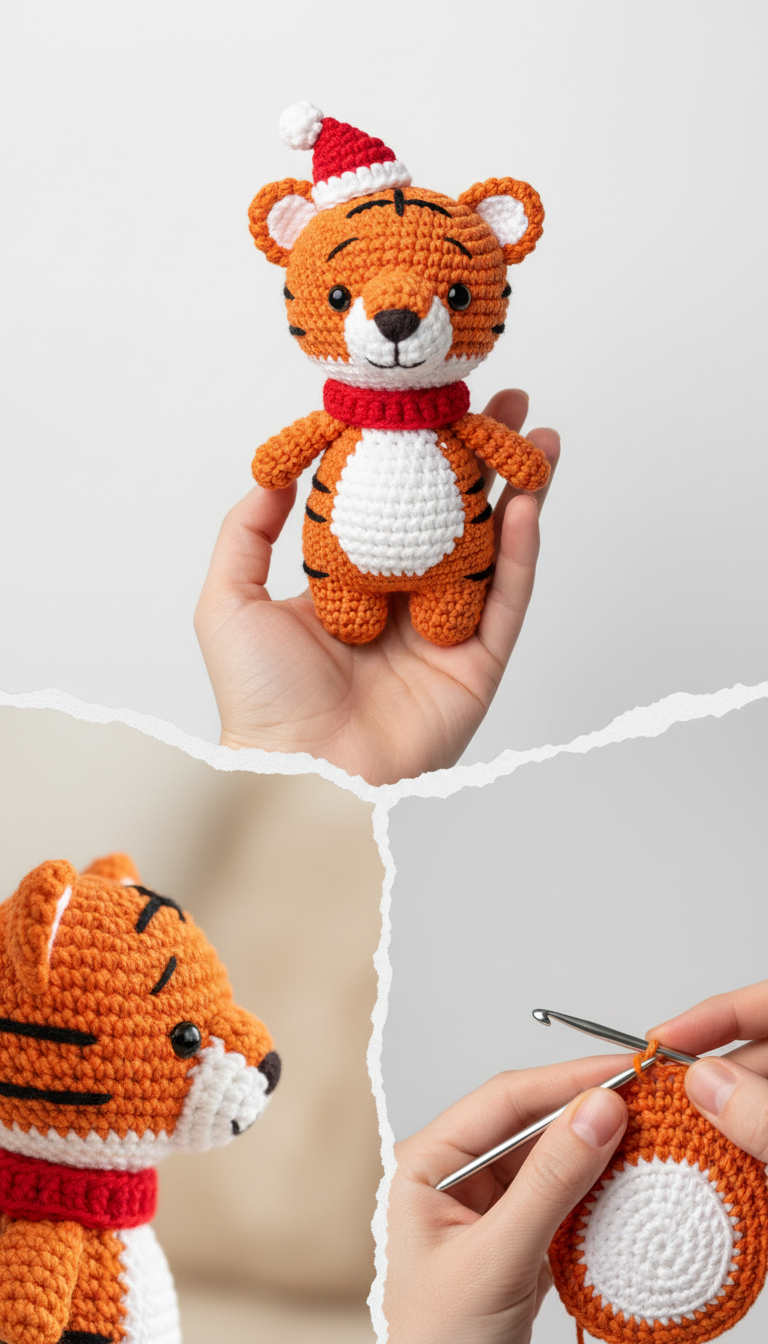
3. Embroider Face Details: With black yarn, embroider a small triangular nose on the muzzle, and then a line downwards for the mouth. Add small eyebrows above the safety eyes and stripes on the forehead as seen in the image.
4. Attach Ears: If using white inner ears, sew them onto the orange outer ears first. Then, sew the ears to the top of the head, slightly to the sides.
5. Attach Limbs: Sew the arms to the sides of the body, just below the neck. Sew the legs to the bottom of the body.
6. Attach Tail: Sew the tail to the back of the body.
7. Embroider Body Stripes: Using black yarn, embroider vertical stripes on the sides of the orange body, as well as at the base of the legs, as shown in the image.
8. Add Accessories: Tie the red scarf around the tiger’s neck. Place the Santa hat on its head.