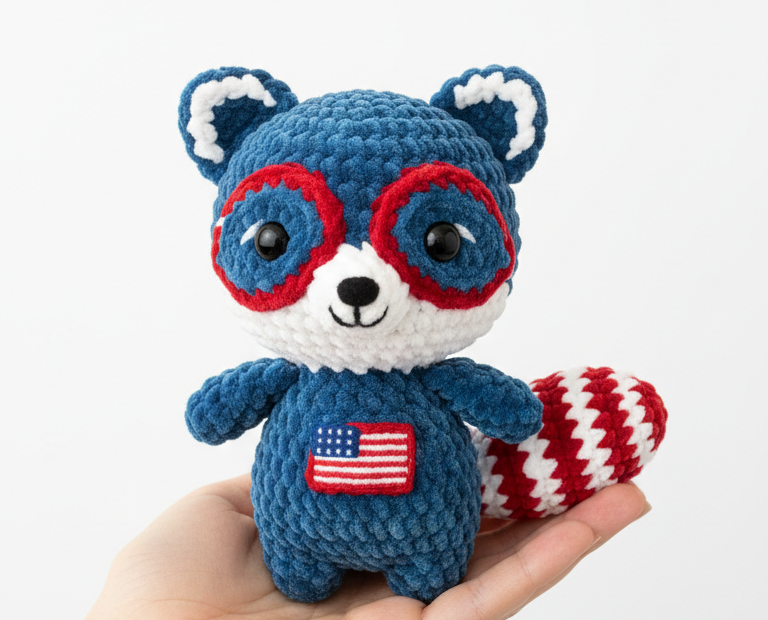
Celebrate with a hook and yarn! This adorable Patriotic Raccoon Amigurumi is the perfect project to showcase your national pride or create a unique gift. Featuring a charming red, white, and blue design, complete with a striped tail and American flag detail, this cuddly friend is sure to bring joy and a touch of Americana to any space. Dive into this fun and rewarding crochet adventure!
Why This Patriotic Raccoon is a Must-Make for Every Crocheter!
This delightful raccoon isn’t just a toy; it’s a statement of handcrafted charm. Ideal for patriotic holidays, a unique nursery decoration, or simply a cute companion, its soft texture and eye-catching details make it truly special. Whether you’re an experienced crocheter or looking for an engaging new challenge, creating this amigurumi brings immense satisfaction and a cherished keepsake.
Crochet Pattern: Crochet Your Own Patriotic Raccoon Amigurumi: A Free Pattern!
Materials
Velvet/Chenille Yarn (Weight 4-5): Royal Blue, Bright Red, White
Crochet Hook: 4.0mm (or size to achieve tight fabric)
Safety Eyes: 10-12mm
Black embroidery floss (for nose and mouth)
Polyester fiberfill stuffing
Tapestry needle
Stitch markers
Small American flag patch (optional, can be embroidered)
Abbreviations
MR: Magic Ring
ch: chain
sc: single crochet
inc: increase (2 sc in one stitch)
dec: decrease (sc 2 stitches together)
sl st: slip stitch
BLO: back loop only
FO: Fasten off
(…)x: repeat instructions in parentheses x times
[ ] : total number of stitches in the round
Instructions
Important Note: Work in continuous rounds unless otherwise specified. Use a stitch marker to keep track of the first stitch of each round.
HEAD (Royal Blue yarn)
Round 1: 6 sc in MR [6]
Round 2: (inc)x6 [12]
Round 3: (sc, inc)x6 [18]
Round 4: (2 sc, inc)x6 [24]
Round 5: (3 sc, inc)x6 [30]
Round 6: (4 sc, inc)x6 [36]
Rounds 7-13: sc in each st around [36]
Insert safety eyes between Rounds 9 and 10, approximately 6-7 stitches apart.
Round 14: (4 sc, dec)x6 [30]
Round 15: (3 sc, dec)x6 [24]
Start stuffing firmly.
Round 16: (2 sc, dec)x6 [18]
Round 17: (sc, dec)x6 [12]
Continue stuffing.
Round 18: (dec)x6 [6]
FO, leaving a long tail. Weave through front loops of remaining stitches and pull to close. Weave in end.
BODY (Royal Blue yarn)
Round 1: 6 sc in MR [6]
Round 2: (inc)x6 [12]
Round 3: (sc, inc)x6 [18]
Round 4: (2 sc, inc)x6 [24]
Round 5: (3 sc, inc)x6 [30]
Round 6: (4 sc, inc)x6 [36]
Rounds 7-12: sc in each st around [36]
Round 13: (4 sc, dec)x6 [30]
Round 14: sc in each st around [30]
Round 15: (3 sc, dec)x6 [24]
Start stuffing firmly.
Round 16: (2 sc, dec)x6 [18]
FO, leaving a long tail for sewing to the head. Continue stuffing until firm.
MUZZLE (White yarn)
Round 1: 6 sc in MR [6]
Round 2: (inc)x6 [12]
Round 3: (sc, inc)x6 [18]
Round 4: sc in each st around [18]
FO, leaving a long tail. Lightly stuff and flatten slightly.
EARS (Make 2 – Royal Blue yarn)
Round 1: 6 sc in MR [6]
Round 2: (inc)x6 [12]
Round 3: (sc, inc)x6 [18]
Fold flat and sc through both layers across to close (9 sc). FO, leaving a long tail for sewing.
Ear Trim (White yarn): Join white yarn to one corner of the flat edge, sc along the curved edge of the ear. FO, weave in ends.
ARMS (Make 2 – Royal Blue yarn)
Round 1: 6 sc in MR [6]
Rounds 2-7: sc in each st around [6]
Lightly stuff. FO, leaving a long tail for sewing. Flatten opening and sew closed.
TAIL (Red and White yarn)
Round 1 (Red): 6 sc in MR [6]
Round 2 (Red): (inc)x6 [12]
Round 3 (White): sc in each st around [12]
Round 4 (White): (sc, inc)x6 [18]
Round 5 (Red): sc in each st around [18]
Round 6 (Red): (2 sc, inc)x6 [24]
Round 7 (White): sc in each st around [24]
Round 8 (White): (3 sc, inc)x6 [30]
Round 9 (Red): sc in each st around [30]
Round 10 (Red): (3 sc, dec)x6 [24]
Round 11 (White): sc in each st around [24]
Round 12 (White): (2 sc, dec)x6 [18]
Round 13 (Red): sc in each st around [18]
Round 14 (Red): (sc, dec)x6 [12]
Stuff firmly.
Round 15 (White): (dec)x6 [6]
FO, leaving a long tail. Weave through front loops of remaining stitches and pull to close.
EYE RINGS (Make 2 – Red yarn)
Round 1: Ch 15, sl st to first ch to form a ring. (Adjust chain length if needed to fit around your safety eyes.)
FO, leaving a long tail for sewing.
ASSEMBLY
Sew the Head to the Body, ensuring it’s centered and secure.
Sew the Muzzle to the lower front of the Head, centering it below the safety eyes. Lightly stuff as you sew.
Embroider a small black nose onto the center of the muzzle and a gentle smile below it using black embroidery floss.
Place the Red Eye Rings around the safety eyes and sew them securely in place.
Sew the Ears to the top of the Head, slightly to the sides, referring to the image for placement.
Sew the Arms to the sides of the Body, just below the neck.
Sew the Tail to the back of the Body, centered.
If using a flag patch, sew or glue it to the front of the body. Alternatively, embroider a small American flag design directly onto the chest using red, white, and blue embroidery floss.