Dive into the vibrant world of amigurumi with this stunning peacock pattern! Create a charming, majestic bird with beautiful fanned tail feathers, perfect for a decorative accent or a unique gift. This pattern guides you through every step to bring this colorful creature to life, adding a touch of elegance and whimsy to any space.
Embrace the Beauty of Handcrafted Elegance
There’s immense satisfaction in crafting something truly beautiful with your own hands. This Amigurumi Peacock is more than just a toy; it’s a small work of art. Perfect for brightening up a shelf, gifting to a nature lover, or simply enjoying the therapeutic process of crochet, this project offers a rewarding experience from start to finish.
Crochet Pattern: Crochet Amigurumi Peacock Pattern: Craft Your Own Majestic Bird!
Materials
Worsted weight yarn in Royal Blue (A)
Worsted weight yarn in Olive Green (B)
Worsted weight yarn in Teal (C)
Worsted weight yarn in Gold/Tan (D)
Small amount of Black embroidery floss or yarn
Small amount of White embroidery floss or yarn
Small amount of Grey yarn (for crest detail)
3.0mm crochet hook (or size suitable for your yarn)
6mm safety eyes
Fiberfill for stuffing
Tapestry needle
Stitch marker
Abbreviations
MR: Magic Ring
ch: chain
sc: single crochet
inc: increase (2 sc in one stitch)
dec: decrease (sc 2 together)
sl st: slip stitch
FO: Fasten Off
Rnd: Round
st(s): stitch(es)
Instructions
Gauge: Not critical for this project, just ensure stitches are tight enough so stuffing does not show through.
Note: Work in continuous rounds unless otherwise specified. Use a stitch marker to mark the beginning of each round.
Body (Start with Yarn A – Royal Blue)
Rnd 1: MR, 6 sc in MR. (6)
Rnd 2: Inc in each st around. (12)
Rnd 3: (Sc 1, inc) x 6. (18)
Rnd 4: (Sc 2, inc) x 6. (24)
Rnd 5: (Sc 3, inc) x 6. (30)
Rnd 6: (Sc 4, inc) x 6. (36)
Rnd 7-12: Sc in each st around. (36)
Rnd 13: (Sc 4, dec) x 6. (30)
Rnd 14: (Sc 3, dec) x 6. (24)
Rnd 15: (Sc 2, dec) x 6. (18)
Rnd 16-17: Sc in each st around. (18) Stuff the body firmly and continue stuffing as you go.
Rnd 18: (Sc 1, dec) x 6. (12)
Rnd 19-24: Sc in each st around. (12) This forms the neck.
Rnd 25: (Sc 1, inc) x 6. (18)
Rnd 26: (Sc 2, inc) x 6. (24)
Rnd 27-28: Sc in each st around. (24)
Rnd 29: (Sc 2, dec) x 6. (18)
Attach safety eyes between Rnd 27 and 28, about 5 sts apart. Embroider a small white highlight next to each eye with white floss. Embroider eyelashes with black floss.
Rnd 30: (Sc 1, dec) x 6. (12)
Rnd 31: Dec x 6. (6)
FO, leaving a long tail. Weave through the remaining 6 stitches and pull tight to close. Weave in ends.
Beak (Yarn D – Gold/Tan)
Rnd 1: MR, 4 sc in MR. (4)
Rnd 2: (Sc 1, inc) x 2. (6)
Rnd 3: Sc in each st around. (6)
FO, leaving a tail for sewing. Stuff lightly. Sew beak onto the head between the eyes, positioning it below Rnd 28-29.
Crest (Yarn A – Royal Blue, and Grey)
Using Royal Blue yarn, ch 3. Sl st into the first ch to form a loop. Repeat two more times without fastening off, forming three small loops connected at the base.
For the grey detail, take a small piece of grey yarn and stitch it into the top of each loop, creating a small ‘tuft’.
Sew the crest onto the top of the head, centered between the eyes.
Belly Patch (Yarn B – Olive Green)
Row 1: Ch 5. Sc in 2nd ch from hook and next 3 ch. (4)
Row 2: Ch 1, turn. Inc, sc 2, inc. (6)
Row 3: Ch 1, turn. Sc in each st across. (6)
Row 4: Ch 1, turn. Inc, sc 4, inc. (8)
Row 5: Ch 1, turn. Sc in each st across. (8)
Row 6: Ch 1, turn. Dec, sc 4, dec. (6)
Row 7: Ch 1, turn. Dec, sc 2, dec. (4)
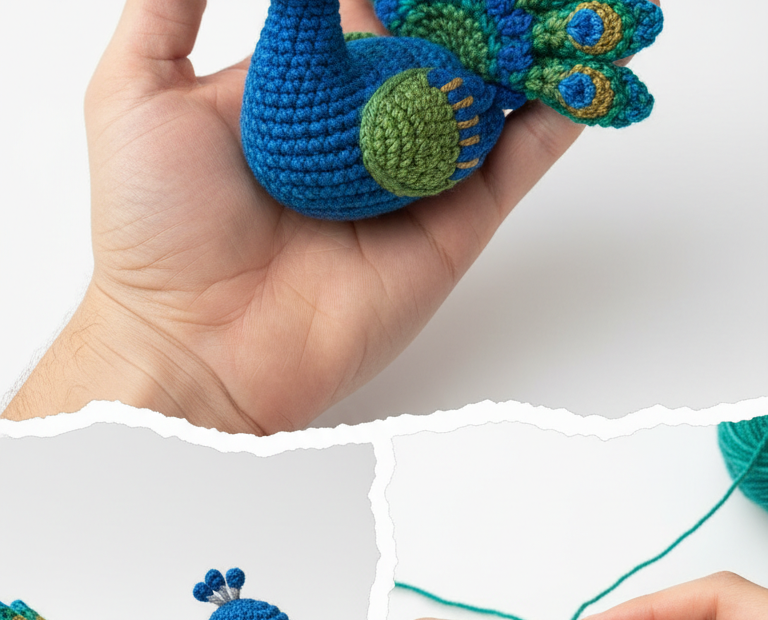
FO, leaving a long tail for sewing. Sew the oval patch onto the belly of the peacock. With Yarn D (Gold/Tan), embroider three short horizontal lines on the belly patch, as shown in the image.
Tail Feathers (Make 7-8 feathers in varying sizes, using Yarn B, A, C, D)
Feather Base (Yarn B – Olive Green):
Row 1: Ch 4. Sc in 2nd ch from hook and next 2 ch. (3)
Row 2: Ch 1, turn. Inc, sc 1, inc. (5)
Row 3: Ch 1, turn. Sc in each st across. (5)
Row 4: Ch 1, turn. Inc, sc 3, inc. (7)
Row 5: Ch 1, turn. Sc in each st across. (7)
Row 6: Ch 1, turn. Dec, sc 4, dec. (6)
Row 7: Ch 1, turn. Dec, sc 2, dec. (4)
Switch to Yarn A (Royal Blue). Ch 1, turn. Sc in each st across. (4)
Switch to Yarn C (Teal). Ch 1, turn. Sc in each st across. (4)
Switch to Yarn D (Gold/Tan). Ch 1, turn. Sc in each st across. (4)
FO, leaving a long tail for sewing. Work a border of sc stitches around the entire feather to give it a neat edge.
Make 7-8 feathers, varying slightly in size by adjusting the starting chain and increase/decrease rows. For smaller feathers, skip some increase/decrease rows.
Assembly
Attach the tail feathers to the back of the peacock’s body. Start with the largest feathers at the bottom and layer smaller ones on top, fanning them out as shown in the image. Use the long tails to sew them securely. Position them so they curve upwards slightly.