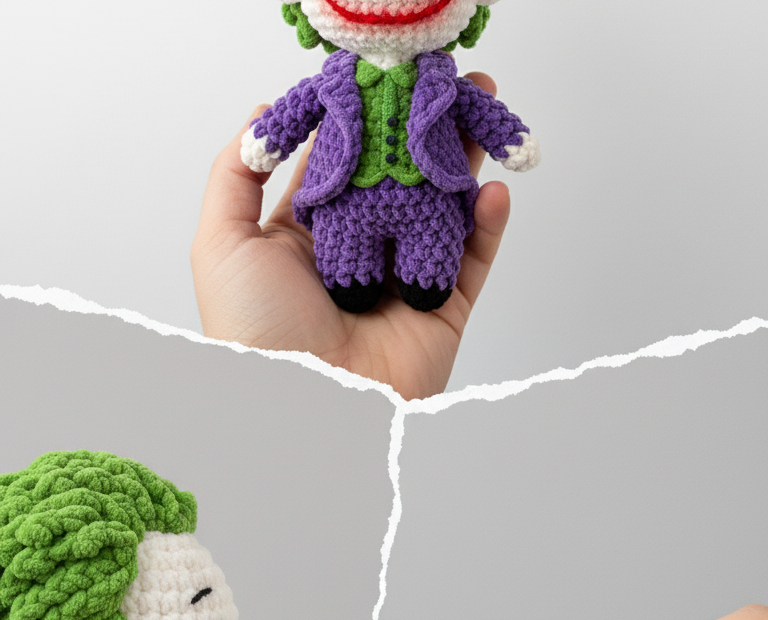
Unleash your inner crafter with this detailed pattern to create your very own Crochet Joker Amigurumi! Perfect for fans of the iconic villain, this charming little doll captures his signature look with vibrant colors and a mischievous grin. Whether you’re a seasoned crocheter or looking for a fun new project, this pattern will guide you step-by-step to bring the Clown Prince of Crime to life in yarn.
Why This Amigurumi Joker is a Must-Make
Beyond just a pattern, this project offers the joy of creating a unique, handmade collectible. It’s an ideal gift for comic book enthusiasts, a fantastic addition to your amigurumi collection, or a delightful decorative piece. Each stitch brings you closer to crafting a personalized character that showcases your passion for crochet and pop culture.
Crochet Pattern: Craft Your Own Mischievous Crochet Joker Amigurumi Doll
Materials
White yarn (for head, hands, ears)
Green yarn (for hair, shirt)
Purple yarn (for jacket, pants)
Red yarn (for mouth embroidery)
Black yarn (for shoes, jacket buttons embroidery)
2.5mm or 3.0mm crochet hook (adjust to your tension)
6mm safety eyes (or size appropriate for your doll)
Fiberfill stuffing
Yarn needle
Stitch markers
Scissors
Abbreviations
MR: Magic Ring
sc: Single Crochet
inc: Increase (2 sc in one stitch)
dec: Decrease (sc2tog)
sl st: Slip Stitch
ch: Chain
FO: Fasten Off
BLO: Back Loop Only
LS: Loop Stitch (see instructions for hair)
Instructions
Head (White Yarn)
R1: MR 6 sc [6]
R2: 6 inc [12]
R3: (1 sc, inc) x 6 [18]
R4: (2 sc, inc) x 6 [24]
R5: (3 sc, inc) x 6 [30]
R6: (4 sc, inc) x 6 [36]
R7-R12: 36 sc (6 rounds) [36]
Insert safety eyes between R9 and R10, 6-7 stitches apart.
R13: (4 sc, dec) x 6 [30]
R14: (3 sc, dec) x 6 [24]
Stuff firmly.
R15: (2 sc, dec) x 6 [18]
R16: (1 sc, dec) x 6 [12]
R17: 6 dec [6]
FO, close hole.
Ears (White Yarn, make 2)
R1: MR 4 sc [4]
R2: 4 inc [8]
Sl st, FO, leave a long tail for sewing.
Hair (Green Yarn)
The textured hair is created using the Loop Stitch (LS). To make an LS: Insert hook into stitch, wrap yarn around your index finger (from back to front), hook through both loops on your finger and hook, yarn over, pull through all 3 loops on hook. This creates a loop on the wrong side of your work. Work these rounds with the right side facing inwards to have the loops on the outside.
R1: MR 6 sc [6]
R2: 6 inc [12]
R3: (1 sc, inc) x 6 [18]
R4: (2 sc, inc) x 6 [24]
R5: (3 sc, inc) x 6 [30]
R6: (4 sc, inc) x 6 [36]
R7-R11: 36 LS [36]
FO, leave a long tail for sewing.
Body & Legs (Purple Yarn, start with legs, make 2)
Legs (Purple Yarn, make 2):
R1: MR 6 sc [6]
R2: 6 inc [12]
R3-R5: 12 sc [12]
Change to Black Yarn for the base of the shoe:
R6: BLO 12 sc [12]
FO Leg 1. For Leg 2, after R6, do not FO.
Join Legs & Body (Purple Yarn):
From Leg 2, ch 3. Join to Leg 1 with sc in any stitch.
R7: 12 sc around Leg 1, 3 sc in the 3 ch stitches, 12 sc around Leg 2, 3 sc in the 3 ch stitches [30]
R8-R11: 30 sc (4 rounds) [30]
R12: (3 sc, dec) x 6 [24]
R13: 24 sc [24]
R14: (2 sc, dec) x 6 [18]
R15-R16: 18 sc (2 rounds) [18]
Stuff firmly.
Sl st, FO, leave a long tail for sewing to the head.
Arms (Purple Yarn, make 2)
R1: MR 6 sc [6]
R2-R3: 6 sc [6]
Change to White Yarn (hands):
R4-R6: 6 sc [6]
Stuff lightly.
FO, leave a long tail for sewing.
Jacket (Purple Yarn, worked flat)
Ch 25.
Row 1: Sc in 2nd ch from hook and across [24]
Row 2-R8: Ch 1, turn, 24 sc [24]
FO, leave a long tail for sewing.
Shirt Front Panel (Green Yarn, worked flat)
Ch 8.
Row 1: Sc in 2nd ch from hook and across [7]
Row 2-R5: Ch 1, turn, 7 sc [7]
FO, leave a long tail for sewing.
Assembly and Embroidery
Sew the Head to the Body securely.
Sew the Ears onto the sides of the head, roughly between rounds 7-9.
Sew the Hair cap onto the top of the head, aligning the front edge slightly above the eyes.
Attach the Arms to the sides of the body, just below the neck.
Position and sew the green Shirt Front Panel onto the front of the body.
Wrap the purple Jacket around the body, overlapping the shirt panel. Fold the top outer corners of the jacket to create the lapels as seen in the image. Secure with stitches.
Using Red yarn, embroider the Joker’s iconic smile onto the face, extending from below the safety eyes.
Using Black yarn, embroider small dots for the jacket buttons down the center front.