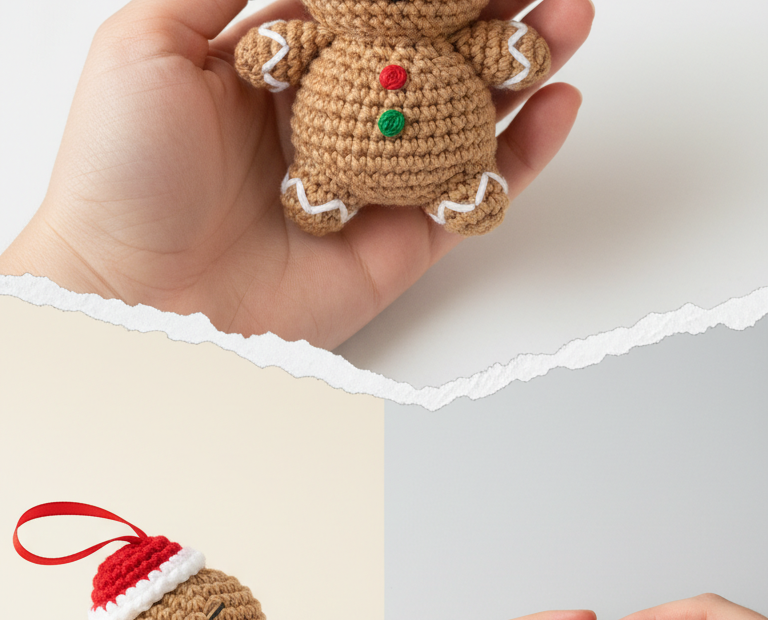
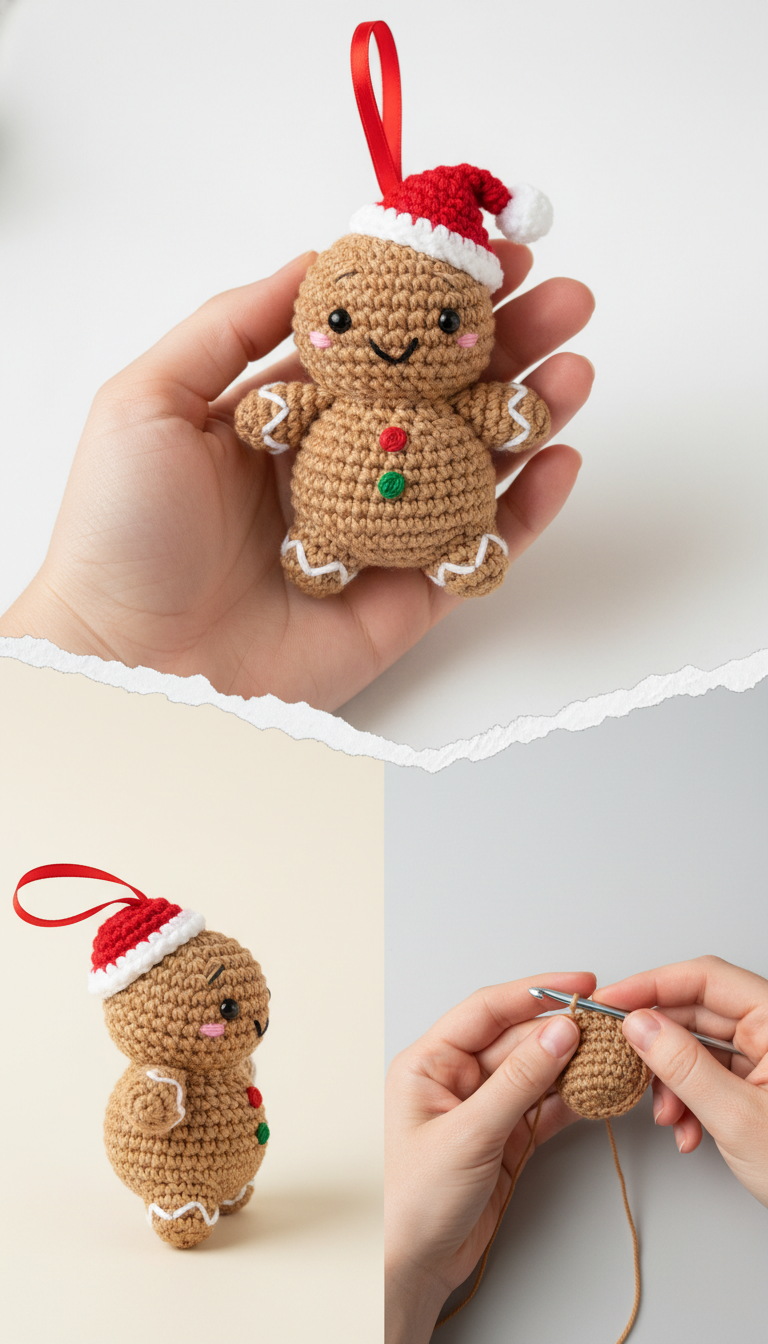
Get ready to sprinkle some handmade cheer on your Christmas tree with this adorable Gingerbread Man Amigurumi Ornament! This delightful pattern is perfect for adding a touch of festive sweetness to your holiday decor or gifting to loved ones. Crafted with care, this little guy is sure to bring smiles throughout the season.
Craft Your Own Whimsical Holiday Keepsake
There’s something truly special about handmade ornaments, and this Gingerbread Man Amigurumi is no exception. It’s a charming project that’s enjoyable to make, resulting in a unique decoration that you’ll cherish for years. Imagine the joy of seeing your very own crocheted gingerbread friend hanging among the festive lights!
2.5mm or 3.0mm Crochet Hook (or hook size to achieve tight stitches)
6mm Safety Eyes
Polyester Fiberfill for stuffing
Tapestry Needle
Stitch Marker
Small piece of Red Ribbon (approx. 6 inches)
Abbreviations
MR: Magic Ring
sc: Single Crochet
inc: Increase (2 sc in one stitch)
dec: Decrease (sc 2 stitches together)
sl st: Slip Stitch
ch: Chain
FO: Fasten Off
Instructions
This pattern is worked in continuous rounds unless otherwise specified. Use a stitch marker to keep track of your first stitch in each round.
Body & Head (Light Brown Yarn)
R1: 6 sc in MR (6)
R2: 6 inc (12)
R3: (1 sc, inc) x 6 (18)
R4: (2 sc, inc) x 6 (24)
R5: (3 sc, inc) x 6 (30)
R6-R9: 30 sc (4 rounds)
R10: (3 sc, dec) x 6 (24)
R11: (2 sc, dec) x 6 (18) Start stuffing firmly here and continue as you go.
R12: 18 sc
R13: (2 sc, inc) x 6 (24)
R14: (3 sc, inc) x 6 (30)
R15-R19: 30 sc (5 rounds)
Insert safety eyes between R16 and R17, approximately 5-6 stitches apart.
R20: (3 sc, dec) x 6 (24)
R21: (2 sc, dec) x 6 (18)
R22: (1 sc, dec) x 6 (12) Ensure the head is firmly stuffed.
R23: 6 dec (6)
FO, leave a long tail. Weave tail through remaining 6 stitches and pull tight to close. Hide tail.
Arms (Light Brown Yarn – Make 2)
R1: 6 sc in MR (6)
R2-R4: 6 sc (3 rounds)
FO, leave a long tail for sewing. Lightly stuff the end of the arm.
Legs (Light Brown Yarn – Make 2)
R1: 6 sc in MR (6)
R2-R5: 6 sc (4 rounds)
FO, leave a long tail for sewing. Lightly stuff the end of the leg.
Santa Hat
Hat Cone (Red Yarn)
R1: 4 sc in MR (4)
R2: (1 sc, inc) x 2 (6)
R3: 6 sc
R4: (2 sc, inc) x 2 (8)
R5: 8 sc
R6: (3 sc, inc) x 2 (10)
R7: 10 sc
R8: (4 sc, inc) x 2 (12)
R9: 12 sc
R10: (5 sc, inc) x 2 (14)
R11: 14 sc
R12: (6 sc, inc) x 2 (16)
R13: 16 sc. Sl st to first sc. FO.
Brim (White Yarn)
Join white yarn to any stitch on R13 of the red hat cone.
Ch 1, 16 sc around the base of the hat. Sl st to first sc. FO.
Pom-Pom (White Yarn)
R1: 4 sc in MR (4)
R2: 4 inc (8)
R3: 8 sc
R4: 4 dec (4)
FO, leave a tail, stuff lightly, and weave through remaining stitches to close. Pull tight.
Assembly & Details
Attach Limbs: Sew the arms to the sides of the body around R11-12. Sew the legs to the bottom of the body, centered on the front around R4-5.
Facial Features: With black embroidery floss, embroider a small ‘V’ shape for the mouth below the safety eyes. With pink embroidery floss, add small horizontal lines for blush on each cheek.
Icing Detail: Using white yarn and a tapestry needle, embroider zigzag lines onto the arms and legs to resemble gingerbread icing.
Buttons: With red yarn, embroider a small circle for a button on the belly around R7-8 of the body. With green yarn, embroider another small circle below the red one.
Santa Hat: Sew the white pom-pom to the tip of the red hat. Place the Santa hat on the gingerbread man’s head and stitch it in place.
Hanger: Fold the red ribbon in half to form a loop. Stitch the ends securely to the top of the Santa hat.