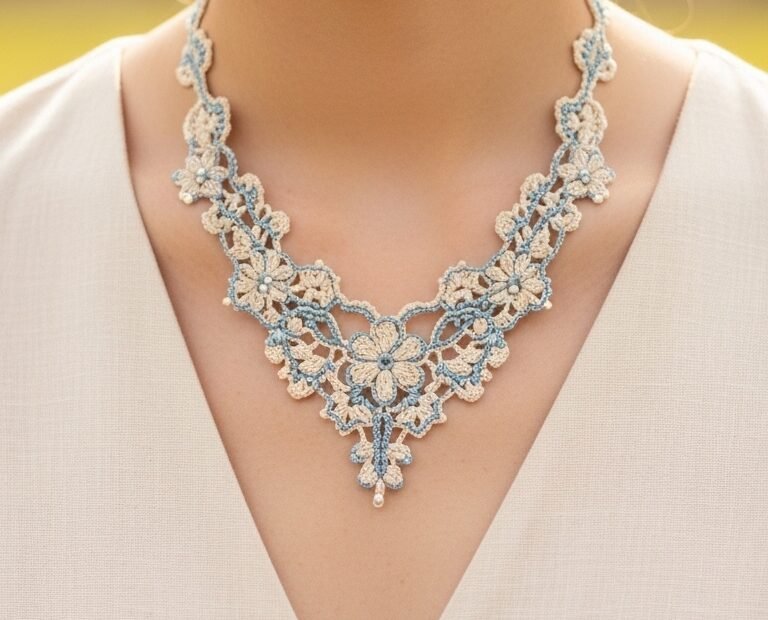
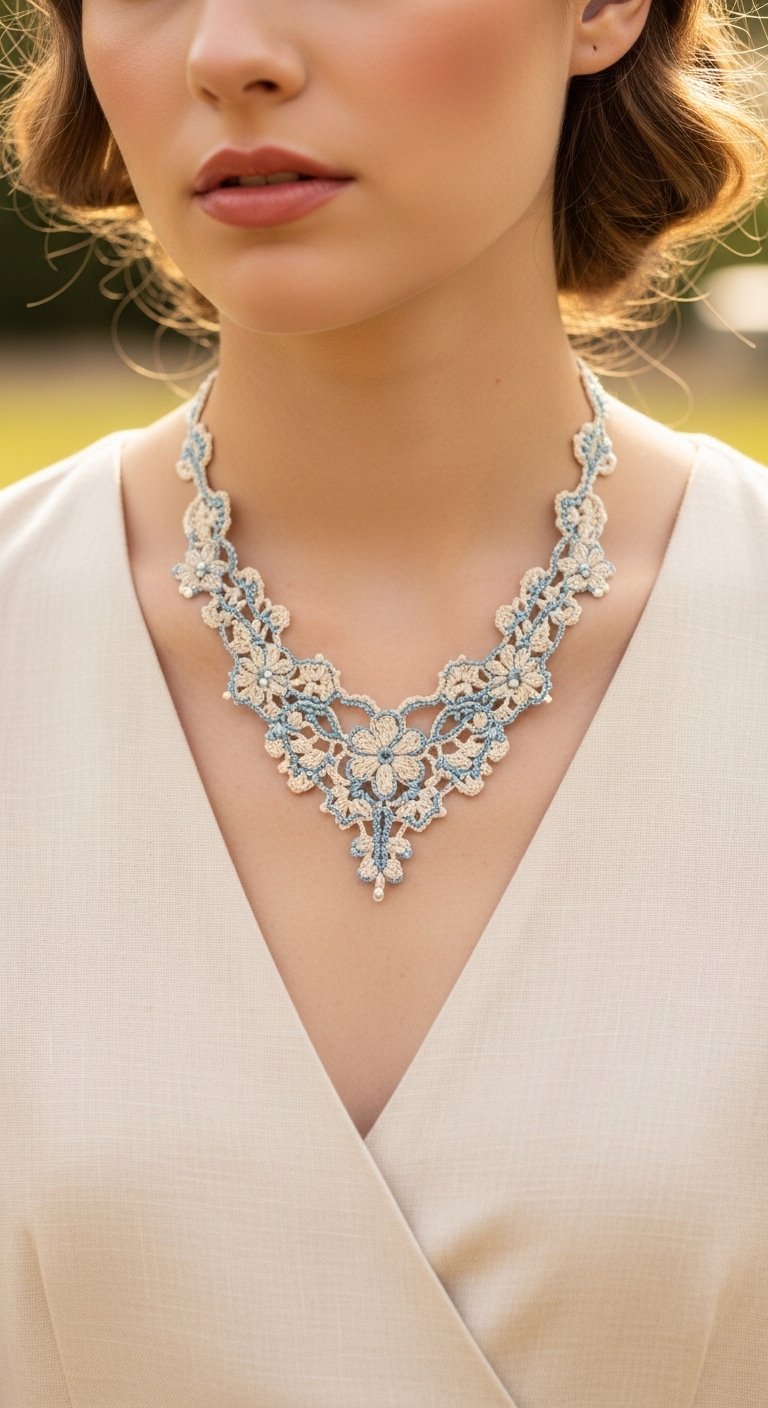
Adorn yourself with the exquisite charm of this handcrafted floral crochet lace necklace. Inspired by delicate antique lace, this pattern allows you to create a stunning statement piece that exudes timeless elegance. Perfect for special occasions or adding a touch of vintage romance to your everyday wear, this necklace will become a cherished part of your jewelry collection.
Craft Your Own Heirloom-Quality Accessory
There’s something truly special about wearing a piece of jewelry made by your own hands. This elegant floral crochet necklace isn’t just an accessory; it’s a labor of love, a unique creation that reflects your personal style and craftsmanship. It also makes a thoughtful, one-of-a-kind gift for someone special, sure to be treasured for years to come.
Crochet thread size 10 (approx. 20g) in Light Blue
Steel crochet hook 1.5mm
Small pearl beads (approx. 2mm-3mm for flower centers, 1 larger bead for the central drop)
Jewelry clasp (e.g., lobster clasp with jump rings)
Tapestry needle
Fine sewing needle and matching thread (for attaching beads)
Abbreviations
ch = chain
sl st = slip stitch
sc = single crochet
dc = double crochet
tr = treble crochet
dtr = double treble crochet
p = picot (ch 3, sl st in 3rd ch from hook)
st(s) = stitch(es)
rnd = round
rep = repeat
Instructions
This necklace is created by making individual motifs and joining them as you go, or sewing them together later. The pattern builds from the central V-point upwards. Adjust the length by adding or removing connector motifs.
Motif A: Small Cream Flower (Make 11-15 depending on desired length)
Rnd 1: Ch 5, join with sl st to form a ring.
Rnd 2: Ch 1, 10 sc into ring. Join with sl st to first sc.
Rnd 3 (Petals): *Ch 3, 2 dc in next sc, ch 3, sl st in same sc, sl st in next sc.* Rep from * to * 5 times total. You will have 5 petals. Fasten off, leaving a long tail for joining if not joining as you go. Weave in starting tail.
Bead Placement: Using a fine needle and thread, sew a small pearl bead securely to the center of each flower.
Motif B: Light Blue Leaf/Connector (Make 10-14 depending on desired length)
Row 1: Ch 10.
Row 2: Sc in 2nd ch from hook, sc in next 2 ch, ch 3, skip 1 ch, sc in next 3 ch, ch 3, skip 1 ch, sc in last ch. Turn.
Row 3: Ch 1, sc in first sc, *p, sc in next 2 sc, ch 1, skip ch-3 space, sc in next 2 sc*. Rep from * to * once. p, sc in last sc. Fasten off, leaving a long tail for joining.
Motif C: Central Droplet (Make 1)
Using Cream thread: Ch 8.
Row 1: Sl st in 2nd ch from hook, sc in next ch, hdc in next ch, dc in next ch, tr in next ch, dtr in next ch, dtr in last ch.
Fasten off, leaving a tail. Using the tail and a fine needle, attach the larger pearl bead to the tip of this droplet.
Assembly Instructions
Start with the Central V: Join one Cream Flower (Motif A) to the bottom point of the Central Droplet (Motif C) with sl sts or by sewing.
First Blue Connectors: Take two Light Blue Leaf/Connector Motifs (Motif B). Join one end of each Motif B to the sides of the first Cream Flower (Motif A) from Step 1, forming the bottom-most V shape.
Next Cream Flowers: Join a Cream Flower (Motif A) to the other end of each Motif B created in Step 2. These flowers should sit above the first set.
Continue the V-Shape: Alternate joining Motif B (Light Blue Leaf/Connector) and Motif A (Cream Flower) along each side of the V, ensuring the motifs are joined securely at multiple points to create the dense lace effect seen in the image. For a more defined ‘V’, ensure a slight gap between the inner points of the Motif B connectors as they ascend. Aim for about 2-3 Cream Flowers and 2-3 Blue Connectors on each side of the central ‘V’ before tapering.
Tapering for the Neck Strap: Once the main ‘V’ shape is established (approx. 5-7 inches wide, or desired width), begin to narrow the necklace. You can do this by using smaller connecting chains with picots (e.g., ch 5, sc in next motif, ch 5, sc in next, with picots along the chain) or by simply using fewer motifs. Continue with small alternating Cream Flowers and Blue Leaf/Connector motifs, or simple ch-loops with picots, to create the strap that goes around the neck.
Finishing the Neck Strap: Continue the strap until the desired necklace length is achieved, ensuring both sides are symmetrical. The total length should comfortably fit around your neck.
Attaching the Clasp: Securely sew the jewelry clasp components to each end of the necklace strap using the tapestry needle and thread, or by crocheting directly onto the clasp rings.
Final Touches: Weave in all remaining loose ends securely. Check all bead attachments and reinforce if necessary.