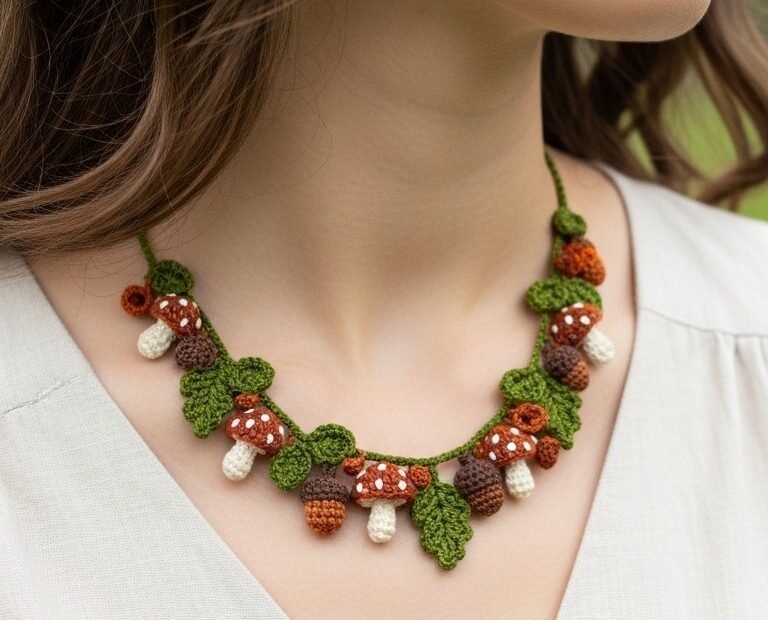
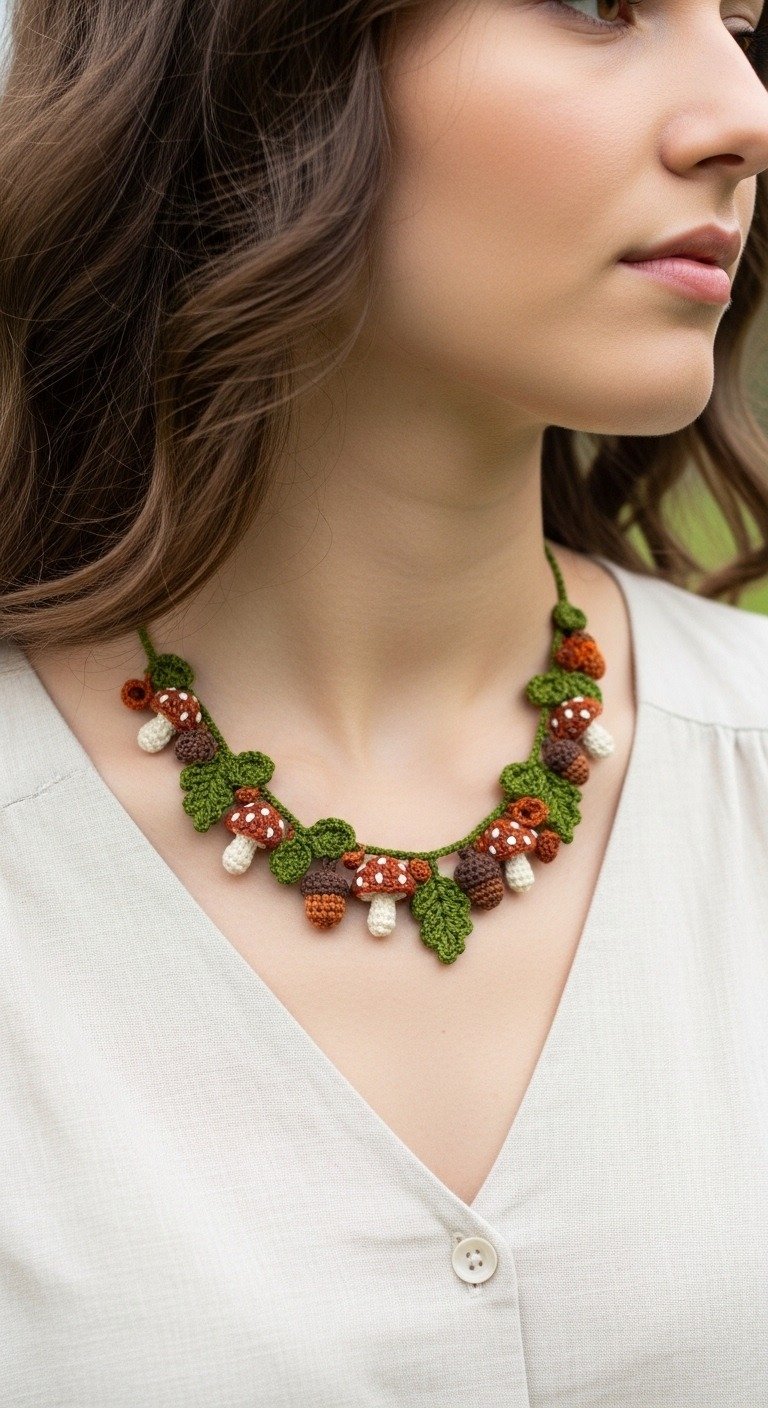
Step into an enchanted forest with our exquisite Crochet Mushroom Acorn Necklace! This delightful pattern captures the whimsical charm of autumn, bringing nature’s beauty right to your neckline. Perfect for cottagecore enthusiasts or anyone who loves unique, handmade accessories, this necklace is surprisingly simple to create and makes a wonderful gift.
Craft Your Own Whimsical Forest Accessory
Immerse yourself in the calming craft of crochet as you bring these adorable mushrooms, detailed acorns, and delicate leaves to life. This project allows you to express your love for nature and add a touch of woodland magic to any outfit. The finished necklace is lightweight, comfortable, and a true conversation starter, celebrating the artistry of handmade design.
2.0mm Crochet Hook (or size needed for tight stitches)
Tapestry Needle
Small Scissors
Stitch Markers (optional)
Abbreviations
ch: chain
sl st: slip stitch
sc: single crochet
hdc: half double crochet
dc: double crochet
inc: increase (2 sc in one stitch)
dec: decrease (sc 2 stitches together)
MR: magic ring
st(s): stitch(es)
FO: fasten off
Instructions
This pattern creates a necklace featuring various small elements (mushrooms, acorns, leaves) attached to a crocheted vine. We’ll make each element separately and then assemble them.
Part 1: The Main Vine Base (Forest Green)
Chain enough stitches to comfortably fit around your neck, plus about 2-3 inches for tying or clasp attachment (e.g., ch 120-150 depending on desired length). This creates the base chain.
Row 1: Sc in the 2nd ch from hook and in each ch across. Ch 1, turn.
Row 2: Sc in each st across. FO, leaving a long tail for sewing or weaving in.
Alternatively, you can create a thicker base by working 2-3 rows of sc, or use a simple chain with sl sts over it for firmness. The image suggests a relatively thin base. For simplicity, a simple chain with a row of sc is effective.
Part 2: Small Leaves (Forest Green – Make 8-10)
Ch 6.
Row 1: Sc in 2nd ch from hook, hdc in next ch, dc in next 2 chs, hdc in next ch, sc in last ch. Ch 1, turn.
Row 2: Sc in 1st st, hdc in next st, dc in next 2 sts, hdc in next st, sc in last st. Sl st into the first sc of the row to form a point. FO, leaving a tail for attachment.
Alternatively, for simpler leaves: Ch 5. Sc in 2nd ch from hook, hdc in next, dc in next, hdc in next, sc in last. FO.
Part 3: Small Mushrooms (Make 6-8, varying colors)
Mushroom Cap (Terracotta or Rust/Burnt Orange – Make various)
MR, sc 6 into ring (6 sts).
Rnd 1: Inc in each st around (12 sts).
Rnd 2: (Sc 1, inc) repeat 6 times (18 sts).
Rnd 3: Sc in each st around (18 sts).
Rnd 4: (Sc 1, dec) repeat 6 times (12 sts). Sl st to next st, FO, leaving a tail.
Mushroom Stem (Cream – Make matching number of caps)
MR, sc 4 into ring (4 sts).
Rnd 1-3: Sc in each st around (4 sts). (Adjust height as needed).
Sl st to next st, FO, leaving a tail.
Attach stem to cap by sewing. For spots on terracotta caps, use Cream yarn and a tapestry needle to embroider small French knots or satin stitches before assembly.
Part 4: Small Acorns (Make 6-8, varying colors)
Acorn Cap (Dark Brown – Make various)
MR, sc 6 into ring (6 sts).
Rnd 1: Inc in each st around (12 sts).
Rnd 2: (Sc 1, inc) repeat 6 times (18 sts).
Rnd 3: Sc in each st around (18 sts).
Rnd 4: (Sc 1, dec) repeat 6 times (12 sts). Sl st to next st, FO, leaving a tail.
Acorn Body (Terracotta or Lighter Brown – Make matching number of caps)
MR, sc 6 into ring (6 sts).
Rnd 1: (Sc 1, inc) repeat 3 times (9 sts).
Rnd 2-3: Sc in each st around (9 sts).
Rnd 4: (Sc 1, dec) repeat 3 times (6 sts).
Stuff lightly if desired (optional, for shape).
Rnd 5: Dec 3 times (3 sts). Sl st to next st, pull tight to close. FO, leaving a tail.
Attach body to cap by sewing.
Part 5: Assembly
Arrange your crocheted elements (mushrooms, acorns, and leaves) along the main vine base, referring to the image for placement.
Using the tails left from each element and your tapestry needle, securely sew each mushroom, acorn, and leaf onto the vine base. Distribute them evenly, mixing the different types and colors to create a natural, organic look.
Ensure all elements are facing the desired direction and are firmly attached to prevent them from drooping or coming loose.
Part 6: Finishing Touches
Weave in any remaining loose ends securely.
The vine can be tied with a knot at the back of the neck for closure, or you can attach a small clasp or buttons if preferred.