Adorn your neckline with timeless elegance! This exquisite crochet lace statement necklace, featuring delicate floral motifs and shimmering pearl beads, offers a sophisticated touch to any outfit. Handcrafted with fine thread, it’s a stunning accessory perfect for weddings, special occasions, or elevating your everyday style. Create a unique, heirloom-quality piece that reflects your personal charm.
Craft Your Own Heirloom: The Beauty of Handmade Crochet Jewelry
There’s something truly special about wearing a piece of jewelry made by hand. This crochet lace necklace isn’t just an accessory; it’s a wearable work of art, infused with the care and creativity of its maker. Imagine gifting this personalized treasure to a loved one or wearing it yourself, knowing it’s utterly unique. Embrace the joy of creating beauty with your own hands.
Crochet Pattern: Delicate Pearl Crochet Lace Statement Necklace Pattern
Crochet Hook: 1.5mm (or size to achieve desired drape)
Pearl Beads: 3mm, approx. 60-70 beads (with holes large enough for thread)
Small Lobster Clasp and Jump Ring
Tapestry Needle
Small amount of fabric stiffener (optional, for shaping)
Abbreviations
ch: chain
sl st: slip stitch
sc: single crochet
hdc: half double crochet
dc: double crochet
tr: treble crochet
picot: ch3, sl st in 3rd ch from hook
MR: Magic Ring
st(s): stitch(es)
rnd: round
yo: yarn over
FPdc: front post double crochet
Instructions
Gauge: Not critical for this project, but aim for a tight, delicate fabric.
Note: Beads are incorporated by sliding them up the working thread and securing them with a stitch (usually a ch or sc).
Part 1: Main Lower Flower (MLF)
Rnd 1: Start with a MR. Ch1 (does not count as st), 8sc into MR. Sl st to first sc to join. (8 sc)
Rnd 2: Ch3 (counts as 1dc), 2dc in same st, ch2. *3dc in next sc, ch2.* Repeat from * around. Sl st to top of beg ch3 to join. (8 x 3dc clusters, 8 ch2 sps)
Rnd 3 (Petals): Sl st into next 2dc, sl st into ch2 sp. Ch1, (sc, ch3, 2dc, ch3, sc) into same ch2 sp. *Sl st into next 3dc, sl st into ch2 sp. (sc, ch3, 2dc, ch3, sc) into ch2 sp.* Repeat from * around. Sl st to first sc to join. Fasten off. (8 petals)
Add Bead: Thread a pearl bead onto your tapestry needle and sew it securely to the center of the MLF.
Part 2: Dangling Fringe
Attach thread with a sl st to the underside of the MLF, evenly spaced below the petals (e.g., in every other sl st between petals from Rnd 3).
For each strand: Ch (number of chains varies for different lengths – e.g., 20, 25, 30, 35, 40 chains). Slide a pearl bead onto the thread, ch1 to secure the bead, sl st back into the last ch made before the bead. Sl st back up 3 chains. Fasten off. (Create 5-7 strands of varying lengths, securing them to the bottom of the MLF.)
Part 3: Small Floral Motif (SFM – Make 10-12)
Rnd 1: Start with a MR. Ch1, 6sc into MR. Sl st to first sc to join. (6 sc)
Rnd 2 (Petals): Ch1. *(sc, ch3, 2dc, ch3, sc) in first sc.* Repeat from * in each sc around. Sl st to first sc to join. Fasten off. (6 petals)
Add Bead: Sew a pearl bead securely to the center of each SFM.
Part 4: Connecting the Lace Structure
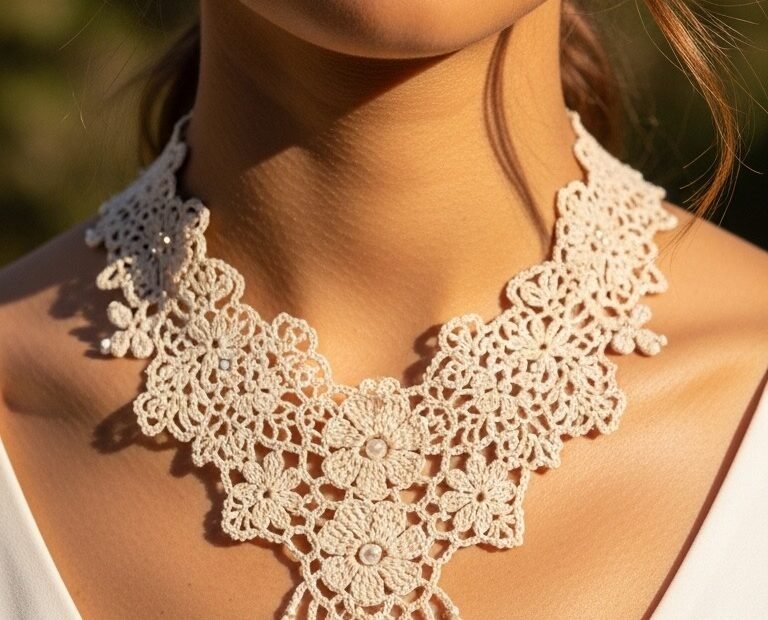
This section involves strategically joining SFMs with chain spaces and occasional stitches to build the necklace shape. Refer to the image for placement.
Row 1 (Above MLF): Join 3 SFMs together in a triangular formation above the MLF. Attach the first SFM to the top center of the MLF using sl sts or scs to bridge the gap. Join the other two SFMs to the sides of the first, using ch3-ch5 spaces to connect petals.
Row 2 & 3 (Side Panels): Continue adding SFMs, creating a fan-like effect towards the sides and upwards. For each new SFM, connect it to 2-3 existing SFMs using ch3-ch5 spaces or sl sts into existing petals/ch spaces. Aim to create a symmetrical pattern on both sides of the center. Use short chains (ch2-ch5) to bridge gaps between motifs. You’ll use approx. 4-5 SFMs per side.
Lace Fill: In any larger gaps between motifs, create small lace elements by chaining (e.g., ch5) and attaching with sc or sl st, or by making small picots (ch3, sl st in 3rd ch) for extra detail.
Part 5: Top Neck Band
Once the main body of the necklace is formed and extends up to the desired width for the neck, you will create a connecting band.
Attach thread to the top outer petal of the furthest SFM on one side.
Row 1 (Base Band): Ch1, sc evenly across the top edge of your assembled lace motifs, joining them together. Ensure the band is flat and follows the curve of the necklace. Use ch3-ch5 spaces to bridge any wider gaps, securing with sc. Work a few sc around each petal edge to create a stable base.
Row 2 (Scalloped Edge): Ch1, turn. *(sc in next st, skip 1 st, 5dc in next st, skip 1 st)* Repeat from * across the entire top edge of the necklace. Finish with a sc. This creates a scalloped edge.
Adding Clasp: On each end of the neckband, attach your lobster clasp and jump ring. You may need to create a small loop of chains (ch5-7) at one end for the clasp to attach to.
Finishing:
Weave in all loose ends carefully using your tapestry needle.
Block your necklace gently. For a stiffer finish, apply a fabric stiffener according to product instructions, then pin the necklace to shape on a blocking mat and let it dry completely.