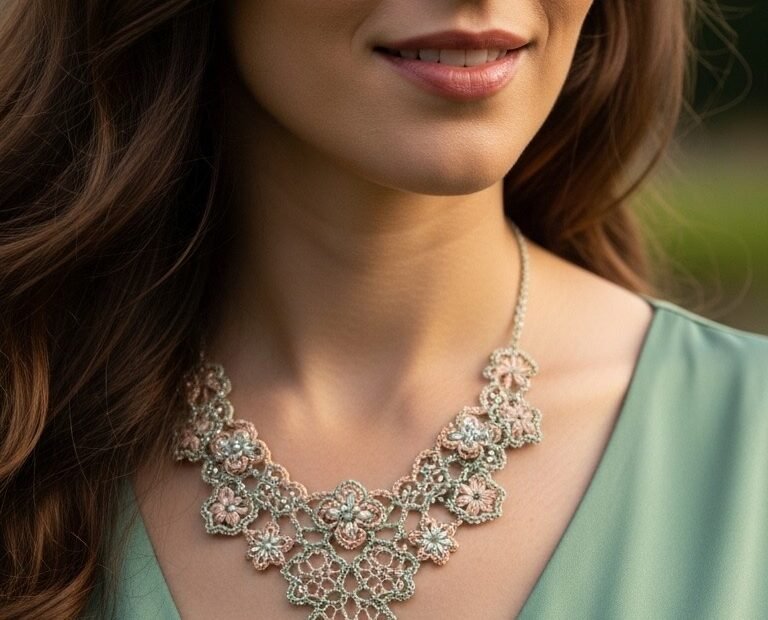
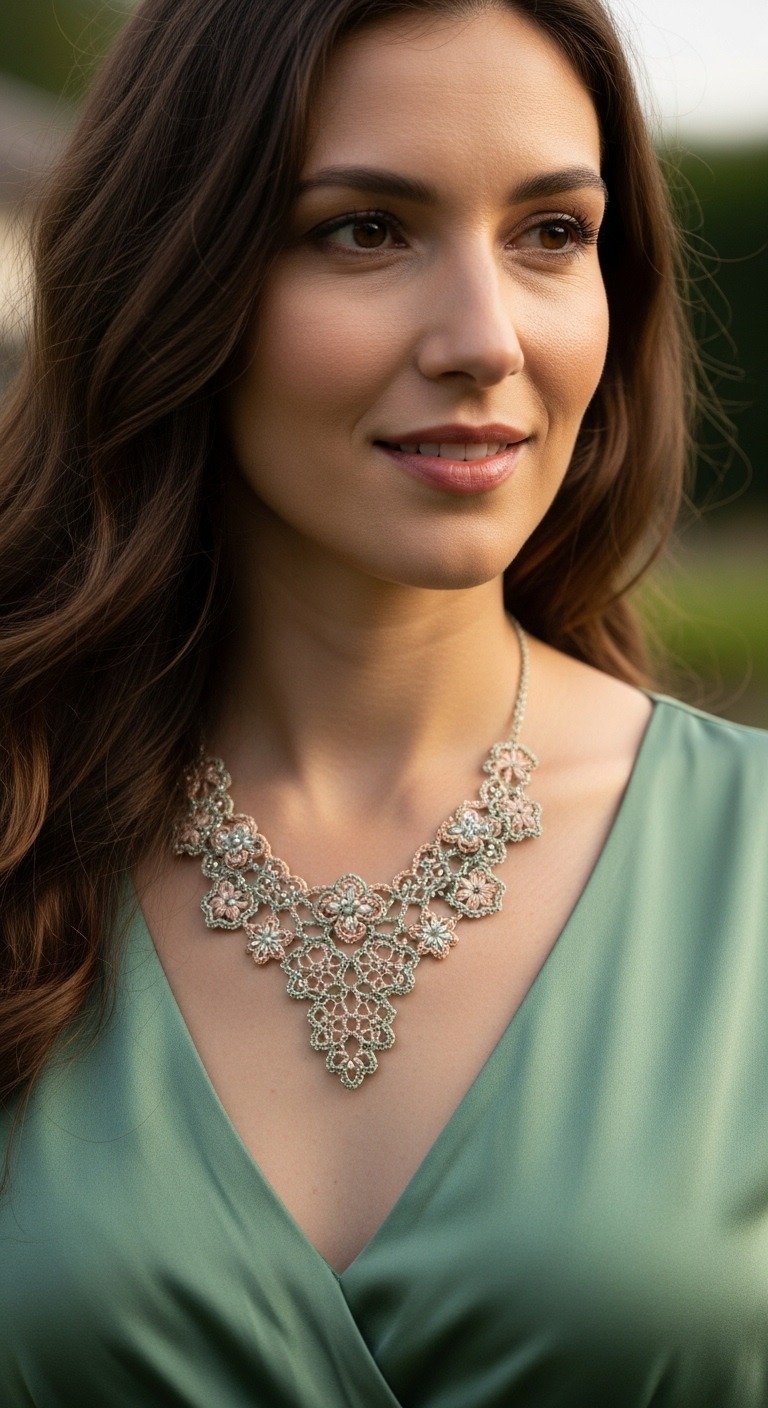
Step into a world of timeless elegance with our exquisite Floral Lace Crochet Necklace pattern. Inspired by delicate antique lacework, this project transforms fine thread into a wearable piece of art. Its intricate floral motifs and soft, ethereal colors will add a touch of romantic charm to any outfit, making it perfect for special occasions or to elevate your everyday style. This isn’t just a necklace; it’s a statement of handcrafted beauty.
Crafting Elegance: The Allure of Handmade Lace Jewelry
There’s a unique satisfaction in creating something truly beautiful with your own hands. This lace crochet necklace offers that experience, allowing you to master delicate stitches and watch as a stunning piece of jewelry takes shape. It’s a meditative project that results in a treasure, a testament to your skill and patience, and a truly personal accessory that stands apart from mass-produced items.
Crochet Thread Size 10 (approx. 100 yds each of Sage Green, Blush Pink)
Steel Crochet Hook 1.5mm (US 7)
20-30 small seed beads (2-3mm, clear or silver)
Beading needle
Small jewelry clasp (lobster or spring ring)
Scissors
Tapestry needle for weaving in ends
Abbreviations
ch = chain
sl st = slip stitch
sc = single crochet
dc = double crochet
tr = treble crochet
p = picot (ch 3, sl st into first ch)
sk = skip
st(s) = stitch(es)
sp = space
rep = repeat
FO = Fasten off
Instructions
This pattern creates a delicate floral lace necklace using small motifs that are joined as you go. Work with a tight tension for best results.
Part 1: Basic Floral Motif (Make 12-15, adjust for desired length)
Using Sage Green thread:
R1: Ch 5, sl st into first ch to form a ring. Ch 1, 8 sc into ring, sl st to first sc. (8 sc)
Using Blush Pink thread:
R2 (Petals): Join Pink thread in any sc. *Ch 2, (dc, tr, dc) into same sc, ch 2, sl st into next sc* rep 4 times. You will have 4 petals. Sl st to first sl st. FO Pink.
Using Sage Green thread:
R3 (Joining Round): Join Green thread into any sl st between petals. Ch 3, sc into the top of the tr st of the next petal. *Ch 3, sl st into the sl st between petals, ch 3, sc into the top of the tr st of the next petal* rep around. Sl st to first ch-3 space. (8 ch-3 spaces created, 4 from the top of the petals, 4 from between them.)
R4 (Picot Edging/Joining Points): Sl st into first ch-3 space. Ch 1, (sc, p, sc) into same ch-3 sp. *Ch 3, (sc, p, sc) into next ch-3 sp* rep around. Sl st to first sc. FO.
Thread a small seed bead onto the center of each motif with a beading needle and secure it on the back with a few stitches of matching thread.
Part 2: Constructing the Necklace Body
The necklace is built by joining these motifs. The pattern below creates a V-shape. You may need to adjust the number of motifs based on desired length.
Central Motif: Take one completed Basic Floral Motif. This will be the bottom center of your necklace.
First Layer Sides (2 Motifs): Make two more Basic Floral Motifs, but on R4, when you encounter a point where you want to join to the central motif, replace one “p” (picot) with a “sl st” into a picot of the central motif. Join each side motif to one side of the central motif.
Second Layer Sides (2 Motifs): Make two more motifs. Join each to the outer edge of the first layer side motifs, and also to each other in the center (creating a ‘V’ shape).
Continuing the V-Shape: Continue adding motifs in pairs, joining them to the previous layer’s outer motifs and to each other as needed to maintain and extend the V-shape. The goal is to create a gradual curve upwards towards the neck.
Lacy Fillers (Optional): For areas that look too open, use a small amount of Green thread to create small chain loops (ch 3-5, sl st) or tiny 3-ch picots to fill gaps and create a more cohesive lace fabric, mimicking the delicate lattice work in the image.
Part 3: Upper Border and Neck Chain
Once you have achieved your desired bib length and width:
Upper Border (Green): With Sage Green thread, attach it to the top-most picot of one end of your necklace bib. Work a row of *sc, ch 3, sc* into the picots and joining points across the top edge of your bib, creating a consistent lace border that will form the attachment for the neck chain. Ensure even spacing.
Neck Chain (Green): From each end of the upper border, chain approximately 50-70 stitches (or desired length for your neck). Sl st back down the chain to strengthen it. Repeat on the other side.
Attach Clasp: Attach one half of your jewelry clasp to each end of the chain using a tapestry needle or small pliers.
Part 4: Finishing
Weave in all remaining loose ends securely using a tapestry needle.
Block your necklace gently to help the lace lay flat and enhance the delicate details. Pin it into shape on a blocking mat, mist with water, and let it dry completely.