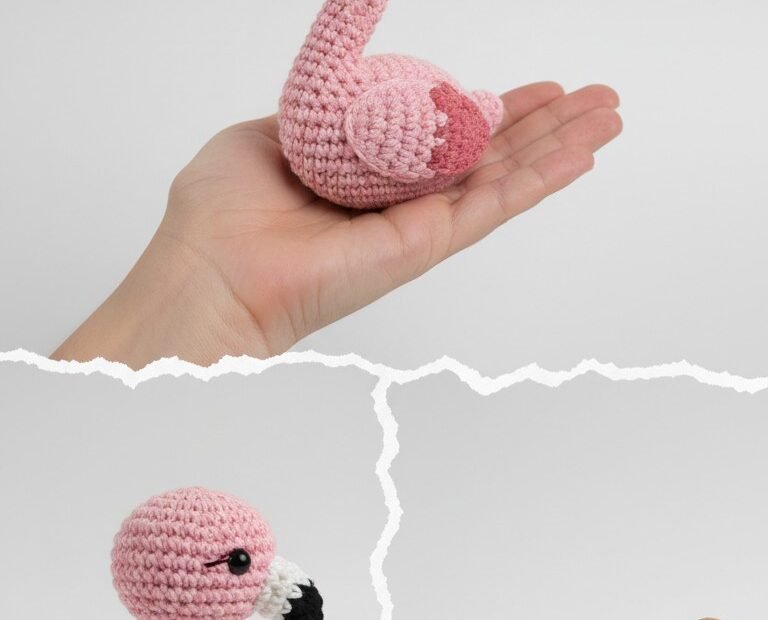
Dive into tropical fun with this adorable Amigurumi Flamingo crochet pattern! Perfect for brightening any space, this charming little bird makes a wonderful handmade gift or a delightful addition to your own collection. With its soft pink hues and sweet expression, this project is sure to bring a smile to your face as you create it.
Bring a Touch of Tropical Delight to Your Home
Imagine this sweet flamingo perched on your shelf, adding a splash of vibrant color and whimsical charm. This pattern is designed to be enjoyable for crocheters of various skill levels, offering clear instructions to guide you through each step. Craft your very own mini tropical paradise with this delightful project!
Crochet Pattern: Charming Amigurumi Flamingo: Free Crochet Pattern for a Tropical Friend
Materials
Light Pink yarn (worsted weight)
Darker Pink yarn (worsted weight, for wing detail and tail)
White yarn (worsted weight, for beak)
Black yarn (worsted weight, for beak tip)
3.0mm crochet hook
6mm or 8mm black safety eyes
Polyester fiberfill for stuffing
Tapestry needle
Stitch marker
Scissors
Abbreviations
MR: Magic Ring
ch: chain
sc: single crochet
sl st: slip stitch
inc: increase (2 sc in one stitch)
dec: decrease (sc 2 stitches together)
(…) xN: Repeat instructions in parentheses N times
FO: Fasten off
R: Round
Instructions
This pattern is worked in continuous rounds unless otherwise stated. Use a stitch marker to keep track of your rounds.
Head (Light Pink)
R1: Start with a MR, 6 sc into the ring (6)
R2: inc in each stitch around (12)
R3: (sc, inc) x6 (18)
R4: (2 sc, inc) x6 (24)
R5: (3 sc, inc) x6 (30)
R6-R10: sc in each stitch around (30) (5 rounds)
Insert safety eyes between R9 and R10, approximately 5 stitches apart.
R11: (3 sc, dec) x6 (24)
R12: (2 sc, dec) x6 (18)
Start stuffing the head firmly.
R13: (sc, dec) x6 (12)
R14: dec x6 (6)
FO, leaving a long tail for sewing. Weave the tail through the front loop of the remaining 6 stitches and pull tight to close the opening.
Beak (White and Black)
Start with White yarn.
R1: Ch 4. sc in 2nd ch from hook, sc in next ch, 3 sc in the last ch. Rotate to work on the other side of the chain: sc in next ch, inc in last ch (8)
R2: sc in each stitch around (8)
Switch to Black yarn.
R3: sc in each stitch around (8)
R4: (2 sc, dec) x2 (6)
FO, leaving a long tail for sewing. Stuff very lightly, if at all.
Neck (Light Pink)
R1: Start with a MR, 6 sc into the ring (6)
R2-R25: sc in each stitch around (6) (24 rounds)
FO, leaving a long tail for sewing. Stuff lightly as you attach it.
Body (Light Pink)
R1: Start with a MR, 6 sc into the ring (6)
R2: inc in each stitch around (12)
R3: (sc, inc) x6 (18)
R4: (2 sc, inc) x6 (24)
R5: (3 sc, inc) x6 (30)
R6: (4 sc, inc) x6 (36)
R7: (5 sc, inc) x6 (42)
R8-R15: sc in each stitch around (42) (8 rounds)
R16: (5 sc, dec) x6 (36)
R17: (4 sc, dec) x6 (30)
R18: (3 sc, dec) x6 (24)
Start stuffing the body firmly.
R19: (2 sc, dec) x6 (18)
R20: (sc, dec) x6 (12)
R21: dec x6 (6)
FO, leaving a long tail for sewing. Weave the tail through the front loop of the remaining 6 stitches and pull tight to close.
Wings (Make 2)
Wing 1 (Light Pink)
R1: Start with a MR, 6 sc into the ring (6)
R2: inc in each stitch around (12)
R3: (sc, inc) x6 (18)
R4: sc in each stitch around (18)
FO, leaving a long tail for sewing. Flatten the wing slightly.
Wing 2 (Light Pink and Darker Pink)
Start with Light Pink yarn.
R1: Start with a MR, 6 sc into the ring (6)
R2: inc in each stitch around (12)
R3: (sc, inc) x6 (18)
Switch to Darker Pink yarn.
R4: sc in each stitch around (18)
FO, leaving a long tail for sewing. Flatten the wing slightly.
Tail (Darker Pink)
R1: Start with a MR, 6 sc into the ring (6)
R2: inc in each stitch around (12)
R3: sc in each stitch around (12)
R4: (sc, dec) x4 (8)
FO, leaving a long tail for sewing. Stuff lightly.
Assembly
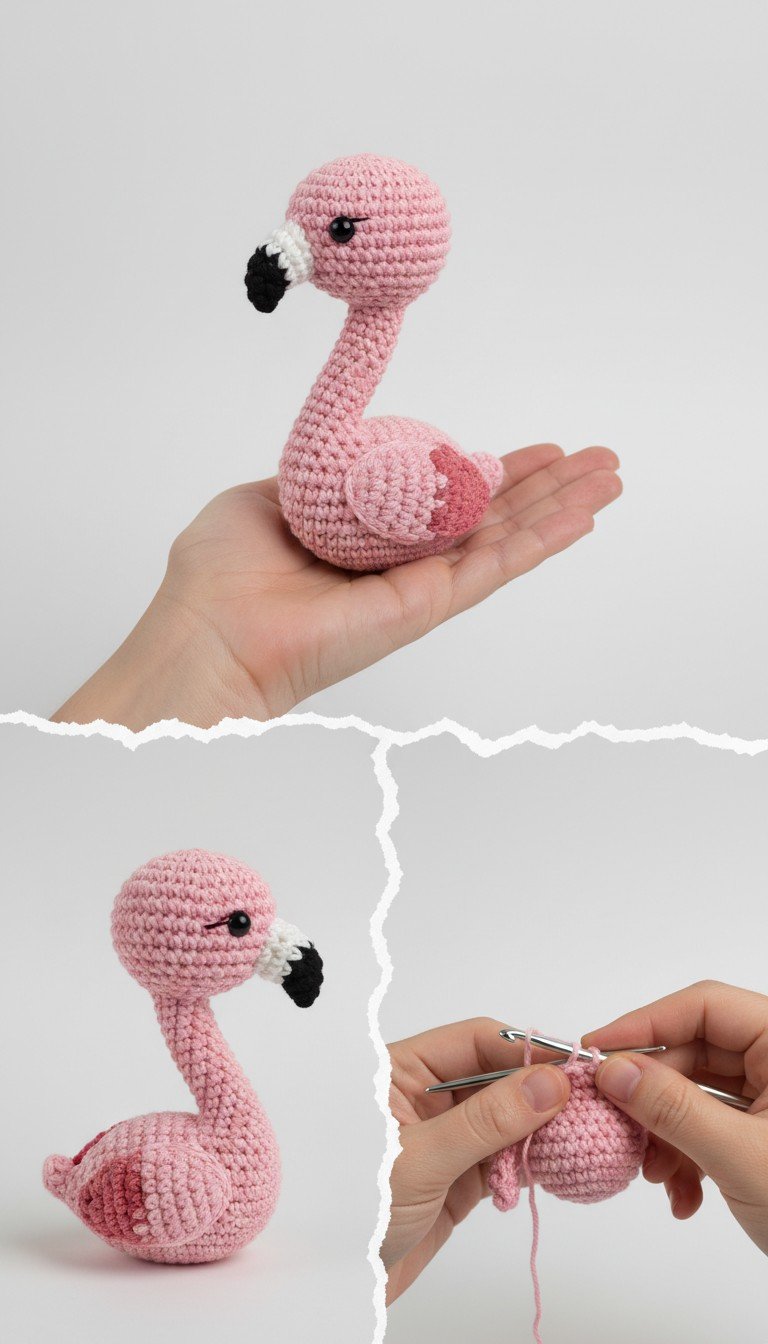
Sew the Beak to the front of the Head.
Sew one end of the Neck to the bottom of the Head. Ensure it’s centered. Stuff the neck as you sew it to maintain its shape.
Sew the other end of the Neck to the top-back of the Body, positioning it so the flamingo will sit upright and its neck forms an S-curve.
Attach the two Wings to the sides of the Body. Position the all-light-pink wing slightly more forward and the two-toned wing slightly behind it, overlapping slightly, as shown in the image.
Sew the Tail to the back of the Body.
Use black embroidery floss to embroider small eyelashes above the safety eyes for extra charm.