Step into Halloween Town with this enchanting Jack Skellington amigurumi crochet pattern! Whether you’re a devoted fan of ‘The Nightmare Before Christmas’ or simply love unique handmade creations, this pattern will guide you to craft your very own Pumpkin King. Perfect for seasonal decor or a year-round display, this detailed guide ensures your Jack comes to life with all his iconic charm.
Why Every ‘Nightmare’ Fan Needs This Crocheted Jack Skellington
Bring the magic of Tim Burton’s classic to life with a handmade Jack Skellington doll. This project is more than just a craft; it’s a tribute to a beloved character, offering a satisfying challenge for crocheters to create a unique piece of movie memorabilia. Imagine the joy of holding your own Pumpkin King, a conversation starter and a testament to your crafting skills.
Crochet Pattern: Spooktacular Jack Skellington Amigurumi Crochet Pattern – Craft Your Own Pumpkin King
Materials
White worsted weight yarn (approx. 50g)
Black worsted weight yarn (approx. 70g)
2.5mm or 3.0mm crochet hook (or size suitable for yarn to create tight stitches)
Two 10-12mm safety eyes
Polyester fiberfill for stuffing
Tapestry needle
Stitch marker
Scissors
Abbreviations
MR: Magic Ring
sc: Single Crochet
inc: Increase (2 sc in one stitch)
dec: Decrease (sc 2 stitches together)
sl st: Slip Stitch
ch: Chain
FO: Fasten Off
(X): Number of stitches at the end of the round/row
W: White yarn
B: Black yarn
Instructions
Notes: Work in continuous rounds unless otherwise stated. Use a stitch marker to keep track of your rounds. For sections with alternating White (W) and Black (B) stitches, practice tapestry crochet by carrying the unused color loosely behind your work to maintain tension and avoid gaps.
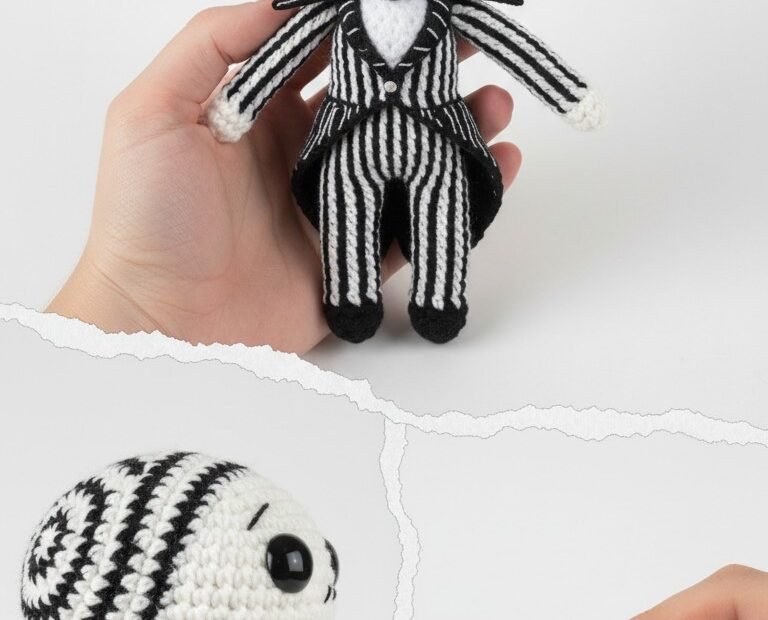
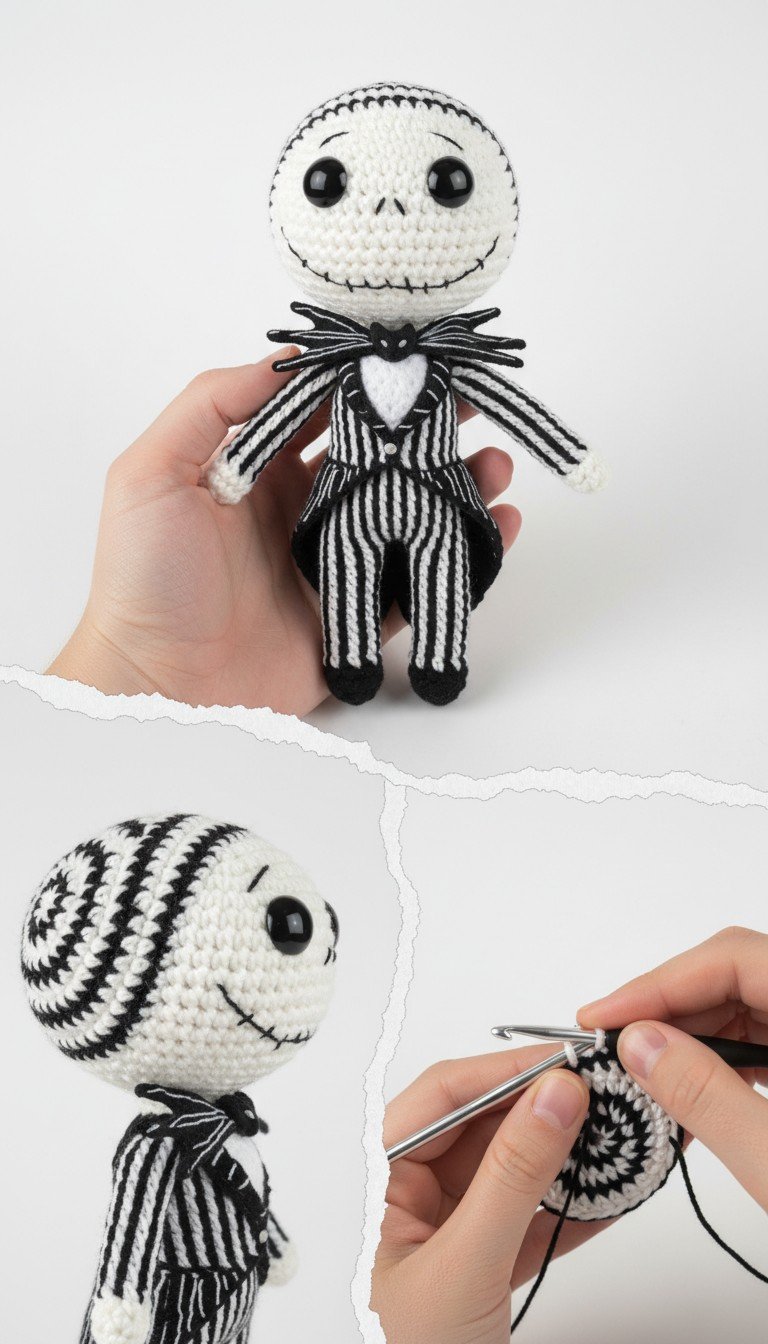
Head (White yarn)
R1: MR, 6sc (6)
R2: 6inc (12)
R3: (sc, inc)x6 (18)
R4: (2sc, inc)x6 (24)
R5: (3sc, inc)x6 (30)
R6: (4sc, inc)x6 (36)
R7: (5sc, inc)x6 (42)
R8-R16: 42sc (9 rounds)
Insert safety eyes between R12-R13, approximately 7 stitches apart. Begin stuffing firmly.
R17: (5sc, dec)x6 (36)
R18: (4sc, dec)x6 (30)
R19: (3sc, dec)x6 (24)
R20: (2sc, dec)x6 (18) Continue stuffing firmly.
R21: (sc, dec)x6 (12)
R22: 6dec (6)
FO, leaving a long tail for sewing. With Black yarn, embroider nose slits, mouth stitches, and the iconic skull lines on top and back of the head as pictured.
Legs (Make 2)
Start with Black yarn.
R1: MR, 6sc (6)
R2: 6inc (12)
R3-R4: 12sc (2 rounds)
Change to White yarn. Carry Black yarn throughout the next rounds for tapestry crochet.
R5-R10: *1sc in W, 1sc in B* repeat 6 times (12) (6 rounds total of alternating W and B stitches).
FO the first leg, leaving a tail for later weaving if desired. Do NOT FO the second leg. Stuff both legs lightly.
Body
Continue from the second leg with White yarn (carrying Black yarn).
Chain 3 with White yarn. Join to the first leg with 1sc in White.
R1 (Join Legs): Work 12sc around the first leg (maintaining the alternating W/B stripe pattern), then 3sc in the chain (alternating W, B, W), then 12sc around the second leg (maintaining W/B stripe pattern), then 3sc in the chain (alternating B, W, B). (30 stitches total, maintaining stripe pattern).
R2-R10: Continue working *1sc in W, 1sc in B* around for 30 stitches (9 rounds). Continue stuffing firmly as you go.
R11: (3sc, dec)x6 (24) – maintain the W/B stripe pattern as best as possible during decreases.
R12: (2sc, dec)x6 (18) – maintain stripe pattern.
R13: 18sc – maintain stripe pattern.
FO, leaving a long tail for sewing.
Arms (Make 2)
Start with White yarn.
R1: MR, 6sc (6)
R2: (sc, inc)x3 (9)
R3: 9sc
Change to Black yarn. Carry White yarn for tapestry crochet.
R4-R11: Continue working *1sc in W, 1sc in B* around for 9 stitches (8 rounds). Note: This will result in an uneven number of W and B stitches per round (e.g., 5W, 4B or vice versa), creating a subtle striped effect.
Stuff lightly. FO, leaving a long tail for sewing.
Bowtie (Black yarn)
Ch 12.
R1: Sc in 2nd ch from hook, 10sc (11). Ch 1, turn.
R2-R3: 11sc. Ch 1, turn.
FO, leaving a long tail. Pinch the center of the rectangle and wrap the tail yarn tightly around the middle several times to create the bow shape. Secure.
Tailcoat Flaps (Make 2 – Black yarn)
Ch 10.
R1: Sc in 2nd ch from hook, 8sc (9). Ch 1, turn.
R2: 9sc. Ch 1, turn.
R3: Dec, 5sc, dec (7). Ch 1, turn.
R4: 7sc. Ch 1, turn.
R5: Dec, 3sc, dec (5). Ch 1, turn.
R6: 5sc. Ch 1, turn.
FO, leaving a long tail for sewing.
Assembly
Sew the head firmly to the top of the body.
Sew the arms to the sides of the body, just below the neck.
Sew the bowtie to the front of the body, centered below the head.
Sew the two tailcoat flaps to the back of the body, starting around R10-R11, positioning them to drape downwards like a coat.
With White yarn, embroider a small V-neck or heart shape on the chest, mimicking Jack’s suit opening.