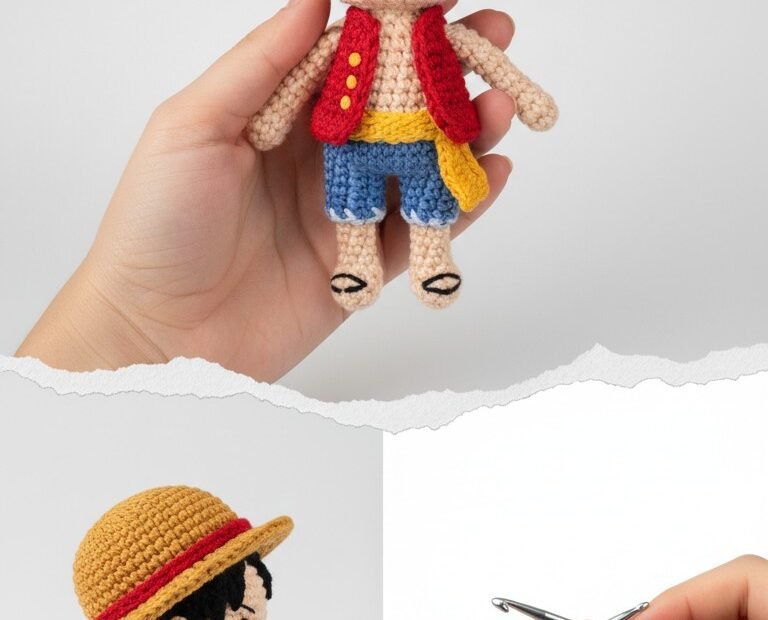
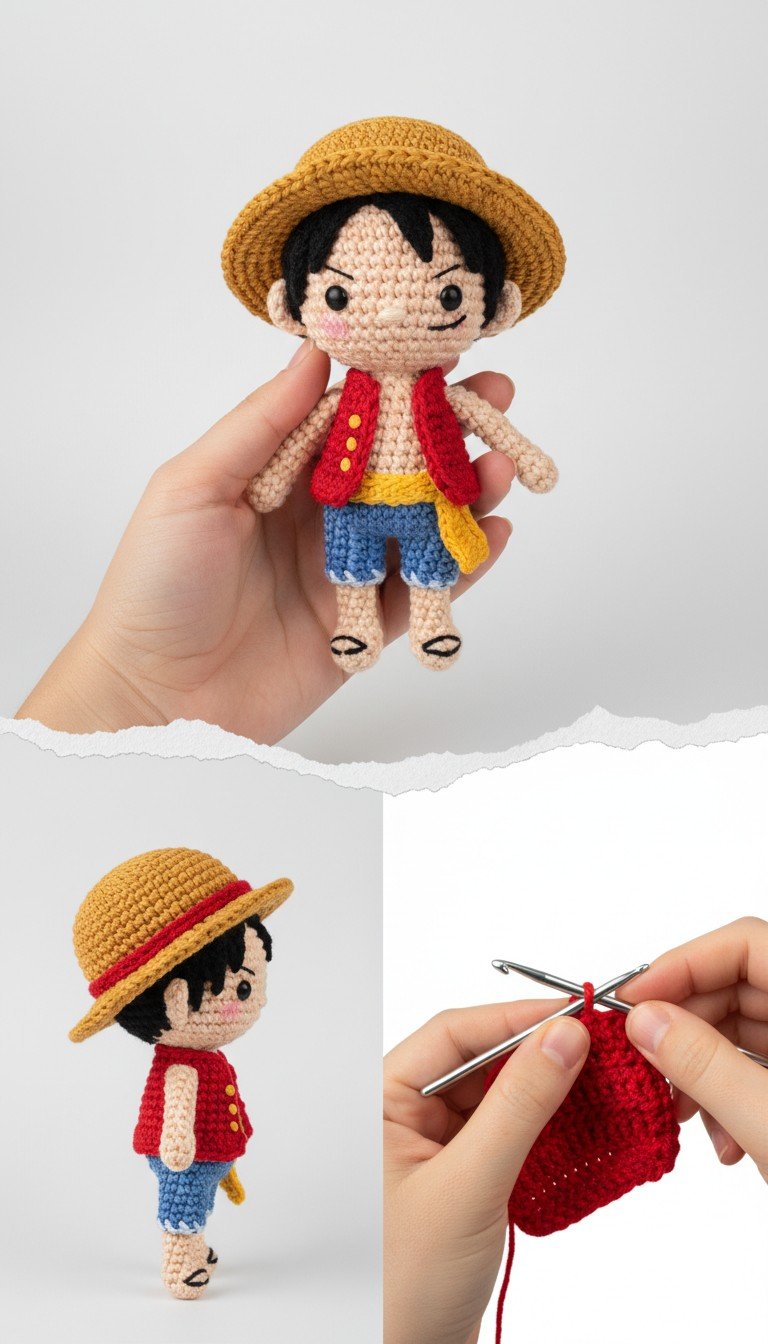
Embark on a grand crochet adventure with this free Monkey D. Luffy amigurumi pattern! Perfect for fans of One Piece, this pattern lets you create the Straw Hat Captain in his iconic outfit. With simple stitches and clear instructions, you’ll craft a charming, collectible doll ready to join your crew. Get your hooks ready and bring this beloved character to life!
Craft Your Own King of the Pirates Amigurumi
There’s immense satisfaction in creating a beloved character with your own hands. This Luffy amigurumi makes a fantastic gift for any One Piece enthusiast or a delightful addition to your own collection. Imagine the joy of holding a miniature Straw Hat captain, ready for new adventures. This pattern is designed for crocheters who want to infuse their passion for anime into their craft.
Crochet Pattern: Set Sail! Free Monkey D. Luffy Amigurumi Crochet Pattern
Materials
Sport or DK weight yarn in: Skin Tone (beige/peach), Black, Red, Blue, Yellow, Dark Yellow/Gold, White, Pink (small amount for blush)
2.5mm or 3.0mm crochet hook (or size suitable for your yarn to achieve tight stitches)
Polyester fiberfill for stuffing
Tapestry needle
Stitch markers
Scissors
Abbreviations
MR: Magic Ring
ch: Chain
sc: Single Crochet
inc: Increase (2 sc in one stitch)
dec: Decrease (sc 2 together)
sl st: Slip Stitch
FO: Fasten Off
R: Round
st(s): Stitch(es)
BLO: Back Loop Only
FLO: Front Loop Only
(…) x N: Repeat instructions in parentheses N times
Instructions
Important Note: Crochet in continuous rounds unless otherwise stated. Use a stitch marker to keep track of the first stitch of each round.
Head (Skin Tone Yarn)
R1: 6 sc in MR (6)
R2: 6 inc (12)
R3: (sc, inc) x 6 (18)
R4: (2 sc, inc) x 6 (24)
R5: (3 sc, inc) x 6 (30)
R6: (4 sc, inc) x 6 (36)
R7-12: 36 sc (6 rounds)
R13: (4 sc, dec) x 6 (30)
R14: (3 sc, dec) x 6 (24)
R15: (2 sc, dec) x 6 (18)
Stuff head firmly. FO, leave a long tail for sewing.
Body (Skin Tone Yarn)
R1: 6 sc in MR (6)
R2: 6 inc (12)
R3: (sc, inc) x 6 (18)
R4: (2 sc, inc) x 6 (24)
R5-9: 24 sc (5 rounds)
Stuff lightly. FO, leave a long tail for sewing.
Arms (Make 2 – Skin Tone Yarn)
R1: 5 sc in MR (5)
R2: 5 inc (10)
R3-8: 10 sc (6 rounds)
Stuff lightly. Flatten opening and sc across to close. FO, leave a long tail for sewing.
Legs (Make 2 – Skin Tone Yarn)
R1: 6 sc in MR (6)
R2: (sc, inc) x 3 (9)
R3-7: 9 sc (5 rounds)
Stuff lightly. FO, leave a long tail for sewing. Using black yarn, embroider a small ‘V’ or line on the front of the foot to indicate toes.
Hair Cap (Black Yarn)
R1: 6 sc in MR (6)
R2: 6 inc (12)
R3: (sc, inc) x 6 (18)
R4: (2 sc, inc) x 6 (24)
R5: (3 sc, inc) x 6 (30)
R6: (4 sc, inc) x 6 (36)
R7-8: 36 sc (2 rounds)
FO, leave a long tail for sewing.
Straw Hat (Dark Yellow/Gold & Red Yarn)
Start with Dark Yellow/Gold Yarn:
R1: 6 sc in MR (6)
R2: 6 inc (12)
R3: (sc, inc) x 6 (18)
R4: (2 sc, inc) x 6 (24)
R5: (3 sc, inc) x 6 (30)
R6: (4 sc, inc) x 6 (36)
R7: 36 sc in BLO (crown base)
R8-9: 36 sc (2 rounds, through both loops for crown height)
Change to Red Yarn:
R10 (Hat band): 36 sl st around. FO Red yarn.
Change back to Dark Yellow/Gold Yarn:
R11 (Brim): Attach yarn to the FLO of R7. (sc, inc) x 18 (54)
R12: (2 sc, inc) x 18 (72)
R13: 72 sc.
FO, weave in ends.
Shorts (Blue & White Yarn)
Start with Blue Yarn:
Ch 24, join with sl st to form a ring.
R1: Ch 1, 24 sc around. Join with sl st (24)
R2-4: Ch 1, 24 sc around. Join with sl st (24)
Change to White Yarn:
R5 (Cuff): Ch 1, 24 sc around. Join with sl st (24).
FO, weave in ends.
Vest (Red & Yellow Yarn)
Back Panel (Red Yarn)
Ch 12.
Row 1: Sc in 2nd ch from hook, sc in next 10 ch (11 sc). Ch 1, turn.
Row 2-6: 11 sc. Ch 1, turn.
FO.
Front Panels (Make 2 – Red Yarn)
Ch 5.
Row 1: Sc in 2nd ch from hook, sc in next 3 ch (4 sc). Ch 1, turn.
Row 2-6: 4 sc. Ch 1, turn.
FO.
Sash (Yellow Yarn)
Ch 30. Sc in 2nd ch from hook and across (29 sc). FO.
Assembly and Detailing
Sew the Head to the Body securely.
Sew the Legs to the bottom of the Body, ensuring they are evenly spaced.
Slide the Shorts onto the doll. The white cuff should be visible just above the skin-tone legs.
Sew the Arms to the sides of the Body, just below the neck.
Sew the Hair Cap to the head.
Using black embroidery floss or thin yarn, embroider Luffy’s eyes, arched eyebrows, and a small ‘V’ shape for his mouth. Under his left eye, embroider a short black line for his scar. Add a small stitch of pink yarn or floss on each cheek for blush.
Assemble the Vest by sewing the shoulder seams of the front panels to the back panel. Drape the vest over the doll’s shoulders and chest, then stitch it in place. Embroider three small yellow dots (buttons) on each front panel of the vest.
Wrap the Yellow Sash around the doll’s waist, tying or sewing it in place as seen in the image.
Place the Straw Hat on Luffy’s head and tack it in place with a few stitches if desired.