Embrace the magic of winter with this adorable Amigurumi Snowman crochet pattern! Perfect for bringing a touch of frosty cheer to your home or as a delightful gift, this pattern will guide you step-by-step to create a charming, huggable snowman. Get ready to crochet your new favorite frosty companion!
Craft a Cozy Companion for Snowy Days
There’s nothing quite like the joy of a handmade creation, especially one as sweet as this Amigurumi Snowman. Whether you’re a seasoned crocheter or looking for a fun new project, this pattern offers a rewarding experience, resulting in a unique, heartwarming character ready to brighten any day, no matter the weather outside.
Crochet Pattern: Charming Amigurumi Snowman Pattern: Crochet Your Own Winter Friend
Materials
White DK Weight Yarn
Orange DK Weight Yarn
Brown DK Weight Yarn
Black DK Weight Yarn
2.5mm Crochet Hook
8mm Black Safety Eyes
Tapestry Needle
Stitch Markers
Scissors
Polyfill Stuffing
Abbreviations
MR: Magic Ring
sc: single crochet
inc: increase (2 sc in one stitch)
dec: decrease (sc two stitches together)
sl st: slip stitch
FO: fasten off
ch: chain
Instructions
Important Notes: Work in continuous rounds unless otherwise stated. Use a stitch marker to mark the first stitch of each round.
Head (White Yarn)
R1: 6 sc in MR (6)
R2: 6 inc (12)
R3: (1 sc, inc) x 6 (18)
R4: (2 sc, inc) x 6 (24)
R5: (3 sc, inc) x 6 (30)
R6-R10: 30 sc (5 rounds)
Insert safety eyes between R8 and R9, approximately 6-7 stitches apart. Begin stuffing firmly.
R11: (3 sc, dec) x 6 (24)
R12: (2 sc, dec) x 6 (18)
R13: (1 sc, dec) x 6 (12)
R14: 6 dec (6)
FO, leaving a long tail for sewing. Weave in ends to close the opening.
Upper Body (White Yarn)
R1: 6 sc in MR (6)
R2: 6 inc (12)
R3: (1 sc, inc) x 6 (18)
R4: (2 sc, inc) x 6 (24)
R5-R7: 24 sc (3 rounds)
Begin stuffing lightly.
R8: (2 sc, dec) x 6 (18)
FO, leaving a long tail for sewing.
Lower Body (White Yarn)
R1: 6 sc in MR (6)
R2: 6 inc (12)
R3: (1 sc, inc) x 6 (18)
R4: (2 sc, inc) x 6 (24)
R5: (3 sc, inc) x 6 (30)
R6-R9: 30 sc (4 rounds)
Begin stuffing firmly.
R10: (3 sc, dec) x 6 (24)
R11: (2 sc, dec) x 6 (18)
FO, leaving a long tail for sewing.
Nose (Orange Yarn)
R1: 4 sc in MR (4)
R2: (1 sc, inc) x 2 (6)
R3: (2 sc, inc) x 2 (8)
R4: 8 sc
FO, leaving a long tail for sewing. Stuff lightly.
Arms (Brown Yarn) – Make 2
Ch 10. Starting in 2nd ch from hook, 9 sc. FO, leaving a long tail for sewing.
Hair (Brown Yarn) – Make 3
Ch 5. Starting in 2nd ch from hook, 4 sc. FO, leaving a long tail for sewing.
Assembly
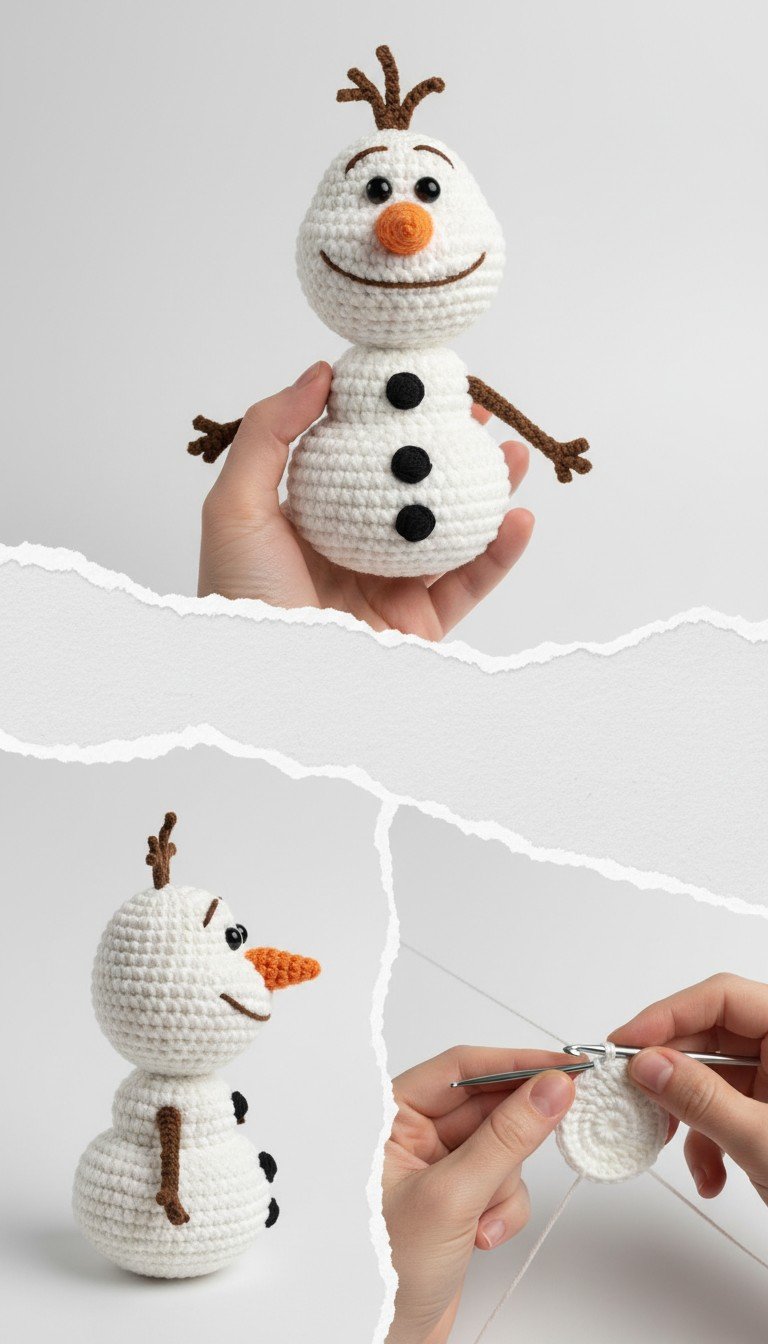
Sew the Upper Body to the bottom of the Head, ensuring they are centered.
Sew the Lower Body to the bottom of the Upper Body.
Sew the orange nose onto the center of the face, below the eyes.
Using brown yarn and a tapestry needle, embroider a smiling mouth below the nose, matching the curve in the image.
Attach the two brown arm pieces to the sides of the upper body, slightly below the head seam.
Sew the three brown hair pieces to the top of the head, arranging them to resemble twigs.
Using black yarn, embroider three small circular buttons down the front of the body, spaced evenly.