
Embark on a delightful journey to London’s Paddington Station from the comfort of your home with this charming crochet pattern! Recreate the beloved bear from Peru, complete with his iconic red hat and blue duffle coat. This detailed amigurumi pattern will guide you through crafting your very own Paddington, a timeless companion for any fan.

Craft Your Own Beloved Paddington Bear
Bring the heartwarming tales of Paddington to life with a handmade touch. This amigurumi project is perfect for crocheters looking to create a cherished gift or add a touch of nostalgic charm to their collection. Each stitch is a step closer to a huggable, story-filled friend who’s always ready for an adventure.
Crochet Pattern: Crochet Paddington Bear Amigurumi Pattern: Craft Your Own Classic Companion
Materials
- Worsted weight yarn in Brown (for body, head, limbs)
- Worsted weight yarn in Red (for hat)
- Worsted weight yarn in Blue (for coat)
- Worsted weight yarn in Cream (for snout, inner ears)
- Black embroidery floss or thin yarn (for nose, mouth, coat toggles)
- 2.5mm or 3.0mm crochet hook (or size to achieve tight stitches)
- 6mm safety eyes
- Polyester fiberfill for stuffing
- Tapestry needle
- Stitch markers
- Scissors
- Small brown craft tag (optional, for ‘Please Look After This Bear’ detail)
- Thin brown string (optional, for tag)
Abbreviations
- MR: Magic Ring
- ch: chain
- sc: single crochet
- inc: increase (2 sc in one stitch)
- dec: decrease (sc 2 stitches together)
- sl st: slip stitch
- FO: Fasten Off
- BLO: Back Loop Only
- Rnd: Round
- st(s): stitch(es)
Instructions
Gauge: Gauge is not critical for this project, but ensure your stitches are tight enough so stuffing does not show through.
Note: Work in continuous rounds unless otherwise specified. Use a stitch marker to mark the beginning of each round.
HEAD & BODY (Brown Yarn)
- Head:
- Rnd 1: 6 sc in MR (6)
- Rnd 2: (inc) x 6 (12)
- Rnd 3: (sc, inc) x 6 (18)
- Rnd 4: (2 sc, inc) x 6 (24)
- Rnd 5: (3 sc, inc) x 6 (30)
- Rnd 6: (4 sc, inc) x 6 (36)
- Rnd 7-12: sc in each st around (36) (6 rounds)
- Place safety eyes between Rnd 10 and 11, about 6-7 stitches apart.
- Rnd 13: (4 sc, dec) x 6 (30)
- Rnd 14: (3 sc, dec) x 6 (24)
- Begin stuffing the head firmly.
- Neck:
- Rnd 15: (2 sc, dec) x 6 (18)
- Body:
- Rnd 16: (2 sc, inc) x 6 (24)
- Rnd 17: (3 sc, inc) x 6 (30)
- Rnd 18-24: sc in each st around (30) (7 rounds)
- Continue stuffing the body firmly as you go.
- Rnd 25: (3 sc, dec) x 6 (24)
- Rnd 26: (2 sc, dec) x 6 (18)
- Rnd 27: (sc, dec) x 6 (12)
- Rnd 28: (dec) x 6 (6)
- FO, leave a tail and weave through remaining 6 sts, pull tight to close. Weave in end.
SNOUT (Cream Yarn)
- Rnd 1: Ch 5. Sc in 2nd ch from hook, sc in next 2 ch, 3 sc in last ch. Turn and work on other side of ch: sc in next 2 ch, 2 sc in last ch. (10)
- Rnd 2: inc, sc in next 2, inc x 3, sc in next 2, inc x 2 (16)
- Rnd 3: sc in each st around (16)
- FO, leave a long tail for sewing. Lightly stuff and sew onto the face, centered below the eyes. Embroider a black nose and mouth.
EARS (Brown Yarn, Make 2)
- Rnd 1: 6 sc in MR (6)
- Rnd 2: (sc, inc) x 3 (9)
- Rnd 3: sc in each st around (9)
- FO, leave a tail for sewing. Flatten the ear. Sew to the top sides of the head, between Rnds 4 and 5, above the eyes.
ARMS (Brown Yarn, Make 2)
- Rnd 1: 6 sc in MR (6)
- Rnd 2: (sc, inc) x 3 (9)
- Rnd 3-10: sc in each st around (9) (8 rounds)
- Lightly stuff the arm. Press the opening flat and sc across to close (4 sc).
- FO, leave a long tail for sewing. Sew arms to the sides of the body, just below the neck.
LEGS (Brown Yarn, Make 2)
- Rnd 1: 6 sc in MR (6)
- Rnd 2: (inc) x 6 (12)
- Rnd 3: (sc, inc) x 6 (18)
- Rnd 4: sc in each st around (18) BLO
- Rnd 5-8: sc in each st around (18) (4 rounds)
- Stuff leg firmly.
- Rnd 9: (sc, dec) x 6 (12)
- Rnd 10: (dec) x 6 (6)
- FO, leave a tail and weave through remaining 6 sts, pull tight to close. Weave in end. Sew legs to the bottom of the body, evenly spaced.
HAT (Red Yarn)
- Crown:
- Rnd 1: 6 sc in MR (6)
- Rnd 2: (inc) x 6 (12)
- Rnd 3: (sc, inc) x 6 (18)
- Rnd 4: (2 sc, inc) x 6 (24)
- Rnd 5: (3 sc, inc) x 6 (30)
- Rnd 6-9: sc in each st around (30) (4 rounds)
- Brim:
- Rnd 10: (4 sc, inc) x 6 (36) BLO
- Rnd 11: sc in each st around (36)
- Rnd 12: (5 sc, inc) x 6 (42)
- Rnd 13: sc in each st around (42)
- FO, weave in ends. Place on the bear’s head.
COAT (Blue Yarn)
- Main Body of Coat: (Work in rows, turning at the end of each row)
- Ch 21.
- Row 1: Sc in 2nd ch from hook, sc in next 19 ch (20 sc). Ch 1, turn.
- Row 2-20: sc in each st across (20 sc). Ch 1, turn. (This forms the back panel and will wrap around)
- Fold the piece and sl st the sides together to form a tube, leaving openings for arms and neck.
- Sleeves (Make 2):
- Rnd 1: 6 sc in MR (6)
- Rnd 2: (sc, inc) x 3 (9)
- Rnd 3-8: sc in each st around (9) (6 rounds)
- FO, leave a tail for sewing. Sew sleeves to the armholes of the coat.
- Hood:
- Ch 21.
- Row 1: Sc in 2nd ch from hook, sc in next 19 ch (20 sc). Ch 1, turn.
- Row 2-15: sc in each st across (20 sc). Ch 1, turn. (14 rows)
- Fold the piece in half and sl st across the top edge to close the hood.
- Sew the bottom edge of the hood to the neck opening of the coat.
- Finishing Coat Details:
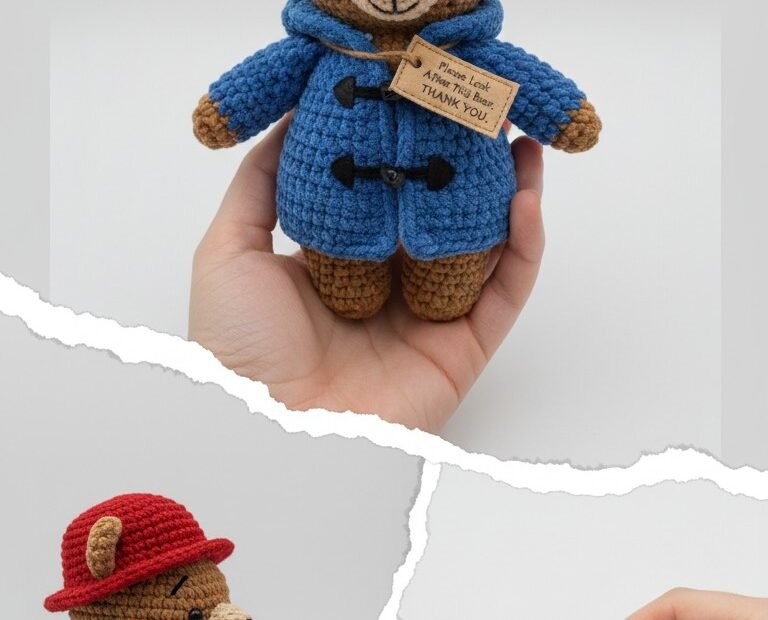
- Embroider the two black toggle shapes and their loops on the front of the coat using black embroidery floss, referring to the image.
- Attach the small craft tag with thin brown string to the coat, displaying ‘Please Look After This Bear. THANK YOU.’ (You may need to write this on the tag).
ASSEMBLY
- Ensure all parts are stuffed and securely sewn.
- Place the hat on Paddington’s head.
- Dress him in his finished blue duffle coat.
- Adjust and admire your new Paddington Bear!