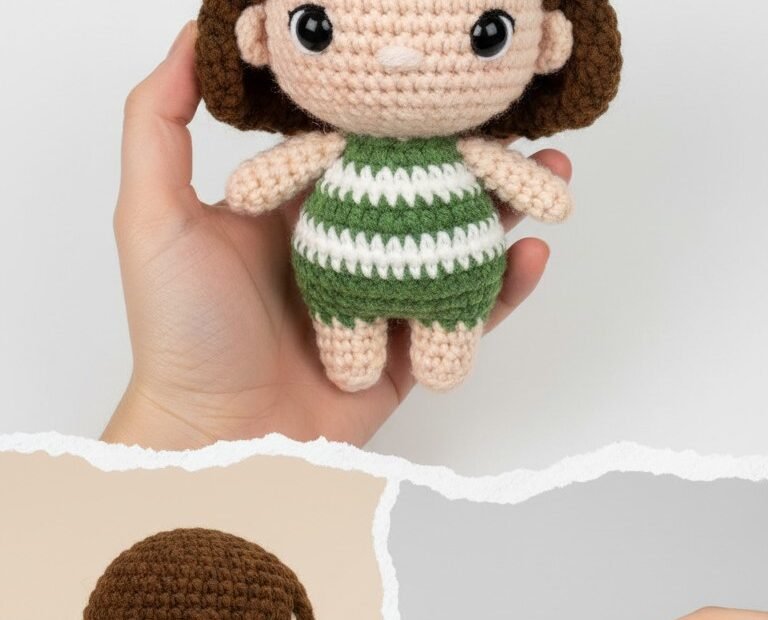
Discover the joy of creating your very own adorable Amigurumi doll with this easy-to-follow crochet pattern! This little doll features a sweet bob haircut and a cheerful green and white striped outfit, perfect for a personalized gift or a charming addition to your collection. Even beginners will find success in bringing this cute character to life, stitch by stitch. Get ready to embark on a delightful crafting journey!
Craft Your Own Adorable Amigurumi Companion
There’s nothing quite like the satisfaction of crocheting a handmade doll. This Amigurumi companion is designed to be cherished, whether as a thoughtful present for a loved one or a whimsical piece of decor for your own space. With its distinctive striped dress and friendly expression, this doll is sure to bring a smile to anyone’s face and add a touch of handmade charm to any room.
2.5mm or 3.0mm crochet hook (or size suitable for your yarn)
6mm or 8mm black safety eyes
Polyester fiberfill for stuffing
Tapestry needle
Stitch marker
Scissors
Abbreviations
MR: Magic Ring
sc: single crochet
inc: increase (2 sc in one stitch)
dec: decrease (sc 2 stitches together)
sl st: slip stitch
ch: chain
FO: Fasten off
st(s): stitch(es)
R: Round
Instructions
This pattern is worked in continuous rounds unless otherwise specified. Use a stitch marker to mark the beginning of each round.
Head and Body (worked as one piece, start with Light Peach yarn)
R1: MR 6sc (6)
R2: 6inc (12)
R3: (sc, inc) x6 (18)
R4: (2sc, inc) x6 (24)
R5: (3sc, inc) x6 (30)
R6: (4sc, inc) x6 (36)
R7-13: 36sc (7 rounds)
Insert safety eyes between R10-11, approximately 6-7 stitches apart. Embroider eyebrows and a small mouth after attaching the hair.
R14: (4sc, dec) x6 (30)
R15: (3sc, dec) x6 (24)
R16: (2sc, dec) x6 (18)
R17: 18sc (Neck round)
Begin stuffing the head firmly.
R18: (2sc, inc) x6 (24)
R19: (3sc, inc) x6 (30)
R20: (4sc, inc) x6 (36)
Change to Green yarn.
R21-22: 36sc (2 rounds Green)
Change to White yarn.
R23-24: 36sc (2 rounds White)
Change to Green yarn.
R25-26: 36sc (2 rounds Green)
Change to White yarn.
R27-28: 36sc (2 rounds White)
Change to Green yarn.
R29-30: 36sc (2 rounds Green)
Continue stuffing the body firmly as you go.
R31: (4sc, dec) x6 (30)
R32: (3sc, dec) x6 (24)
R33: (2sc, dec) x6 (18)
R34: (sc, dec) x6 (12)
R35: 6dec (6)
FO, leaving a long tail. Weave the tail through the front loop of the remaining 6 stitches and pull tight to close the hole. Weave in ends.
Arms (make 2, with Light Peach yarn)
R1: MR 6sc (6)
R2: (sc, inc) x3 (9)
R3-7: 9sc (5 rounds)
Stuff lightly. FO, leaving a long tail for sewing.
Legs (make 2, with Light Peach yarn)
R1: MR 6sc (6)
R2: 6inc (12)
R3-9: 12sc (7 rounds)
Stuff firmly. FO, leaving a long tail for sewing.
Ears (make 2, with Light Peach yarn)
R1: Ch 4. Sc in 2nd ch from hook, sc in next, 3sc in last ch. Working on the other side of the chain: sc in next, 2sc in last. (8)
Sl st to first sc. FO, leaving a long tail for sewing. Flatten the oval slightly.
Hair Cap (with Dark Brown yarn)
R1: MR 6sc (6)
R2: 6inc (12)
R3: (sc, inc) x6 (18)
R4: (2sc, inc) x6 (24)
R5: (3sc, inc) x6 (30)
R6: (4sc, inc) x6 (36)
R7-10: 36sc (4 rounds)
FO, leaving a long tail for sewing.
Assembly
1. Hair: Place the hair cap on the doll’s head, positioning the front edge just above the safety eyes. Pin in place and sew securely to the head with the long tail.
2. Face Details: With a small length of dark brown yarn, embroider two small horizontal lines for eyebrows just above the safety eyes. Using black embroidery floss or a small length of black yarn, embroider a small V-shape or horizontal line for the mouth.
3. Ears: Sew the ears to the sides of the head, slightly below the hair cap and roughly aligned with the eyes.
4. Arms: Pin the arms to the sides of the body, just below the neck. Sew securely in place.
5. Legs: Pin the legs to the bottom of the body. Ensure the doll can sit evenly before sewing securely in place.
6. Finishing: Weave in all remaining loose ends. Your Charming Striped Amigurumi Doll is complete!