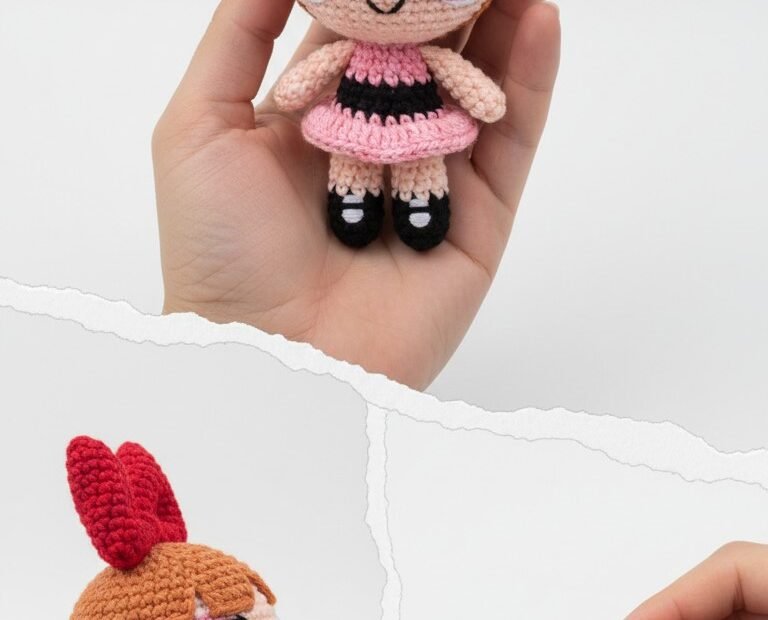
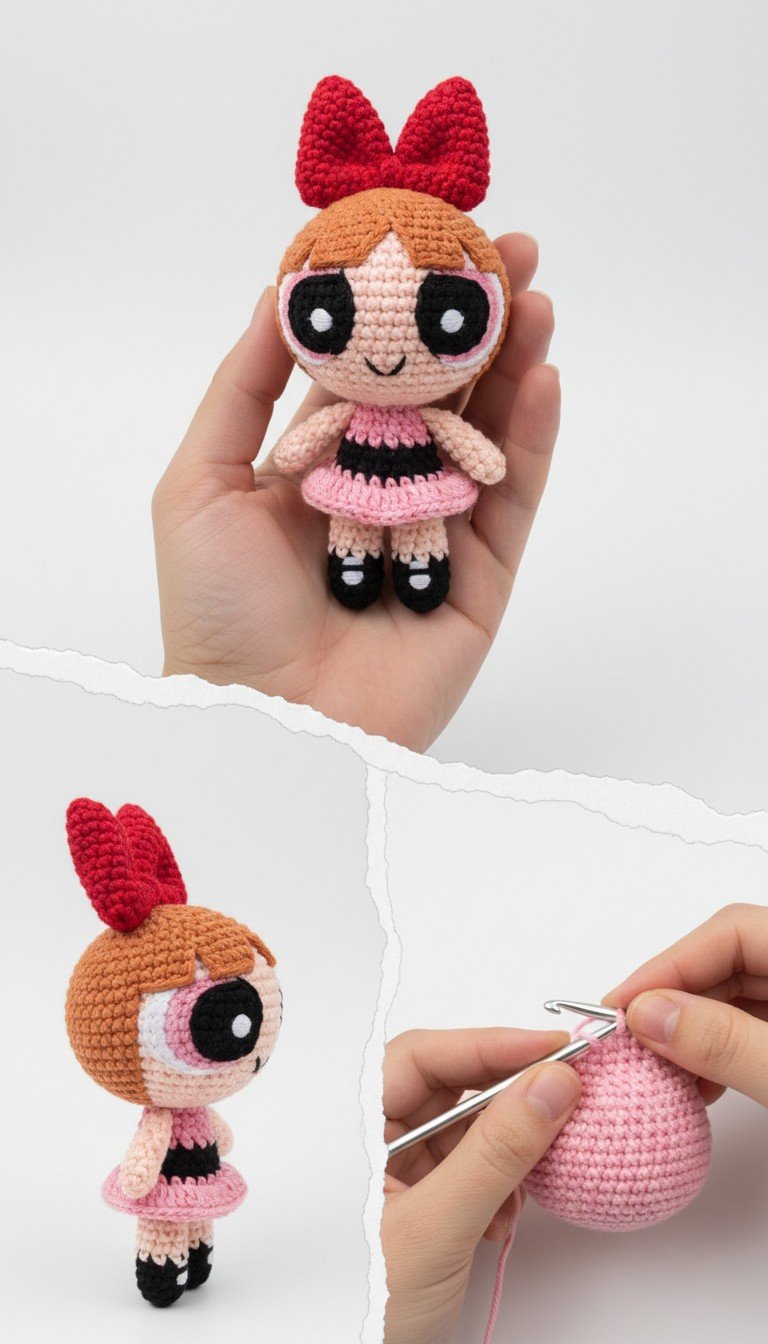
Sugar, spice, and everything nice! Bring the iconic leader of the Powerpuff Girls to life with this adorable Blossom amigurumi pattern. Perfect for fans of the classic cartoon, this detailed guide will help you crochet your very own crime-fighting hero. Get ready to create a charming doll that’s sure to bring a touch of nostalgia and superpower fun to any collection!
Craft Your Own Little Hero from Townsville!
There’s nothing quite like the satisfaction of crafting a beloved character with your own hands. This Blossom amigurumi pattern offers a fantastic opportunity to create a unique, handmade gift or a cherished collectible for yourself. Rekindle your love for Townsville’s heroes and enjoy the therapeutic process of bringing this feisty, intelligent Powerpuff Girl to life with yarn and hook.
DK weight yarn in: Peach (skin), Reddish-Brown (hair), Red (bow), Light Pink (dress/sleeves), Black (dress stripe/shoes/eyes), White (eye details)
2.5mm crochet hook
6mm safety eyes (optional, for embroidering pupils)
Polyester fiberfill for stuffing
Yarn needle
Stitch markers
Scissors
Abbreviations
MR: Magic Ring
ch: Chain
sc: Single Crochet
inc: Increase (2 sc in one stitch)
dec: Decrease (sc 2 stitches together)
sl st: Slip Stitch
fo: Fasten Off
st(s): Stitch(es)
Rnd(s): Round(s)
Instructions
Gauge: Not critical for this project, just ensure tight stitches so stuffing doesn’t show through.
Notes: Work in continuous rounds unless otherwise specified. Use a stitch marker to mark the beginning of each round.
Head (Peach yarn)
Rnd 1: MR, 6 sc (6)
Rnd 2: 6 inc (12)
Rnd 3: (1 sc, 1 inc) x 6 (18)
Rnd 4: (2 sc, 1 inc) x 6 (24)
Rnd 5: (3 sc, 1 inc) x 6 (30)
Rnd 6-10: sc in each st around (30) – 5 rounds
Rnd 11: (3 sc, 1 dec) x 6 (24)
Rnd 12: (2 sc, 1 dec) x 6 (18)
Start stuffing the head firmly.
Rnd 13: (1 sc, 1 dec) x 6 (12)
Rnd 14: 6 dec (6)
Fo, leave a long tail for closing the hole and attaching. Finish stuffing.
Hair (Reddish-Brown yarn)
Hair Cap:
Rnd 1: MR, 6 sc (6)
Rnd 2: 6 inc (12)
Rnd 3: (1 sc, 1 inc) x 6 (18)
Rnd 4: (2 sc, 1 inc) x 6 (24)
Rnd 5: (3 sc, 1 inc) x 6 (30)
Rnd 6-7: sc in each st around (30)
Sl st, fo, leave a long tail for sewing.
Bangs (make 2): Ch 5. Sc in 2nd ch from hook, sc in next 3 ch. (4 sc total). Turn, sc 4. Fo, leave tail.
Body & Dress
Start with Peach yarn:
Rnd 1: MR, 6 sc (6)
Rnd 2: 6 inc (12)
Rnd 3: sc in each st around (12)
Switch to Light Pink yarn:
Rnd 4: (1 sc, 1 inc) x 6 (18)
Rnd 5-6: sc in each st around (18) – 2 rounds
Switch to Black yarn:
Rnd 7: sc in each st around (18)
Switch to Light Pink yarn:
Rnd 8: (2 sc, 1 inc) x 6 (24)
Rnd 9: (3 sc, 1 inc) x 6 (30)
Rnd 10: sc in each st around (30)
Sl st, fo, leave a long tail for sewing. Stuff the body lightly.
Arms (make 2, Peach yarn)
Rnd 1: MR, 6 sc (6)
Rnd 2-6: sc in each st around (6) – 5 rounds
Sl st, fo, leave a long tail for sewing. Stuff very lightly, if at all.
Legs & Shoes (make 2)
Start with Peach yarn:
Rnd 1: MR, 6 sc (6)
Rnd 2-4: sc in each st around (6) – 3 rounds
Switch to Black yarn:
Rnd 5-6: sc in each st around (6) – 2 rounds
Sl st, fo, leave a long tail for sewing. Stuff lightly.
Bow (Red yarn)
Make 2 bow pieces: Ch 7. Sc in 2nd ch from hook, sc in next 5 ch (6 sc). Turn, ch 1. Sc 6 across. Repeat for 2 more rows. (3 rows of 6 sc total). Fo, leave a long tail.
Middle band: Ch 5. Sc in 2nd ch from hook, sc in next 3 ch (4 sc). Fo, leave a long tail.
Assembly
1. Attach Hair: Sew the reddish-brown hair cap to the top of the head. Position the bangs on the forehead and sew them down.
2. Eyes and Mouth: Insert 6mm safety eyes between Rnd 8-9 of the head, with about 5-6 stitches between them. Using white yarn, embroider a small white oval around each safety eye for the white outline. With black yarn, embroider a small ‘V’ or ‘U’ shape for the mouth between Rnd 9-10.
3. Attach Head to Body: Sew the head to the body, ensuring it’s centered and secure.
4. Attach Arms: Sew the arms to the sides of the body, just below the peach neck section, around Rnd 4-5 of the body.
5. Attach Legs: Sew the legs to the bottom of the body, centered underneath.
6. Assemble Bow: Pinch the center of the two red bow pieces. Wrap the small middle band around the pinched center and sew it securely at the back. Sew the finished bow to the top of Blossom’s head.