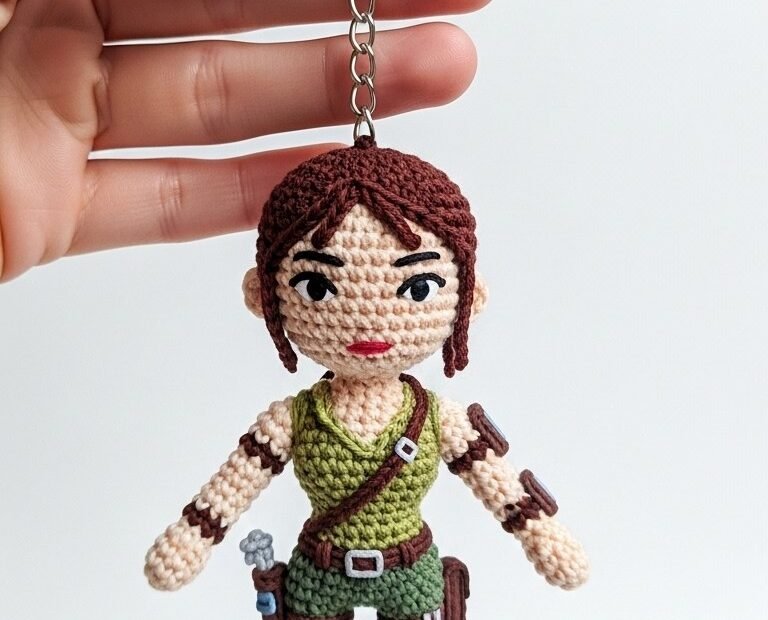
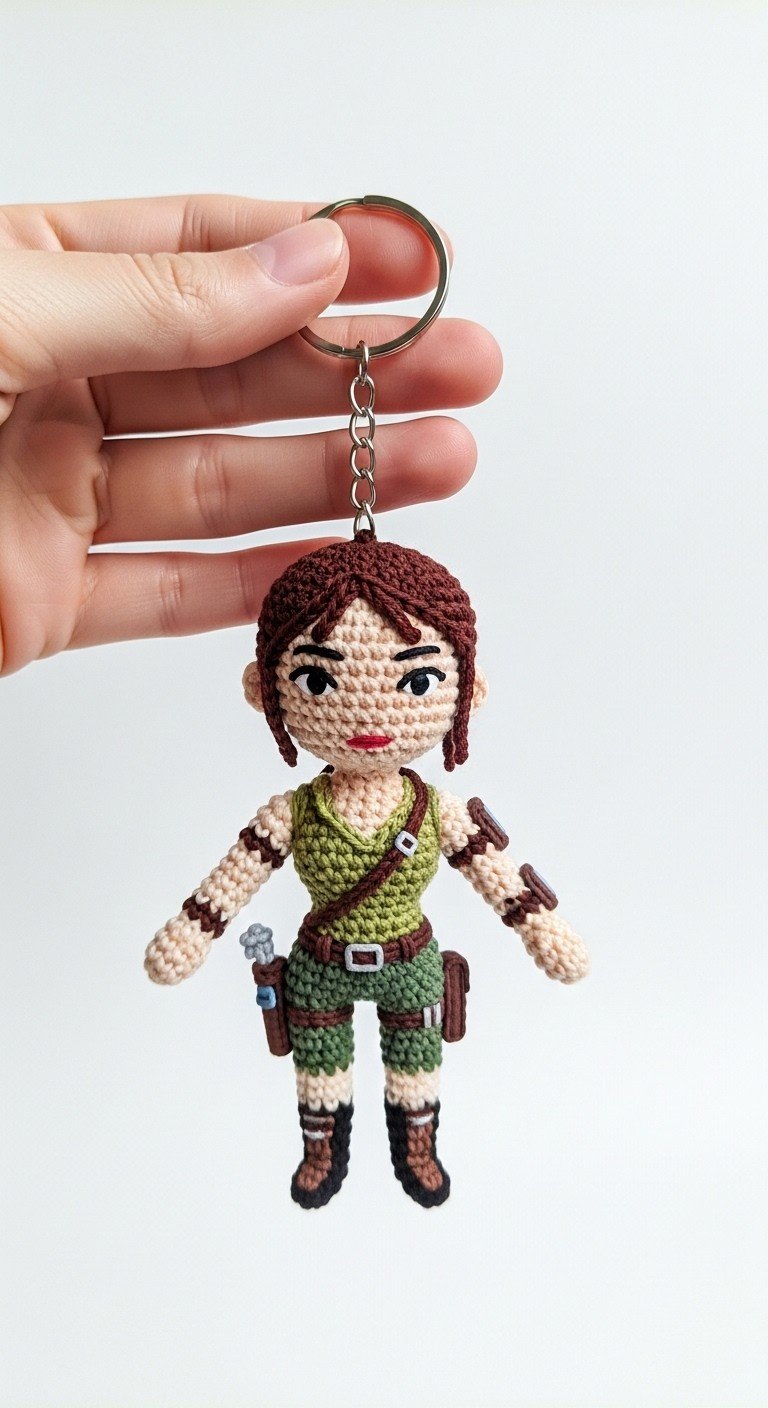
Embark on a miniature crafting adventure with our Amigurumi Adventurer Doll keychain pattern! Inspired by iconic heroines, this detailed crochet project brings a tiny, fearless character to life. Perfect for adorning your keys or backpack, this amigurumi doll is a fun and rewarding make for any crocheter looking for a charming, action-packed project.
Unleash Your Inner Explorer with a Handmade Hero
This adorable adventurer doll isn’t just a keychain; it’s a testament to your crafting skills and a constant reminder of bravery. Imagine the satisfaction of creating every tiny detail, from her determined expression to her essential gear. It’s a wonderful gift for gamers, adventurers, or anyone who appreciates a touch of handmade heroism in their everyday life.
Crochet Pattern: Craft Your Own Hero: Amigurumi Adventurer Doll Keychain Pattern!
Materials
DK weight cotton yarn in: Skin Tone (beige), Olive Green, Dark Brown, Black, Red, Light Blue, Grey
2.0mm crochet hook
Tapestry needle
Stuffing material (fiberfill)
Scissors
Keyring with chain
Stitch markers (optional)
Abbreviations
MR: Magic Ring
sc: Single Crochet
inc: Increase (2 sc in one stitch)
dec: Decrease (sc 2 stitches together)
ch: Chain
sl st: Slip Stitch
FO: Fasten off
( ): Repeat instructions in parentheses
[ ]: Total number of stitches
Instructions
Head & Body (Start with Skin Tone yarn)
R1: Start with MR, 6 sc [6]
R2: 6 inc [12]
R3: (sc, inc) x6 [18]
R4: (2sc, inc) x6 [24]
R5: (3sc, inc) x6 [30]
R6-R10: sc around (5 rounds) [30]
R11: (3sc, dec) x6 [24]
R12: (2sc, dec) x6 [18]
R13: (sc, dec) x6 [12]
R14: 6 dec [6] (Neck)
R15: 6 inc [12] (Widen for shoulders)
R16: (sc, inc) x6 [18]
Change to Olive Green yarn for the top.
R17-R19: sc around (3 rounds) [18]
R20: (sc, dec) x6 [12] (Waist)
R21: (sc, inc) x6 [18] (Hips/Shorts)
R22-R23: sc around (2 rounds) [18]
R24: sc 9. Leave remaining 9 stitches unworked for the second leg. FO, weave in tail.
Stuff head and body firmly as you go.
Legs (Make 2 – Attach to body at R24)
Attach Olive Green yarn to one of the 9 stitches left on R24 of the body.
R1: Ch 1, sc 9 around, working into the 9 stitches and adjusting to close any small gaps [9]
R2-R4: sc around (3 rounds) [9]
R5: Change to Dark Brown yarn. sc around [9]
R6-R7: sc around (2 rounds) [9]
R8: Change to Black yarn. (sc, dec) x3 [6]
R9: 3 dec [3]. FO, weave in tail.
Stuff legs firmly before closing.
Arms (Make 2 – Start with Skin Tone yarn)
R1: Start with MR, 6 sc [6]
R2-R5: sc around (4 rounds) [6]
R6: sc 3, change to Dark Brown yarn, sc 3 [6]
R7: sc around in Dark Brown [6]
R8-R10: Change back to Skin Tone yarn. sc around (3 rounds) [6]
FO, leaving a long tail for sewing. Stuff lightly.
Hair Cap (Dark Brown yarn)
R1: Start with MR, 6 sc [6]
R2: 6 inc [12]
R3: (sc, inc) x6 [18]
R4: (2sc, inc) x6 [24]
R5-R7: sc around (3 rounds) [24]
R8 (Bangs): Ch 3, sc into 2nd ch from hook, sc into next ch, sl st into next sc on cap. Repeat 3-4 times for bangs/fringe. FO.
Facial Features (Embroider)
Using Black yarn/floss, embroider small white ovals for eyes (if not using safety eyes), then black pupils within them, between R8 and R9 of the head, about 5 stitches apart.
Embroider eyebrows above the eyes, slightly angled.
Using Red yarn/floss, embroider a small line for the lips below the eyes.
Belt (Olive Green yarn)
Ch 18. sc in 2nd ch from hook and across [17]. FO.
Using White yarn/floss, embroider a small square in the middle for the buckle.
Cross-body Strap (Olive Green yarn)
Ch 20. sc in 2nd ch from hook and across [19]. FO.
Holsters (Make 2 – Dark Brown yarn)
Ch 3. sc in 2nd ch from hook and next [2].
R1-R2: Ch 1, turn, sc 2 [2]. FO.
Tool (Grey & Light Blue embroidery floss)
On one of the holsters, embroider a tiny pickaxe shape using Grey for the head and Light Blue for the handle.
Assembly
1. Securely sew the Hair Cap to the top of the head.
2. Sew the Arms to the sides of the body at shoulder level.
3. Sew the Legs to the bottom of the body, ensuring they are evenly spaced.
4. Wrap and sew the Belt around the waist of the doll.
5. Attach the Cross-body Strap from one shoulder down to the opposite hip, securing it under the arm.
6. Sew the Holsters to the hips, attaching them to the belt/shorts.
7. Finally, attach the keyring securely to the top of the doll’s head.