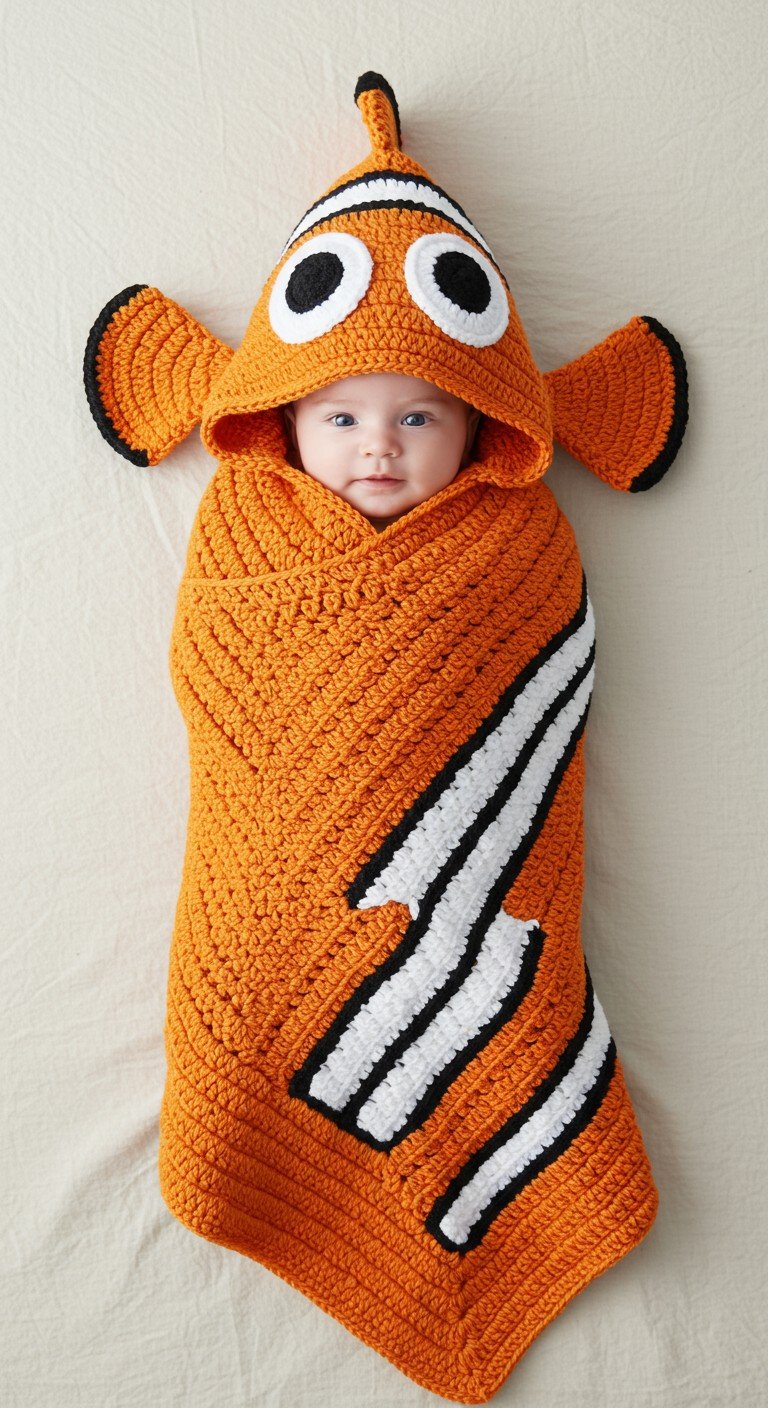
Get ready to make a splash with this absolutely adorable Crochet Clownfish Baby Swaddle Cocoon! Inspired by everyone’s favorite animated fish, this cozy blanket and hooded design will transform your little one into the cutest ocean dweller. Perfect for photo shoots, a unique baby shower gift, or just snuggly comfort, this pattern is a must-try for any crocheting parent or gift-giver.
Dive into Oceanic Dreams: Why This Clownfish Cocoon is a Must-Make!
Imagine the gasps of delight when your baby is wrapped up in this charming clownfish cocoon! Not only is it incredibly cute for memorable photos, but its soft, hand-crocheted warmth provides ultimate comfort and security for your newborn. It’s a unique, handmade item that stands out from store-bought blankets, offering a personal touch that new parents will truly cherish. Make one today and bring a little bit of ocean magic home!
Worsted weight yarn in Orange (approx. 400-500 yards)
Worsted weight yarn in White (approx. 100-150 yards)
Worsted weight yarn in Black (approx. 50-75 yards)
Crochet hook H/5.0mm
Yarn needle
Scissors
Stitch markers
Abbreviations
ch: chain
sl st: slip stitch
sc: single crochet
hdc: half double crochet
dc: double crochet
inc: increase (2 stitches in same stitch)
dec: decrease (crochet 2 stitches together)
fo: fasten off
st(s): stitch(es)
rnd: round
row: row
Instructions
Blanket (Main Cocoon Body)
Using Orange yarn and H/5.0mm hook, ch 80 (adjust for desired width).
Row 1: Hdc in 2nd ch from hook and in each ch across. (79 hdc)
Rows 2-80 (or until desired length, approx. 30-35 inches): Ch 1, turn. Hdc in each st across.
Fo, weave in ends.
This creates a simple rectangular blanket. The diagonal stripes will be added next.
White & Black Stripes (Make 3 sets)
For each stripe, we’ll create a white strip with black borders.
White Strip (Make 3):
Using White yarn, ch 6.
Row 1: Sc in 2nd ch from hook and in each ch across. (5 sc)
Rows 2-60 (or until desired length to span diagonally across blanket): Ch 1, turn. Sc in each st across.
Fo, leave a long tail for sewing.
Black Border (Make 6, 2 for each white strip):
Using Black yarn, ch 2.
Row 1: Sc in 2nd ch from hook. (1 sc)
Rows 2-60 (or same length as white strip): Ch 1, turn. Sc in the sc.
Fo, leave a long tail for sewing.
Assembly of Stripes:
Carefully position the three White strips diagonally across the Orange blanket, evenly spaced, as seen in the image.
Using the yarn needle, sew the White strips securely to the blanket.
Now, sew a Black border strip to each long edge of the White strips, creating a distinct white stripe with black outlines. Ensure they are neatly aligned. Weave in all ends.
Hood
Using Orange yarn and H/5.0mm hook.
Starting from the top of the head:
Rnd 1: Ch 2, 8 hdc in 2nd ch from hook. Join with sl st to first hdc. (8 hdc)
Rnd 2: Ch 1, 2 hdc in each st around. Join. (16 hdc)
Rnd 3: Ch 1, (hdc in next st, 2 hdc in next st) around. Join. (24 hdc)
Rnd 4: Ch 1, (hdc in next 2 sts, 2 hdc in next st) around. Join. (32 hdc)
Rnd 5: Ch 1, (hdc in next 3 sts, 2 hdc in next st) around. Join. (40 hdc)
Rnd 6: Ch 1, (hdc in next 4 sts, 2 hdc in next st) around. Join. (48 hdc)
Rnd 7-15 (or until desired depth for hood, ensuring it fits baby’s head): Ch 1, hdc in each st around. Join. (48 hdc)
For the opening of the hood: Flatten the circle and work across half the stitches.
Row 16: Ch 1, turn. Hdc in first 24 sts. (24 hdc)
Rows 17-25 (or until desired length for hood opening, creating the front flap): Ch 1, turn. Hdc in each st across.
Fo, leave a long tail for sewing.
Eyes (Make 2)
White Eye Base:
Using White yarn and H/5.0mm hook, make a magic ring.
Rnd 1: 6 sc in magic ring. Pull tight. Join with sl st to first sc. (6 sc)
Rnd 2: Ch 1, 2 sc in each st around. Join. (12 sc)
Rnd 3: Ch 1, (sc in next st, 2 sc in next st) around. Join. (18 sc)
Fo, leave a long tail for sewing.
Black Pupil:
Using Black yarn and H/5.0mm hook, make a magic ring.
Rnd 1: 6 sc in magic ring. Pull tight. Join with sl st to first sc. (6 sc)
Fo, leave a tail for sewing.
Eye Assembly: Sew each Black Pupil onto the center of each White Eye Base. Then, sew the completed eyes onto the top of the hood as pictured.
Top Fin
Ch 6.
Row 1: Sc in 2nd ch from hook and next 3 ch, hdc in last ch. (4 sc, 1 hdc)
Row 2: Ch 1, turn. Sc in first 4 sts, 2 sc in last st. (6 sc)
Row 3: Ch 1, turn. Sc in first 5 sts, 2 sc in last st. (7 sc)
Row 4: Ch 1, turn. Sc in first 6 sts, 2 sc in last st. (8 sc)
Fo. Join Black yarn to the base of the fin and sc evenly around the edges for a border. Fo, leave a long tail for sewing.
Sew the Top Fin to the very top center of the hood.
Side Fins (Make 2)
Ch 8.
Row 1: Sc in 2nd ch from hook and next 5 ch, hdc in last ch. (6 sc, 1 hdc)
Row 2: Ch 1, turn. Sc in first 6 sts, 2 sc in last st. (8 sc)
Row 3: Ch 1, turn. Sc in first 7 sts, 2 sc in last st. (9 sc)
Fo. Join Black yarn to the base of the fin and sc evenly around the edges for a border. Fo, leave a long tail for sewing.
Sew one Side Fin to each side of the hood, slightly behind the eyes, as shown in the image.
Tail Fin
Ch 10.
Row 1: Sc in 2nd ch from hook and next 7 ch, hdc in last ch. (8 sc, 1 hdc)
Row 2: Ch 1, turn. Sc in first 8 sts, 2 sc in last st. (10 sc)
Row 3: Ch 1, turn. Sc in first 9 sts, 2 sc in last st. (11 sc)
Row 4: Ch 1, turn. Sc in first 10 sts, 2 sc in last st. (12 sc)
Fo. Join Black yarn to the base of the fin and sc evenly around the edges for a border. Fo, leave a long tail for sewing.
Sew the Tail Fin to the back center of the hood, where the hood joins the blanket, or directly to the blanket if preferred for stability. The image shows it attached to the top/back of the hood.
Final Assembly
Sew the finished hood securely to one short edge of the main blanket body. Ensure all ends are woven in neatly. Your adorable Crochet Clownfish Baby Swaddle Cocoon is now complete!