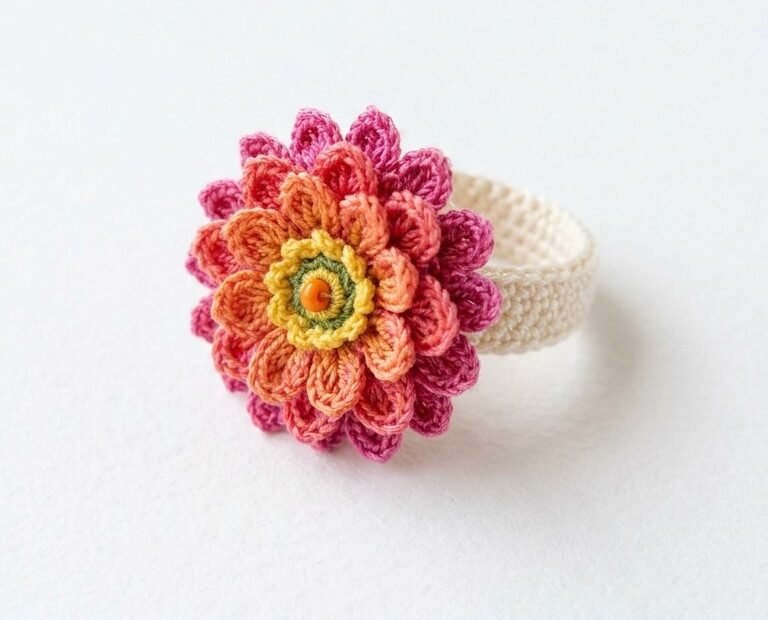
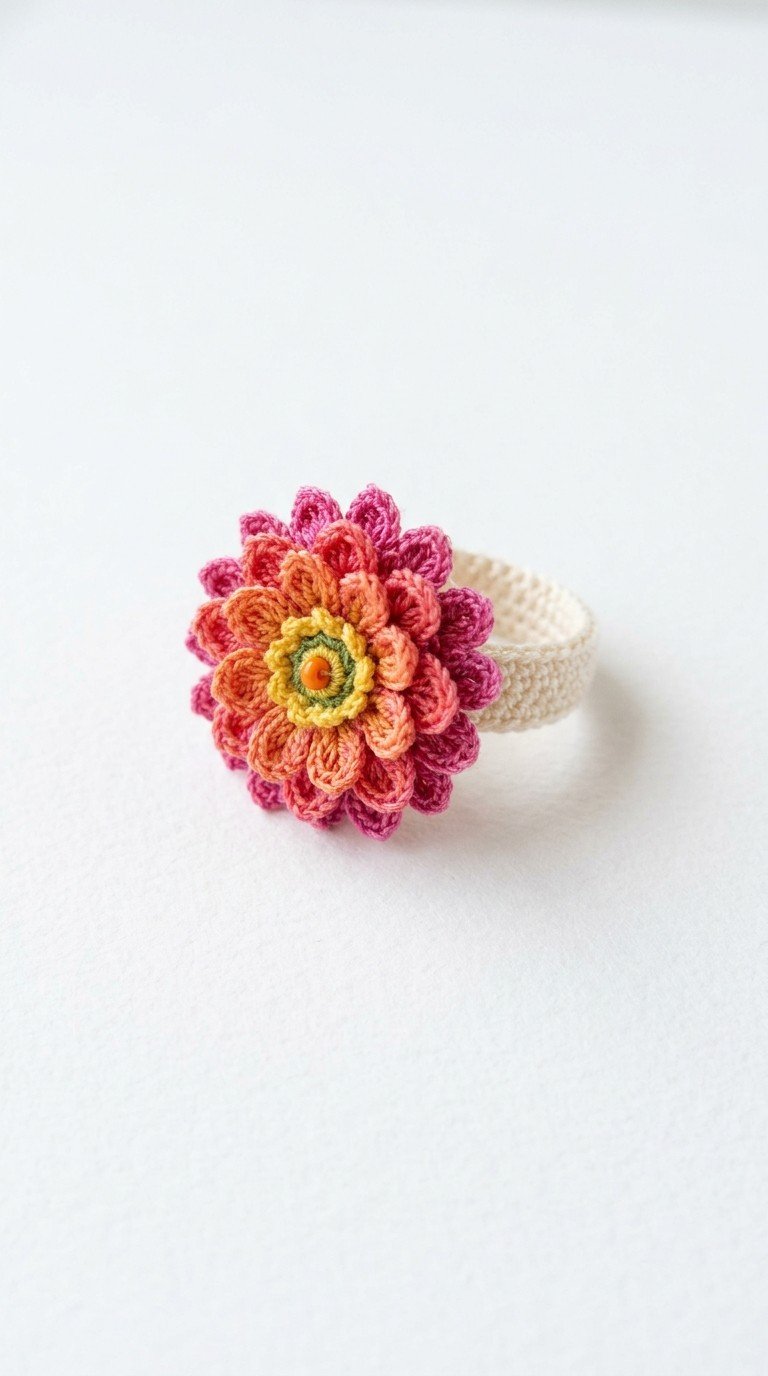
Embrace vibrant style with this exquisite Crochet Flower Ring! This detailed pattern guides you through creating a stunning, multi-layered floral accessory that’s perfect for adding a pop of color to any outfit. Handcrafted with love, this unique ring makes a beautiful personalized gift or a charming addition to your own jewelry collection. Get ready to bloom with your crochet hook!
Unleash Your Inner Florist with Handmade Crochet Jewelry
There’s something uniquely special about handmade jewelry, and this crochet flower ring is no exception. It allows you to express your creativity, choose your favorite color combinations, and craft a truly one-of-a-kind piece. Whether you’re making it for yourself or as a thoughtful gift, the intricate layers and vibrant hues of this floral ring are sure to bring joy and a touch of nature-inspired elegance.
Crochet Pattern: Crochet Flower Power Ring: A Vibrant DIY Floral Jewelry Pattern
Crochet Hook: 1.5mm – 2.0mm (or size suitable for your chosen yarn/thread)
Small Orange Bead (for flower center)
Tapestry Needle
Scissors
Abbreviations
ch: chain
sl st: slip stitch
sc: single crochet
hdc: half double crochet
dc: double crochet
tr: treble crochet
MR: Magic Ring
BLO: Back Loop Only
st(s): stitch(es)
rep: repeat
Instructions
Crochet Flower Ring Pattern
Ring Band (Ecru)
Row 1: Ch 30 (adjust chain count to fit your finger), sl st to the first ch to form a ring, being careful not to twist. (30 sts)
Round 1: Ch 1, sc in each ch around. Join with sl st to first sc. (30 sc)
Round 2-4: Ch 1, sc in each sc around. Join with sl st to first sc. (30 sc)
Fasten off, leaving a long tail for sewing.
Flower Layers
Work each layer separately, fastening off after each color. The petals are created by working into the back loops of previous base rounds.
Layer 1: Yellow-Green (Innermost Petals)
Round 1 (Base): Create a Magic Ring (MR). Ch 1, 8 sc in MR. Join with sl st to first sc. (8 sts)
Round 2 (Petals): *[Sl st into next sc, ch 2, 2 dc in same sc, ch 2, sl st in same sc]*. Repeat from * 8 times around. Join with sl st to first sl st.
Fasten off Yellow-Green yarn.
Layer 2: Light Yellow
Join Light Yellow yarn with a sl st into the Back Loop Only (BLO) of any sc from Round 1 of the Yellow-Green layer.
Round 3 (Base): Ch 1, sc in BLO of each sc from Yellow-Green Round 1. Join with sl st to first sc. (8 sts)
Round 4 (Petals): *[Sl st into next sc, ch 2, (dc, tr, dc) in same sc, ch 2, sl st in same sc]*. Repeat from * 8 times around. Join with sl st to first sl st.
Fasten off Light Yellow yarn.
Layer 3: Orange-Peach
Join Orange-Peach yarn with a sl st into the BLO of any sc from Light Yellow Round 3.
Round 5 (Base): Ch 1, sc in BLO of each sc from Light Yellow Round 3. Join with sl st to first sc. (8 sts)
Round 6 (Petals): *[Sl st into next sc, ch 2, (dc, 2 tr, dc) in same sc, ch 2, sl st in same sc]*. Repeat from * 8 times around. Join with sl st to first sl st.
Fasten off Orange-Peach yarn.
Layer 4: Coral
Join Coral yarn with a sl st into the BLO of any sc from Orange-Peach Round 5.
Round 7 (Base): Ch 1, sc in BLO of each sc from Orange-Peach Round 5. Join with sl st to first sc. (8 sts)
Round 8 (Petals): *[Sl st into next sc, ch 2, (2 dc, tr, 2 dc) in same sc, ch 2, sl st in same sc]*. Repeat from * 8 times around. Join with sl st to first sl st.
Fasten off Coral yarn.
Layer 5: Magenta (Outermost Petals)
Join Magenta yarn with a sl st into the BLO of any sc from Coral Round 7.
Round 9 (Base): Ch 1, sc in BLO of each sc from Coral Round 7. Join with sl st to first sc. (8 sts)
Round 10 (Petals): *[Sl st into next sc, ch 2, (3 dc, tr, 3 dc) in same sc, ch 2, sl st in same sc]*. Repeat from * 8 times around. Join with sl st to first sl st.
Fasten off Magenta yarn. Weave in all ends securely.
Assembly
Using a tapestry needle and a short piece of Ecru yarn, sew the small orange bead to the very center of your Yellow-Green petals.
Center the finished flower onto the Ecru ring band. Using the long tail from the Magenta layer (or a fresh piece of Magenta yarn), securely sew the back of the flower to the ring band. Ensure it is firmly attached and all threads are hidden.