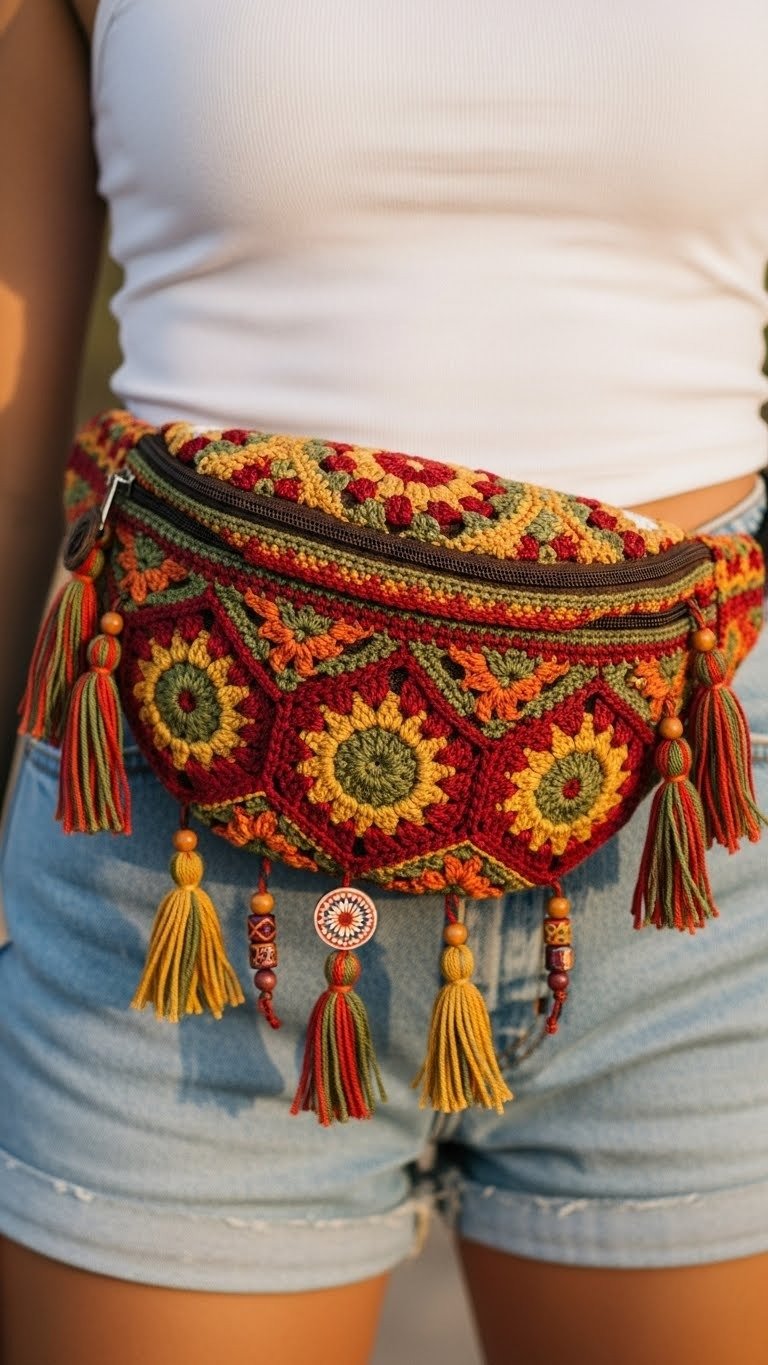
Unveil your unique style with our vibrant Crochet Granny Hexagon Fanny Pack Pattern! This bohemian-inspired waist bag, adorned with sunflower-like motifs and playful tassels, is the perfect accessory for festivals, travels, or everyday adventures. Crafted from a colorful array of hexagon granny squares, this pattern guides you through creating a statement piece that blends intricate design with practical functionality. Get ready to crochet your new favorite hands-free companion!
Craft Your Own Bohemian Statement Piece
Embrace the joy of handmade fashion and personalize your wardrobe with this charming fanny pack. Beyond its eye-catching aesthetic, this project allows you to express your creativity through color choices and embellishments, resulting in a truly one-of-a-kind accessory. Not only will you enjoy the therapeutic process of crocheting, but you’ll also create a durable and stylish bag that’s both a practical essential and a reflection of your unique artisan spirit.
Crochet Pattern: Vibrant Crochet Granny Hexagon Fanny Pack Pattern: Your Boho Festival Essential
Materials
Worsted weight yarn in: Mustard Yellow (Color A), Deep Olive Green (Color B), Burnt Orange (Color C), Dark Red/Burgundy (Color D), Dark Brown (Color E)
4.0mm (G/6) Crochet Hook
12-14 inch zipper in Dark Brown
Tapestry needle
Scissors
Wooden beads (various sizes)
Decorative button or charm (optional, for center bottom)
Abbreviations
MR – Magic Ring
ch – chain
sl st – slip stitch
sc – single crochet
hdc – half double crochet
dc – double crochet
st(s) – stitch(es)
sp – space
rep – repeat
FO – Fasten Off
Instructions
Gauge: Each completed hexagon motif should measure approximately 4.5-5 inches across from point to point.
Hexagon Motif (Make 12)
With Color A (Mustard Yellow)
Rnd 1: Start with a MR. Ch 2 (counts as 1st hdc), 11 hdc into the ring. Sl st to the top of the beg ch-2 to join. (12 hdc) FO.
With Color B (Deep Olive Green)
Rnd 2: Join Color B with a sl st in any hdc of Rnd 1. Ch 2 (counts as 1st dc), 2 dc in the same st. *Skip 1 hdc, 3 dc in the next hdc.* Rep from * 5 more times. Sl st to the top of the beg ch-2 to join. (6 x 3-dc clusters) FO.
With Color C (Burnt Orange)
Rnd 3: Join Color C with a sl st in any space between 3-dc clusters of Rnd 2. Ch 1, sc in the same space. *Ch 3, sc in the next space between 3-dc clusters.* Rep from * 5 more times. Ch 3, sl st to the first sc to join. (6 sc, 6 ch-3 loops) FO.
With Color D (Dark Red/Burgundy)
Rnd 4: Join Color D with a sl st in any ch-3 loop of Rnd 3. Ch 3 (counts as 1st dc), 2 dc in the same loop. This is your first half side. *(3 dc, ch 2, 3 dc) in the next ch-3 loop (this forms a corner). 3 dc in the next ch-3 loop.* Rep from * 4 more times. Work (3 dc, ch 2, 3 dc) in the last ch-3 loop. Sl st to the top of the beg ch-3 to join. (6 sides of 3-dc groups, 6 ch-2 corners) FO, leaving a long tail for weaving in.
Joining Motifs (with Color E – Dark Brown Yarn)
Lay out 6 motifs for the Front Panel: arrange them in a honeycomb pattern, 3 motifs wide and 2 motifs deep.
Lay out another 6 motifs for the Back Panel in the same arrangement.
Using Color E and a tapestry needle or by slip stitching/single crocheting, join the motifs together along corresponding stitches on the edges. Ensure all joins are secure and consistent. Leave the outer perimeter edges of each panel unjoined.
Constructing the Gusset (with Color D – Dark Red/Burgundy Yarn)
Measure the perimeter of one assembled panel (front or back), starting from one top corner, down the side, across the bottom, and up the other side to the other top corner. Subtract the length of the top opening (where the zipper will be).
Ch a number of stitches in Color D that matches this measured length (make sure it’s an even number if working in rounds later, or sufficient for a flat strip).
Work in sc stitches for approximately 3-4 inches (or desired depth of the bag), creating a rectangular strip. FO.
Bag Assembly
Align the Front Panel, Back Panel, and Gusset.
Using Color E, single crochet or whip stitch the gusset strip between the Front and Back Panels, starting and ending at the top corners, leaving the top edge open. This will form the main body of your fanny pack.
Secure all joins tightly and weave in any remaining ends.
Finishing and Embellishments
Zipper Installation: Carefully sew the dark brown zipper into the top opening of the bag. Use a sewing needle and strong thread for a secure attachment.
Strap: Attach a pre-made adjustable fanny pack strap to the sides of the bag, or crochet a simple strap using Color E (e.g., a long strip of sc stitches) and attach it with D-rings.
Tassels: Create multiple tassels using Colors A, B, and D. Make them varying lengths. Thread wooden beads onto the tassel strings. Attach these adorned tassels to the bottom points of the hexagonal motifs along the front and bottom of the bag, as shown in the image.
Decorative Charm: If desired, attach a small decorative button or charm with smaller tassels to the center bottom of the bag for an extra bohemian touch.