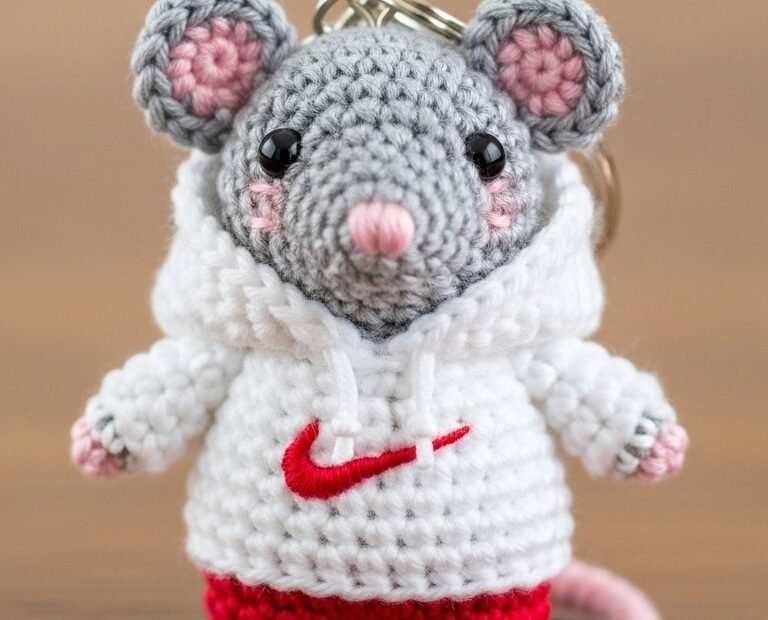
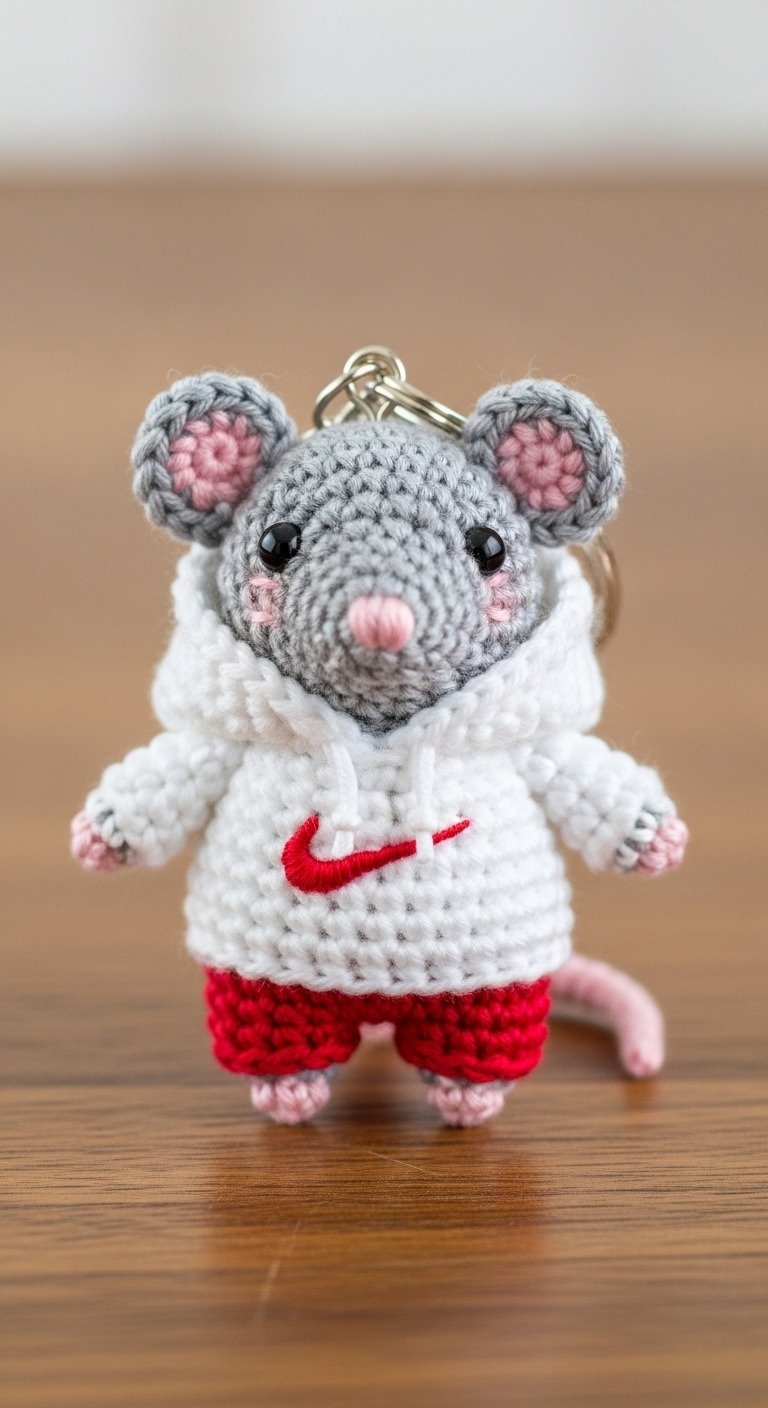
Get ready to create the cutest little athlete with this Sporty Amigurumi Mouse Keychain crochet pattern! Perfect for attaching to your keys, bag, or gifting to a sports enthusiast, this adorable mouse in its iconic hoodie and shorts will bring a smile to anyone’s face. It’s a fun and rewarding project for amigurumi lovers.
Craft Your Own Adorable Athletic Companion
There’s nothing quite like the satisfaction of creating a handmade gift or a unique accessory that truly stands out. This amigurumi mouse keychain lets you express your creativity, resulting in a charming and personalized item. It’s a fantastic way to add a touch of sporty cuteness to your everyday life or surprise a friend with a thoughtful, handcrafted present.
Crochet Pattern: Sporty Amigurumi Mouse Keychain: Run into Crochet Fun!
Materials
Sport weight or DK yarn in Light Gray (Mouse Body)
Sport weight or DK yarn in White (Hoodie)
Sport weight or DK yarn in Red (Shorts & Hoodie Logo)
Sport weight or DK yarn in Light Pink (Ears, Nose, Blush, Paws, Tail)
2.5mm or 3.0mm crochet hook (or hook size suitable for your yarn)
6mm black safety eyes
Polyester fiberfill for stuffing
Tapestry needle
Stitch markers
Keychain ring
Abbreviations
MR: Magic Ring
ch: Chain
sc: Single Crochet
inc: Increase (2 sc in one stitch)
dec: Decrease (sc two stitches together)
sl st: Slip Stitch
FO: Fasten Off
st(s): Stitch(es)
Rnd: Round
Instructions
Mouse Body (Light Gray)
Rnd 1: Start with MR, 6 sc. (6)
Rnd 2: Inc in each st around. (12)
Rnd 3: (Sc, inc) x 6. (18)
Rnd 4: (2 sc, inc) x 6. (24)
Rnd 5: (3 sc, inc) x 6. (30)
Rnd 6-10: Sc in each st around. (30)
Rnd 11: (3 sc, dec) x 6. (24)
Insert safety eyes between Rnd 8 and 9, about 6-7 stitches apart. Stuff firmly.
Rnd 12: (2 sc, dec) x 6. (18)
Rnd 13-16: Sc in each st around. (18)
Rnd 17: (Sc, dec) x 6. (12)
Continue stuffing as you go.
Rnd 18: Dec x 6. (6)
FO, weave in tail to close the hole.
Ears (Make 2)
Inner Ear (Light Pink):
Rnd 1: Start with MR, 6 sc. (6)
Rnd 2: Inc in each st around. (12)
FO.
Outer Ear (Light Gray):
Rnd 1: Start with MR, 6 sc. (6)
Rnd 2: Inc in each st around. (12)
Rnd 3: Sc in each st around. (12)
Do not FO. Place the pink inner ear piece on top of the gray outer ear piece. Sc through both layers around, joining them. FO, leaving a long tail for sewing.
Arms (Light Gray & Light Pink) (Make 2)
Rnd 1: Start with MR, 6 sc. (6)
Rnd 2-4: Sc in each st around. (6)
Change to Light Pink yarn.
Rnd 5: Sc in each st around. (6)
FO, leaving a long tail for sewing. Lightly stuff.
Legs (Light Gray & Light Pink) (Make 2)
Rnd 1: Start with MR, 6 sc. (6)
Rnd 2: Sc in each st around. (6)
Change to Light Pink yarn.
Rnd 3: Sc in each st around. (6)
FO, leaving a long tail for sewing. Lightly stuff.
Tail (Light Pink)
Ch 20. Sl st in 2nd ch from hook and in each ch across. FO, leaving a tail for sewing.
Hoodie (White, with Red details)
Body of Hoodie:
Rnd 1: Ch 22, sl st to first ch to form a ring. Be careful not to twist. (22)
Rnd 2-6: Sc in each st around. (22)
Rnd 7: Ch 1, turn. Sc 8, ch 6 (skip 4 sts for armhole), sc 6, ch 6 (skip 4 sts for armhole). Join to first sc with sl st. (20 sc, 12 ch)
Rnd 8: Sc in each sc and each ch around. (32)
Rnd 9-10: Sc in each st around. (32) FO.
Hood:
With White yarn, attach yarn to the back of the hoodie opening (where the back body panel starts).
Row 1: Sc 16 (across the back and front opening). Ch 1, turn. (16)
Row 2-8: Sc in each st across. Ch 1, turn. (16)
Fold the hood in half and sl st or sc the top seam closed. FO, weave in ends.
Sleeves (Make 2):
Attach White yarn to an armhole. Sc 10 around the armhole opening. (10)
Rnd 2-4: Sc in each st around. (10)
FO, weave in ends.
Embroider Swoosh: Using Red yarn, embroider the desired logo onto the front of the hoodie.
Shorts (Red)
Leg 1 (Make 1):
Rnd 1: Start with MR, 8 sc. (8)
Rnd 2-3: Sc in each st around. (8)
FO.
Leg 2 (Make 1):
Rnd 1: Start with MR, 8 sc. (8)
Rnd 2-3: Sc in each st around. (8)
Do not FO.
Join Legs and Form Waistband:
Rnd 4: Ch 2, then sc into the last stitch of Leg 1. Sc in the next 7 stitches of Leg 1. Sc in the 2 chs. Sc in 8 stitches of Leg 2. Sc in the 2 chs. (20)
Rnd 5-6: Sc in each st around. (20)
FO, leaving a long tail for sewing.
Assembly
Embroider a small pink oval for the nose on the mouse’s face, below the eyes.
Embroider two small horizontal lines with pink yarn on the cheeks for blush.
Sew the ears to the top of the head.
Sew the arms to the sides of the body, just below the neck.
Sew the legs to the bottom of the body.
Sew the tail to the back of the body.
Dress the mouse in its hoodie and shorts. You can secure them with a few stitches if desired.
Attach a keychain ring to the top of the mouse’s head.