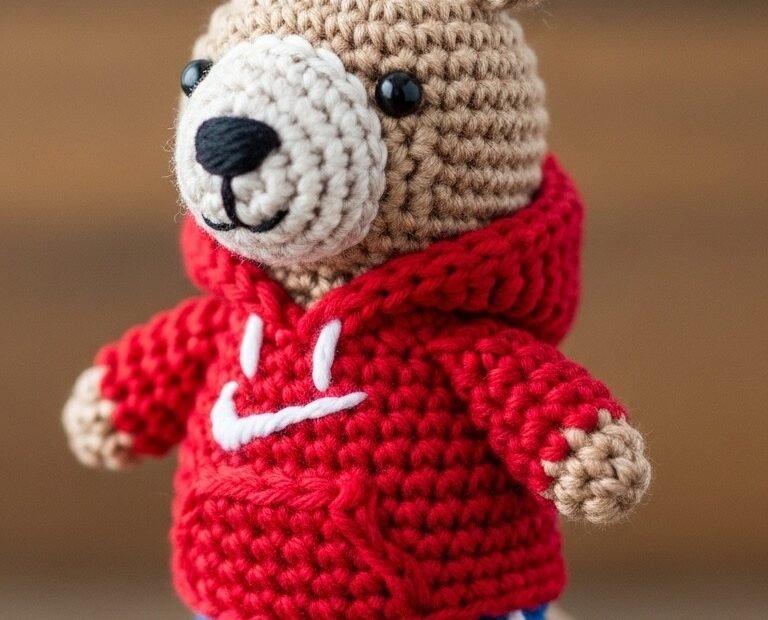
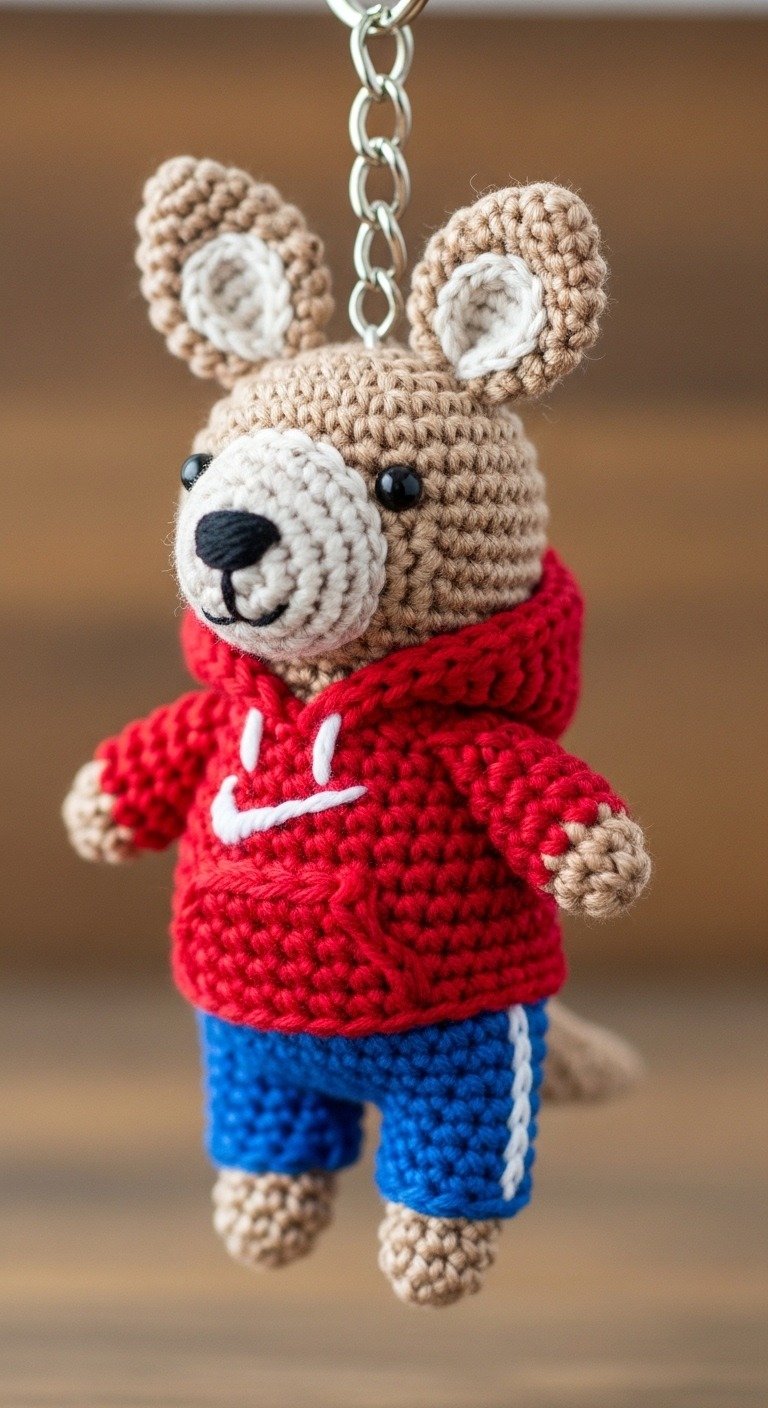
Get ready to crochet the cutest and most active little companion for your keys or bag! This Sporty Bear Amigurumi Keychain pattern brings a burst of fun and personality to your everyday items. Dressed in a cool hoodie and shorts, this adorable bear is a delightful project for amigurumi enthusiasts of all levels. It’s quick to make and perfect for gifting or adding a unique handmade touch to your accessories.
Unleash Your Creativity: The Perfect Customizable Amigurumi Gift
This Sporty Bear isn’t just a pattern; it’s a canvas for your imagination! Easily customize the colors of the hoodie and shorts to match your favorite sports team, school colors, or personal style. It makes a fantastic, thoughtful gift for sports fans, students, or anyone who appreciates a unique, handmade accessory. Create a personalized charm that truly stands out!
Crochet Pattern: Crochet Your Own Sporty Bear Amigurumi Keychain: Free Pattern!
Materials
DK or Light Worsted Weight Yarn in: Tan (for bear body), Cream (for muzzle/inner ears), Red (for hoodie), Royal Blue (for shorts), White (for hoodie logo/shorts stripe), Black (for nose embroidery).
2.5mm or 2.75mm Crochet Hook (or size to get tight stitches)
6mm Black Safety Eyes
Fiberfill Stuffing
Yarn Needle
Stitch Markers
Metal Keychain Ring
Abbreviations
MR: Magic Ring
ch: Chain
sc: Single Crochet
inc: Increase (2 sc in one stitch)
dec: Decrease (sc 2 stitches together)
sl st: Slip Stitch
FO: Fasten Off
Rnd: Round
st(s): Stitch(es)
Instructions
Head and Body (Tan Yarn)
Rnd 1: 6 sc in MR (6)
Rnd 2: 6 inc (12)
Rnd 3: (sc, inc) x6 (18)
Rnd 4: (2 sc, inc) x6 (24)
Rnd 5: (3 sc, inc) x6 (30)
Rnd 6-10: Sc in each st around (30)
Insert safety eyes between Rnd 7 and 8, approximately 5-6 stitches apart. Embroider the nose and mouth with black yarn later.
Rnd 11: (3 sc, dec) x6 (24)
Rnd 12: (2 sc, dec) x6 (18)
Rnd 13: (sc, dec) x6 (12)
Rnd 14: Sc in each st around (12)
Start stuffing firmly. Continue stuffing as you go.
Rnd 15: (sc, inc) x6 (18)
Rnd 16: (2 sc, inc) x6 (24)
Rnd 17-21: Sc in each st around (24)
Rnd 22: (2 sc, dec) x6 (18)
Rnd 23: (sc, dec) x6 (12)
Rnd 24: 6 dec (6)
FO, weave in remaining hole.
Ears (Make 2)
Inner Ear (Cream Yarn)
Rnd 1: 4 sc in MR (4)
Rnd 2: (sc, inc) x2 (6)
FO.
Outer Ear (Tan Yarn)
Rnd 1: 6 sc in MR (6)
Rnd 2: (sc, inc) x3 (9)
Rnd 3: (2 sc, inc) x3 (12)
Rnd 4: Sc in each st around (12)
Do not FO. Place the cream inner ear inside the tan outer ear. Sc through both layers around the opening to join them. Sl st, FO, leaving a long tail for sewing.
Muzzle (Cream Yarn)
Ch 3.
Rnd 1: Sc in 2nd ch from hook, 3 sc in last ch, working on other side of ch: sc, inc (7)
Rnd 2: Inc, sc, (inc) x3, sc, (inc) x2 (13)
Rnd 3: Sc in each st around (13)
Sl st, FO, leaving a long tail for sewing. Stuff lightly before sewing. Embroider nose and mouth with black yarn onto the muzzle.
Arms (Make 2 – Tan Yarn)
Rnd 1: 6 sc in MR (6)
Rnd 2-6: Sc in each st around (6)
FO, leaving a long tail for sewing. Do not stuff. Flatten the arm before sewing to the body.
Legs (Make 2 – Tan Yarn)
Rnd 1: 6 sc in MR (6)
Rnd 2: (sc, inc) x3 (9)
Rnd 3-7: Sc in each st around (9)
FO, leaving a long tail for sewing. Stuff lightly.
Hoodie (Red Yarn)
Hoodie Body:
Ch 20. Join with sl st to first ch to form a ring. (20)
Rnd 1-5: Ch 1, sc in each st around. Join with sl st. (20)
Rnd 6: Ch 1, sc in 3 sts, ch 4 (skip 2 sts), sc in 8 sts, ch 4 (skip 2 sts), sc in 3 sts. Join with sl st. (14 sc, 8 ch for armholes)
Rnd 7-8: Ch 1, sc in each sc and ch around (22 sts). Join with sl st. (22)
FO.
Sleeves (Make 2 – Red Yarn):
Attach red yarn to one armhole (created in Rnd 6 of the Hoodie Body).
Rnd 1: Ch 1, 8 sc evenly around the armhole (working into the chain space and skipped stitches). Join with sl st. (8)
Rnd 2-5: Ch 1, sc in each st around. Join with sl st. (8)
FO. Repeat for the second sleeve.
Hood (Red Yarn):
Ch 12.
Row 1: Sc in 2nd ch from hook, sc in next 10 ch. (11)
Row 2-5: Ch 1, turn, sc in each st across. (11)
Fold the piece in half and sc the top edge together to form the hood shape. Leave the bottom open. Sl st, FO, leaving a long tail for sewing.
Shorts (Royal Blue Yarn)
Ch 20. Join with sl st to first ch to form a ring. (20)
Rnd 1-3: Ch 1, sc in each st around. Join with sl st. (20)
First Leg:
Rnd 4: Ch 1, sc in first 10 sts. Join with sl st to first sc. (10)
Rnd 5-6: Ch 1, sc in each st around. Join with sl st. (10)
FO.
Second Leg:
Rejoin Royal Blue yarn to the remaining 10 sts of Rnd 3.
Rnd 4: Ch 1, sc in 10 sts. Join with sl st to first sc. (10)
Rnd 5-6: Ch 1, sc in each st around. Join with sl st. (10)
FO.
Assembly
Sew the ears to the top of the head.
Sew the muzzle to the face, centered below the eyes.
Embroider the nose and mouth with black yarn onto the muzzle if not already done.
Sew the arms to the sides of the body, just below the neck.
Sew the legs to the bottom of the body.
Sew the hood onto the top edge of the hoodie body.