
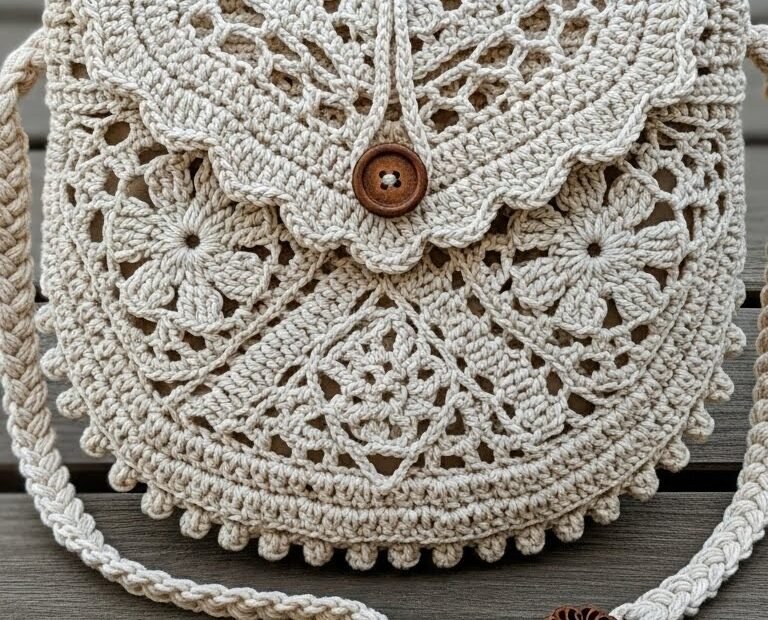
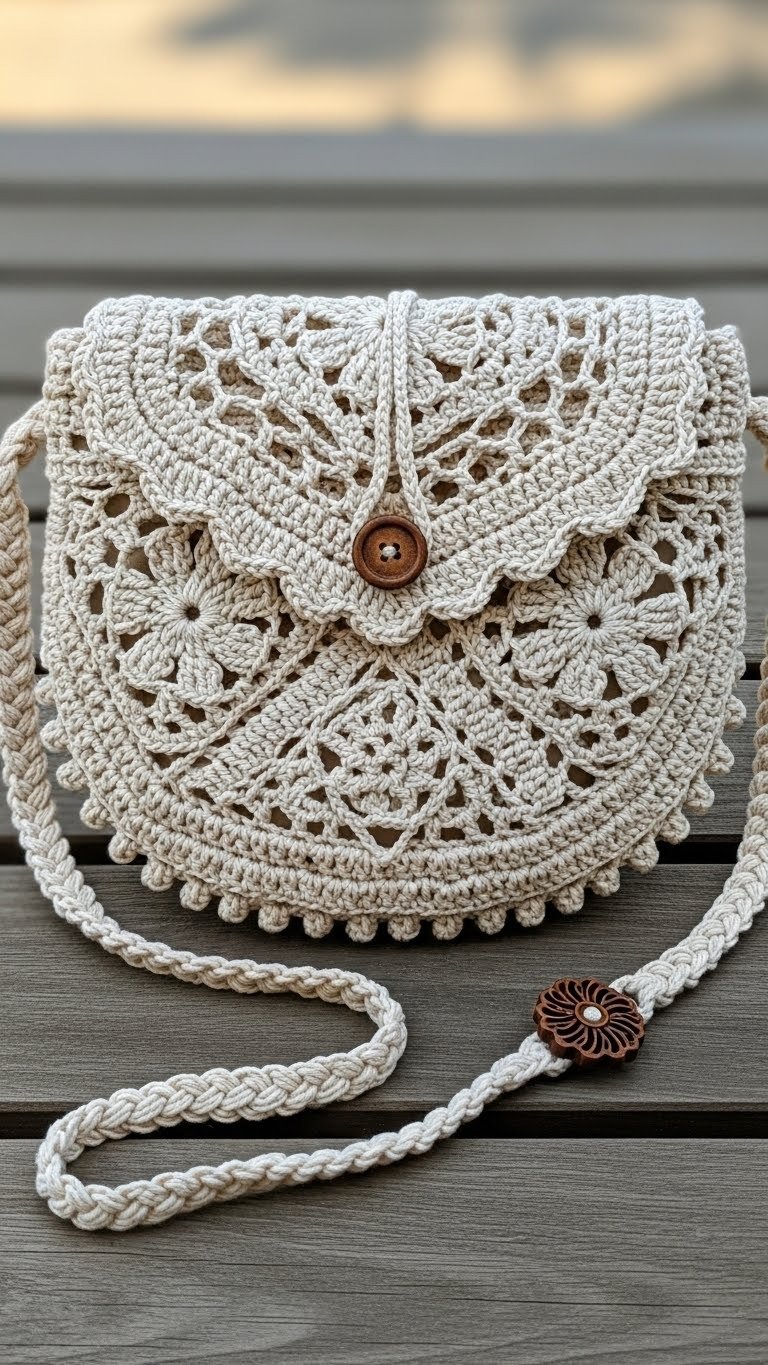
Craft your own stunning accessory with this elegant lace crochet crossbody bag pattern! Perfect for adding a touch of bohemian charm to any outfit, this bag features intricate openwork and a beautiful scalloped flap. It’s a delightful project for intermediate crocheters looking to create a unique and stylish handmade piece that truly stands out.
Embrace Bohemian Elegance with a Handmade Touch
There’s something uniquely satisfying about carrying a bag you’ve created yourself. This lace crossbody bag isn’t just an accessory; it’s a statement of style and craftsmanship. Its timeless design and delicate details make it perfect for summer strolls, market trips, or adding a feminine touch to your everyday look. Get ready to turn heads with your beautiful creation!
Crochet Pattern: Elegant Lace Crochet Crossbody Bag Pattern: Your Next Boho Chic Accessory
Materials
- 200g (approx 400-500 yards) Sport or DK weight Cotton Yarn in Natural/Ecru
- 3.0mm (D/3) Crochet Hook
- Yarn needle
- Scissors
- 1 large (approx 1 inch) wooden button for closure
- 1 small decorative wooden bead (optional, for strap)
Abbreviations
- ch – chain
- sl st – slip stitch
- sc – single crochet
- dc – double crochet
- tr – treble crochet
- hdc – half double crochet
- st(s) – stitch(es)
- sp – space
- rep – repeat
- rnd – round
- RS – right side
- WS – wrong side
- sk – skip
- ch-sp – chain space
- fptc – front post treble crochet
- bptc – back post treble crochet
- bobble – [yo, insert hook, pull up a loop, yo, pull through 2 loops] 4 times in the same st, yo, pull through all 5 loops on hook
Instructions
This pattern is constructed in several parts: a solid back panel, a lace front panel, a connecting gusset, a lace flap, a braided strap, and final assembly.
Gauge:
Not critical for this project, but aiming for a firm fabric that holds its shape. A 4″x4″ swatch in DC should be approximately 20 sts x 10 rows with a 3.0mm hook.
Back Panel (Solid Semi-Circle):
- Row 1: Ch 3 (counts as 1 dc), dc 10 into 3rd ch from hook. Ch 3, turn. (11 dc)
- Row 2: 2 dc in first st, dc in next 9 sts, 2 dc in last st. Ch 3, turn. (13 dc)
- Row 3: 2 dc in first st, dc in next 11 sts, 2 dc in last st. Ch 3, turn. (15 dc)
- Continue in this manner: Work 1 dc in each st across, increasing by 2 dc (2 dc in first and last st) in alternating rows. Work until the panel measures approximately 8 inches (20 cm) in width at the widest point and 4 inches (10 cm) in height at the center. Finish with a WS row. Do not fasten off.
- Edging: Ch 1, turn. Work sc evenly around the straight edge and the curved edge, placing 2 sc in each corner st to keep it flat. Sl st to first sc. Fasten off.
Front Panel (Lace Semi-Circle):
This panel starts as a flat circle, then one side is left unworked to create the semi-circle. The lace pattern aims to mimic the intricate design in the image.
- Rnd 1: Start with a Magic Ring. Ch 3 (counts as 1 dc), 11 dc into the ring. Sl st to top of beg ch 3. (12 dc)
- Rnd 2: Ch 3, dc in same st, (2 dc in next st) around. Sl st to top of beg ch 3. (24 dc)
- Rnd 3: Ch 4 (counts as 1 dc + ch 1), dc in same st (V-st made). *Sk 1 st, (dc, ch 1, dc) in next st*. Rep from * around. Sl st to 3rd ch of beg ch 4. (12 V-sts)
- Rnd 4: Sl st into first ch-1 sp. Ch 3, 2 dc in same ch-1 sp (first shell). *Ch 1, 3 dc in next ch-1 sp*. Rep from * around, ending with ch 1. Sl st to top of beg ch 3. (12 shells)
- Rnd 5: Sl st to first ch-1 sp. Ch 1, sc in same ch-1 sp. *Ch 5, sc in next ch-1 sp*. Rep from * around, ending with ch 5. Sl st to first sc. (12 ch-5 loops)
- Rnd 6: Sl st into first ch-5 loop. Ch 3, (2 dc, ch 3, 3 dc) in same loop (shell with picot). *Ch 1, (3 dc, ch 3, 3 dc) in next ch-5 loop*. Rep from * around, ending with ch 1. Sl st to top of beg ch 3.
- Rnd 7: (This round shapes the semi-circle) Work the lace pattern for half the circle, then turn. For example, work in pattern for 6 ch-sp/shells, then ch 3, turn.
- Subsequent Rows (for semi-circle shaping): Continue working lace pattern rows, increasing at the ends of the rows (e.g., adding extra chain spaces or partial shells) to maintain the semi-circular shape and width similar to the back panel. Work until it matches the back panel size. The goal is to create a visually appealing openwork.
- Edging: Ch 1, turn. Work sc evenly around the straight edge and the curved edge, placing 2 sc in each corner st. Sl st to first sc. Fasten off.
Side Gusset:
- Row 1: Ch 6. Sc in 2nd ch from hook and in each ch across. Ch 1, turn. (5 sc)
- Row 2: Sc in each sc across. Ch 1, turn. (5 sc)
- Repeat Row 2: Continue working rows of sc until the strip is long enough to go around the curved edges of both the front and back panels, starting from one top corner, down around the bottom, and up to the other top corner. Measure by pinning it. Leave a tail for sewing. Fasten off.
Flap (Lace Semi-Circle):
This is worked similarly to the Front Panel, but it will be attached at the top.
- Row 1: Ch 30. Sc in 2nd ch from hook and in each ch across. Ch 1, turn. (29 sc)
- Row 2: Sc in each st across. Ch 1, turn. (29 sc)
- Row 3: (Start lace pattern) Ch 3, dc in same st. *Sk 2 sts, (2 dc, ch 1, 2 dc) in next st (V-shell)*. Rep from * across, ending with dc in last st. Ch 3, turn.
- Row 4: Work (2 dc, ch 1, 2 dc) in each ch-1 sp of V-shell from previous row, separated by ch 1. Continue shaping into a semi-circle by decreasing or increasing as needed at the edges to create a rounded flap.
- Continue in Pattern: Work a few more rows, incorporating shells, V-stitches, and chain spaces to achieve a lace pattern similar to the front panel, shaping it into a semi-circle that will fit over the front of the bag. The final row should be an attractive scalloped edge.
- Scalloped Edge (Example): Work (sc, hdc, dc, tr, dc, hdc, sc) into specific stitches or chain spaces along the curved edge, skipping stitches in between to create the scallop effect.
- Button Loop: Create a small chain loop (ch 10-15 depending on button size) on the underside of the flap, centered, to go around the wooden button. Sl st to secure.
- Fasten off.
Braided Strap:
- Make 3 separate cords: Ch 400 (or desired length for crossbody strap). Sc in 2nd ch from hook and in each ch across. Fasten off, leaving a long tail. Repeat to make 2 more identical cords.
- Braid the three cords together. Secure the ends by tying knots or stitching them together with a yarn needle.
Assembly:
- Attach Gusset: With RS facing, use your yarn needle and whip stitch or sl st to attach the side gusset to the curved edges of the Front Panel, starting and ending at the top corners. Repeat for the Back Panel, ensuring the gusset connects both seamlessly.
- Attach Flap: Position the flap centered at the top back edge of the bag. Using your yarn needle, sew the straight edge of the flap securely to the top edge of the back panel.
- Bottom Edging (Bobbles): Join yarn to the bottom center of the bag (where the gusset meets the front/back). Ch 1, sc in same st. *Sk 1 st, bobble in next st, sk 1 st, sc in next st*. Rep from * around the bottom curved edge of the bag. Sl st to first sc. Fasten off.
- Attach Button: Sew the large wooden button securely to the center of the Front Panel, just below where the flap will close. Test the button loop for fit.
- Attach Strap: Attach each end of the braided strap to the top corners of the bag where the flap meets the gusset/back panel. Secure firmly with a yarn needle.
- Decorative Bead (Optional): Thread the small decorative wooden bead onto one side of the strap, if desired, and secure it by tying a knot or stitching.
- Weave in all remaining ends.