Get ready to craft the most charming accessory with our detailed Crochet Owl Bag Pattern! This project combines the beloved art of amigurumi with practical functionality, resulting in an adorable owl-shaped pouch perfect for carrying essentials. Whether for yourself or as a thoughtful gift, this little hoot will steal hearts and add a whimsical touch to any outfit.
Why This Adorable Owl Pouch Will Be Your Next Favorite Project
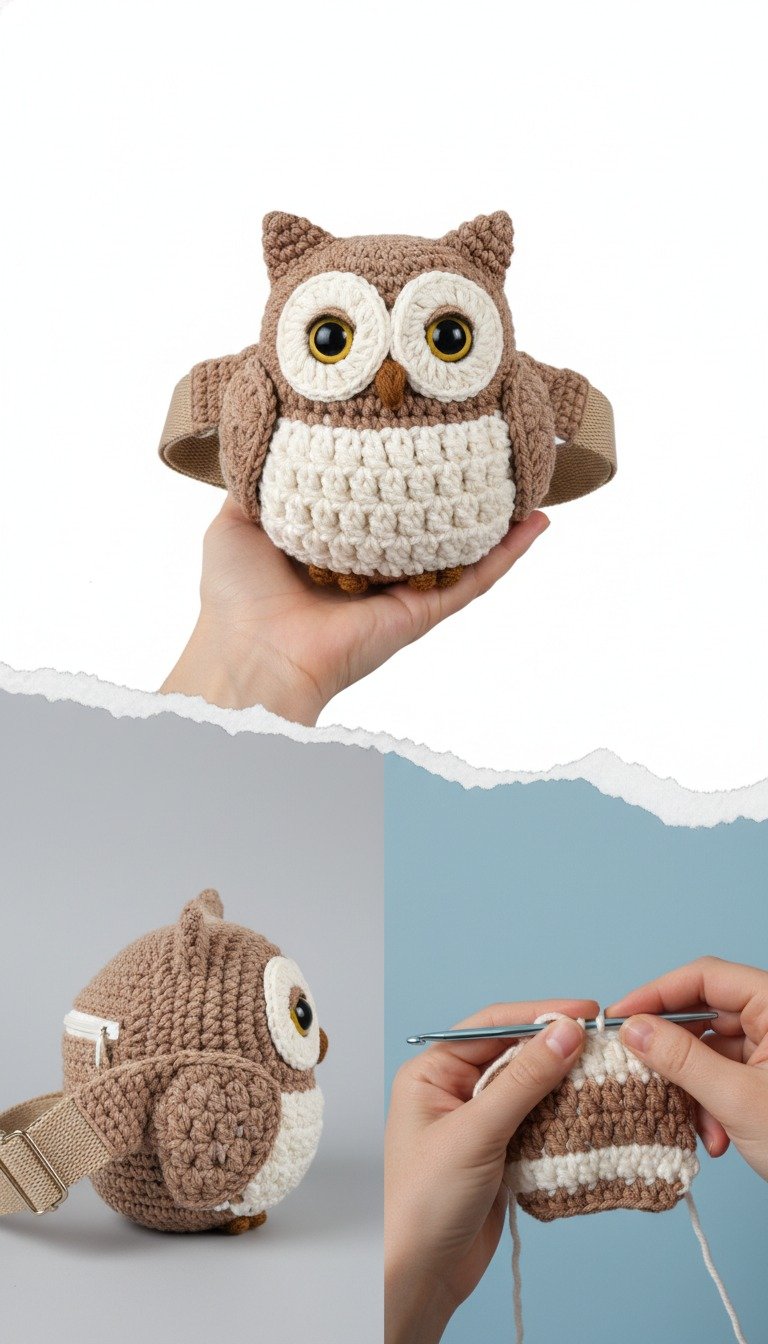
This isn’t just a bag; it’s a statement piece that showcases your crochet skills and love for all things cute! The Crochet Owl Bag is perfectly sized for small necessities like keys, a phone, or lip balm, making it ideal for quick errands or as a unique purse for children. Its charming design and durable construction ensure it will be a beloved companion for years to come.
Crochet Pattern: Hoot-iful Crochet Owl Bag Pattern: Craft Your Adorable Amigurumi Pouch!
Materials
Worsted weight yarn in Taupe (Main Color), Cream (Contrast Color 1), Burnt Orange (Contrast Color 2)
3.5mm (E) crochet hook
Two 20mm safety eyes (yellow iris, black pupil)
7-inch zipper (matching Taupe)
1-inch wide fabric strap (matching Taupe)
Polyester fiberfill
Yarn needle
Stitch markers
Scissors
Abbreviations
MR: Magic Ring
sc: single crochet
inc: increase (2 sc in one stitch)
dec: decrease (sc2tog)
st(s): stitch(es)
ch: chain
sl st: slip stitch
MC: Main Color (Taupe)
CC1: Contrast Color 1 (Cream)
CC2: Contrast Color 2 (Burnt Orange)
FO: Finish off
Instructions
This pattern is worked in continuous rounds unless otherwise specified. Use a stitch marker to mark the first stitch of each round.
Body (Start with MC: Taupe)
Rnd 1: 6 sc in MR (6)
Rnd 2: Inc in each st around (12)
Rnd 3: [Sc 1, inc] around (18)
Rnd 4: [Sc 2, inc] around (24)
Rnd 5: [Sc 3, inc] around (30)
Rnd 6: [Sc 4, inc] around (36)
Rnd 7: [Sc 5, inc] around (42)
Rnd 8: [Sc 6, inc] around (48)
Rnd 9: [Sc 7, inc] around (54)
Rnd 10: [Sc 8, inc] around (60)
Rnd 11-14: Sc in each st around (60)
Change to CC1 (Cream)
Rnd 15-20: Sc in each st around (60)
Change to MC (Taupe)
Rnd 21-26: Sc in each st around (60)
Zipper Opening Section (working in rows):
Row 1: Sc 30. Ch 1, turn. (30 sts now form one side of the opening)
Row 2-5: Sc in each st across. Ch 1, turn. (30)
At the end of Row 5, FO. Join MC to the other side of the opening (the 30 unworked sts of Rnd 26).
Row 1 (second side): Sc 30. Ch 1, turn. (30)
Row 2-5: Sc in each st across. Ch 1, turn. (30)
At the end of Row 5, do not FO. We will now rejoin in rounds. Ch 2, then join with a sc to the first stitch of the first side’s Row 5. You are essentially creating a bridge.
Rnd 27: Sc in each of the 30 sts of the first side, 2 sc into the side of the 5 rows (for the ch-2 gap), sc in each of the 30 sts of the second side, 2 sc into the side of the 5 rows (for the ch-2 gap). (64) – Adjust stitch count to ensure a smooth transition. The goal is to enclose the zipper opening. A simpler method is to just skip stitches for the opening and sew the zipper in later. Let’s simplify this.
Simplified Zipper Opening Approach:
Rnd 27: Sc 28, ch 15 (this will be the opening), skip 15 sts, sc in the remaining 17 sts. (45 sc + 15 ch = 60 total sts for shaping)
Rnd 28: Sc in first 28 sc, sc in each of the 15 ch sts, sc in remaining 17 sc. (60) – This creates a simple opening for the zipper.
Rnd 29: [Sc 8, dec] around (54)
Rnd 30: [Sc 7, dec] around (48)
Rnd 31: [Sc 6, dec] around (42)
Rnd 32: [Sc 5, dec] around (36)
Rnd 33: [Sc 4, dec] around (30)
Rnd 34: [Sc 3, dec] around (24)
Rnd 35: [Sc 2, dec] around (18)
Rnd 36: [Sc 1, dec] around (12)
Stuff the body firmly with fiberfill.
Rnd 37: Dec around (6)
FO, weave in tail to close the hole.
Ears (Make 2 with MC: Taupe)
Rnd 1: 4 sc in MR (4)
Rnd 2: [Sc 1, inc] around (6)
Rnd 3: [Sc 2, inc] around (8)
Rnd 4: [Sc 3, inc] around (10)
FO, leaving a long tail for sewing.
Wings (Make 2 with MC: Taupe)
Ch 6.
Rnd 1: Sc in 2nd ch from hook, sc in next 3 ch, 3 sc in last ch. Continue on other side of chain: sc in next 3 ch, 2 sc in last ch. (12)
Rnd 2: Inc, sc 3, inc 3, sc 3, inc 2 (18)
Rnd 3: Sc in each st around (18)
FO, leaving a long tail for sewing. Flatten and slightly stuff if desired.
Eye Patches (Make 2 with CC1: Cream)
Rnd 1: 6 sc in MR (6)
Rnd 2: Inc in each st around (12)
Rnd 3: [Sc 1, inc] around (18)
Rnd 4: [Sc 2, inc] around (24)
FO, leaving a long tail for sewing.
Beak (with CC2: Burnt Orange)
Ch 3.
Rnd 1: Sc in 2nd ch from hook, sc in last ch. (2)
Rnd 2: Ch 1, turn. Sc 2. (2)
Rnd 3: Ch 1, turn. Dec. (1)
FO, leaving a tail for sewing.
Feet (Make 2 with CC2: Burnt Orange)
Rnd 1: 4 sc in MR (4)
Sl st to first sc to join. FO, leaving a long tail for sewing. These are small bumps.
Assembly
Attach Safety Eyes: Insert the 20mm safety eyes into the center of the Cream eye patches.
Attach Eye Patches: Sew the eye patches onto the face of the owl, symmetrically placed below the zipper opening.
Attach Beak: Sew the Burnt Orange beak centered between and slightly below the eyes.
Attach Ears: Sew the Taupe ears to the top of the owl’s head, slightly to the sides of the midline.
Attach Wings: Sew the Taupe wings to the sides of the owl’s body, just below the color change to the belly section.
Attach Feet: Sew the tiny Burnt Orange feet to the very bottom center of the owl.
Insert Zipper: Pin and hand-sew the 7-inch zipper into the opening created in Rnd 27.
Attach Strap: Securely sew the fabric strap loops to the sides of the owl, typically just above where the wings are attached. Ensure they are aligned.