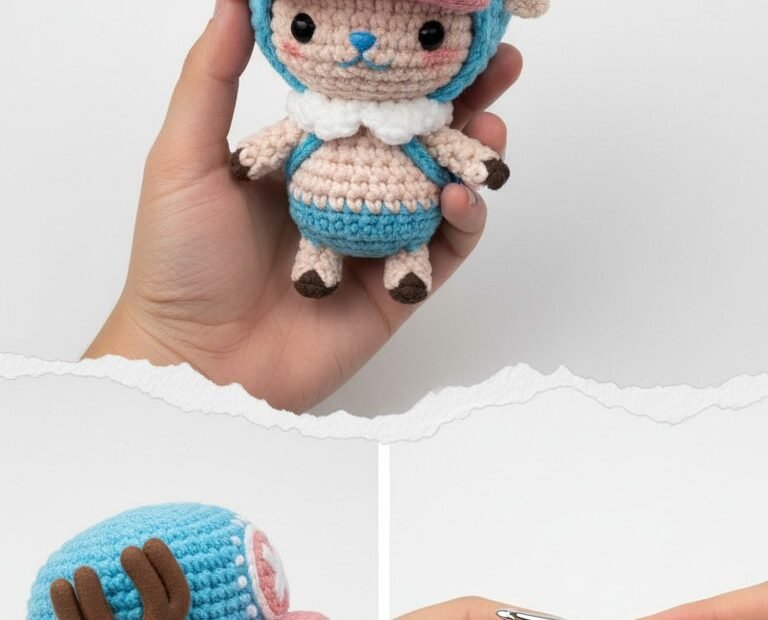
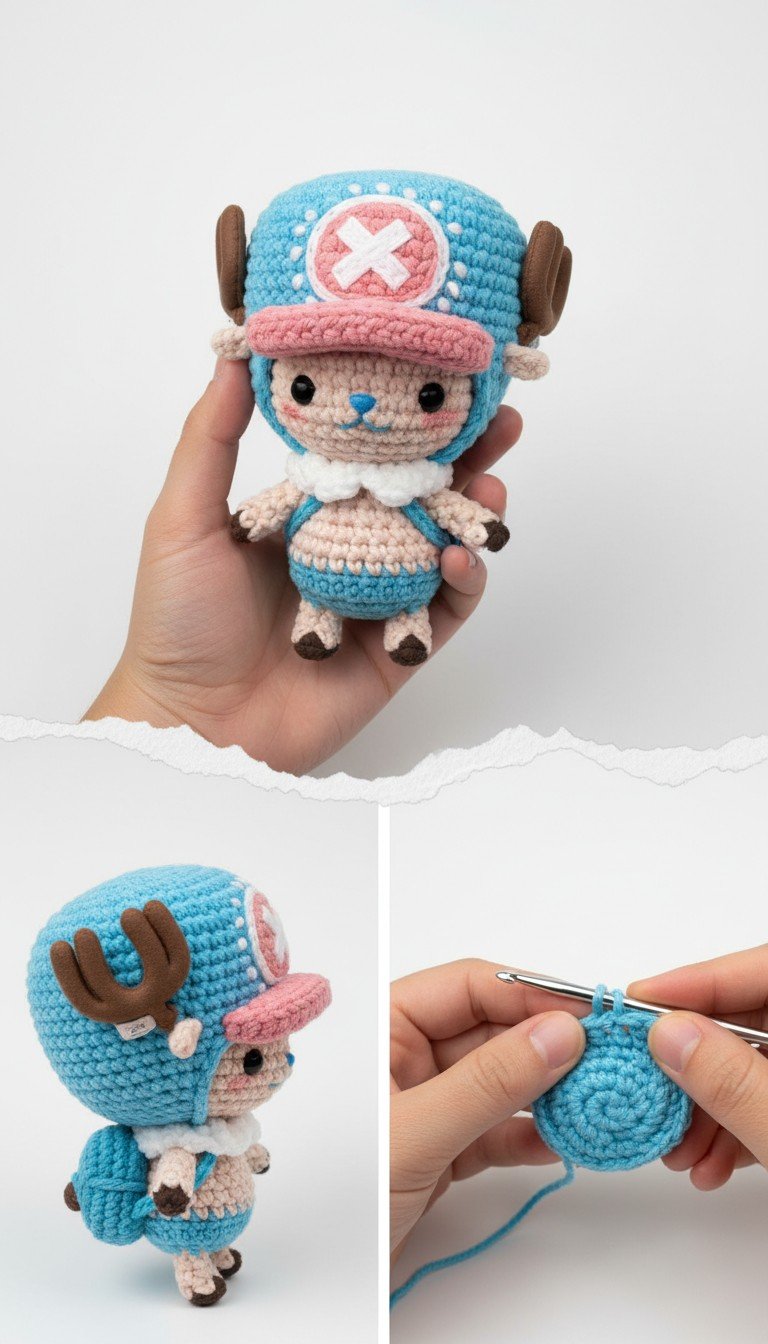
Embark on an exciting crochet adventure to bring everyone’s favorite reindeer doctor, Tony Tony Chopper from One Piece, to life! This amigurumi pattern allows you to create a charming, handmade companion that captures Chopper’s iconic look, from his blue hat to his little hooves. Perfect for fans and crocheters looking for a fun and rewarding project.
Bring Your Favorite Reindeer Doctor to Life with Crochet!
There’s nothing quite like the joy of creating a beloved character with your own hands. This Chopper amigurumi makes a fantastic gift for any One Piece enthusiast or a delightful addition to your own collection. Imagine the smiles this cute, cuddly creation will bring, showcasing your crafting skills and love for adventure.
Crochet Pattern: Adorable Tony Tony Chopper Amigurumi Crochet Pattern – Craft Your Own Straw Hat Doctor!
Materials
Light Blue DK or Worsted Weight Yarn
Light Pink DK or Worsted Weight Yarn
White DK or Worsted Weight Yarn
Light Peach/Skin Tone DK or Worsted Weight Yarn
Brown DK or Worsted Weight Yarn
2.5mm or 3.0mm Crochet Hook
6mm Black Safety Eyes
Polyester Fiberfill Stuffing
Tapestry Needle
Stitch Markers
Scissors
Abbreviations
MR – Magic Ring
sc – single crochet
inc – increase (2 sc in one stitch)
dec – decrease (single crochet 2 together)
sl st – slip stitch
ch – chain
FO – Fasten off
st(s) – stitch(es)
BLO – back loop only
( ) – Repeat instructions in parentheses
[ ] – Total number of stitches
Instructions
Head / Hat (Light Blue)
R1: 6 sc in MR [6]
R2: (inc) x 6 [12]
R3: (sc, inc) x 6 [18]
R4: (2 sc, inc) x 6 [24]
R5: (3 sc, inc) x 6 [30]
R6: (4 sc, inc) x 6 [36]
R7-R12: sc around [36]
FO.
Hat Brim (Light Pink)
Ch 15. Sc in 2nd ch from hook, sc in next 13 ch. Ch 1, turn. [14]
R2-R3: sc across. Ch 1, turn. [14]
FO, leave a long tail for sewing. Form into a slight curve and sew to the front of the Light Blue head piece.
White Cross on Hat
Using White yarn, embroider a large ‘X’ shape onto the front of the Light Blue hat, centered above the pink brim.
Using Light Pink yarn, embroider a thin outline around the white ‘X’.
Using White yarn, embroider small dots around the lower edge of the Light Blue hat, above the pink brim.
Antlers (Brown, Make 2)
For each antler, crochet 2-3 small curved branch shapes (e.g., Ch 6, sl st in 2nd ch, sc in next 4 ch. FO). Join and sew these branches together to form the antler shape.
Sew one antler to each side of the Light Blue hat.
Face (Light Peach)
R1: 6 sc in MR [6]
R2: (inc) x 6 [12]
R3: (sc, inc) x 6 [18]
R4: (2 sc, inc) x 6 [24]
R5-R8: sc around [24]
Insert safety eyes between R6 and R7, approximately 4-5 stitches apart. Start stuffing.
R9: (2 sc, dec) x 6 [18]
R10: (sc, dec) x 6 [12]
FO, leave a long tail for sewing. Stuff firmly.
Embroider a small vertical blue line for the nose and two pink circles for cheeks below the eyes.
Body (Light Peach, then Light Blue)
With Light Peach yarn:
R1: 6 sc in MR [6]
R2: (inc) x 6 [12]
R3: (sc, inc) x 6 [18]
R4: (2 sc, inc) x 6 [24]
R5-R7: sc around [24]
Change to Light Blue yarn:
R8-R10: sc around [24] (This forms the shorts. Continue stuffing as you go.)
R11: (2 sc, dec) x 6 [18]
R12: (sc, dec) x 6 [12]
FO, stuff firmly.
Collar (White)
Ch 25 (adjust length to fit around the body’s neck).
Row 1: Starting in 2nd ch from hook, (sc, ch 2, sc) in same stitch. *Skip 1 ch, (sc, ch 2, sc) in next ch*. Repeat across.
FO, leave a long tail for sewing. Sew around the neck of the body.
Arms (Make 2, Light Peach & Brown)
With Light Peach yarn:
R1: 6 sc in MR [6]
R2-R4: sc around [6]
Change to Brown yarn:
R5: sc around [6]
FO, leave a long tail for sewing. Lightly stuff the arm.
Legs / Hooves (Make 2, Brown & Light Peach)
With Brown yarn:
R1: 6 sc in MR [6]
R2: (sc, inc) x 3 [9]
R3: sc around [9]
Change to Light Peach yarn:
R4-R7: sc around [9]
FO, leave a long tail for sewing. Stuff firmly.
Backpack (Light Blue)
Ch 8.
R1: sc in 2nd ch from hook, 5 sc, 3 sc in last ch. Continue on the other side of the chain: 6 sc, 2 sc in last st. [16]
R2: inc, 5 sc, (inc) x 3, 5 sc, (inc) x 2. [22]
R3: Work in BLO: sc around. [22]
R4-R7: sc around. [22]
Sl st, FO.
Backpack Straps (Make 2, Light Blue)
Ch 15 (adjust length as needed), sc in 2nd ch from hook and across. [14]
FO, leave a long tail for sewing.
Assembly
Sew the Light Peach Face piece to the bottom opening of the Light Blue Head/Hat piece.
Sew the assembled Head to the top of the Body.
Sew the Arms to the sides of the Body, slightly below the collar.
Sew the Legs to the bottom of the Body.
Sew the Collar around the neck.
Sew the Backpack to the back of the body, then attach the two straps to the top of the backpack and secure them over the shoulders to the front/sides of the body.