
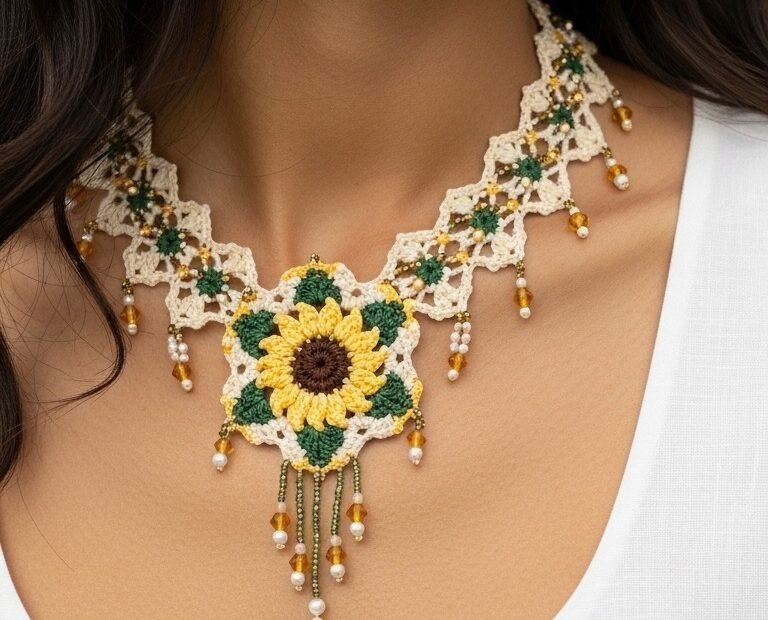
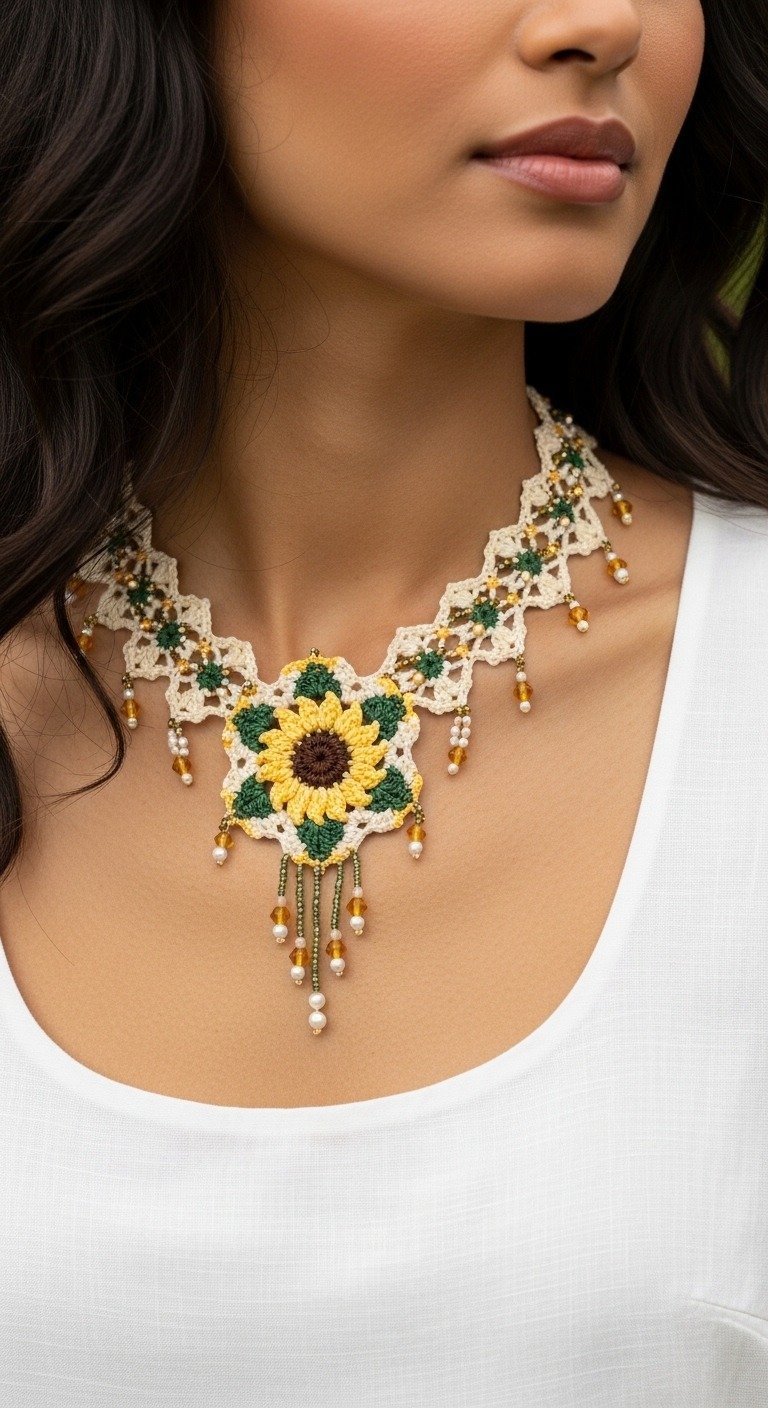
Embrace the beauty of nature with this exquisite Crochet Sunflower Necklace! This unique accessory combines delicate crochet artistry with a vibrant sunflower motif, adorned with shimmering beads. Perfect for adding a touch of bohemian elegance or a cheerful pop of color to any outfit, this pattern guides you through creating a truly stunning piece of wearable art.
Craft Your Own Statement Piece
Imagine the joy of wearing a necklace you’ve created yourself, one that radiates warmth and individuality. This detailed pattern empowers you to craft a personalized statement piece, a celebration of summer’s joy and the timeless charm of sunflowers. It’s not just a necklace; it’s a testament to your creativity and skill.
Crochet Pattern: Blossom & Adorn: Handcrafted Crochet Sunflower Necklace Pattern
Materials
- Crochet thread size 10 in Cream (main lace), Bright Yellow (sunflower petals), Dark Green (sunflower leaves/accents), Dark Brown (sunflower center)
- Steel crochet hook 1.5mm or 1.75mm
- Small green seed beads
- Small gold/amber seed beads
- Pearl beads (approx. 4mm-6mm)
- Crystal faceted beads (approx. 6mm, gold/amber color)
- Jewelry pliers
- Small jump rings (optional, for clasp)
- Necklace clasp (lobster clasp recommended)
- Tapestry needle
- Beading needle and strong beading thread (e.g., Nymo)
Abbreviations
- ch: chain
- sl st: slip stitch
- sc: single crochet
- hdc: half double crochet
- dc: double crochet
- tr: treble crochet
- st(s): stitch(es)
- sk: skip
- rep: repeat
- MR: magic ring
- picot: ch 3, sl st in first ch
Instructions
Welcome to the radiant world of wearable crochet art! This pattern will guide you through creating a beautiful beaded sunflower necklace. We’ll start with the central sunflower motif, then build the delicate lace band, and finally add the shimmering beaded fringes.
Part 1: Sunflower Motif
Using Dark Brown thread for the center:
- Round 1: Create a Magic Ring (MR). Ch 1, 8 sc into MR. Pull tail to close ring. Join with sl st to first sc. (8 sts)
- Round 2: Ch 1, 2 sc in each st around. Join with sl st to first sc. (16 sts) Fasten off Dark Brown.
Using Bright Yellow thread for the petals:
- Round 3: Attach Yellow thread with a sl st into any sc from Round 2. Ch 1, *sc in same st, ch 2, sk next st*, repeat 8 times around. Join with sl st to first sc. (8 sc, 8 ch-2 spaces)
- Round 4: Sl st into first ch-2 space. Ch 1, *[sc, hdc, 3 dc, hdc, sc] in ch-2 space, sl st into next sc from Round 3* (this sl st anchors the petal), repeat 8 times. Join with sl st to first sc. (8 petals) Fasten off Yellow.
Using Dark Green thread for the base/leaves:
- Round 5: Attach Green thread with a sl st into any sl st between petals from Round 4. Ch 1, *sc in same sl st, ch 4, sc in next sl st between petals*, repeat 8 times. Join with sl st to first sc. (8 sc, 8 ch-4 spaces) This round forms the green star-like base for attaching the lace band and is where some beaded fringes will hang. Fasten off Green, leaving a long tail for weaving in.
Part 2: Lace Band Segments (Make 6-8 total)
Using Cream thread:
Each segment is a small diamond/square motif. You will make these individually and then join them. You’ll need about 3-4 segments for each side of the necklace, depending on desired length.
- Motif Start: Ch 6, sl st to first ch to form a ring.
- Round 1: Ch 3 (counts as 1 dc), 2 dc in ring, ch 2, (3 dc in ring, ch 2) 3 times. Join with sl st to top of beg ch 3. (4 x 3dc clusters, 4 ch-2 spaces)
- Round 2: Ch 1, *(sc in next dc, picot (ch 3, sl st in first ch), sc in next 2 dc), (sc in ch-2 space, ch 3, sc in same ch-2 space)* repeat 4 times. Join with sl st to first sc. This creates the picot-edged diamond. Fasten off Cream.
Adding Green Accent to Lace Motifs:
- Using a beading needle and Dark Green thread, carefully surface sl st or embroider a small ‘X’ or ‘cross’ shape over the central 4 stitches of the cream diamond. Weave in ends securely.
Part 3: Assembly & Joining
Joining Lace Motifs to Each Other:
- To join two lace motifs, when working Round 2 of the second motif, at the point where you would normally do a ‘ch 3’ for a picot or a ‘ch 3’ in a ch-2 space, instead do ‘ch 1, sl st into a corresponding picot or ch-3 loop of the first motif, ch 1′ then complete the round. This creates a seamless connection.
Attaching Lace Bands to Sunflower:
- Attach the first lace motif on each side to the Green Outline (Round 5) of the Sunflower. Use a sl st to connect a ch-3 loop of the lace motif to a ch-4 space on the sunflower’s green outline. Secure firmly.
Finishing the Necklace Band:
- Once you have joined all your desired lace motifs for each side, attach a small jump ring and your necklace clasp to the end of one side. On the other side, attach a small jump ring. You can create a small chain loop (ch 10-15) and attach to the end for adjustable length, then add a jump ring.
Part 4: Beaded Fringes
Attach using beading needle and strong beading thread:
- Sunflower Fringes (bottom): Cut several lengths of beading thread. Thread a mix of small green seed beads, gold/amber seed beads, pearl beads, and crystal faceted beads onto each strand. Securely attach these fringes to the bottom ch-4 spaces of the Green Outline (Round 5) of the sunflower, varying lengths for a cascading effect.
- Lace Band Fringes: Attach shorter beaded fringes (mix of gold/amber seed beads and pearl beads) to the lowest picot points of each lace motif segment, or the ch-3 loops at the bottom of the diamonds, as seen in the image.
Part 5: Final Touches
- Weave in all remaining loose ends securely. Gently block your necklace if needed to help the lace lay flat and maintain its shape.
Your beautiful Handcrafted Crochet Sunflower Necklace is now complete!