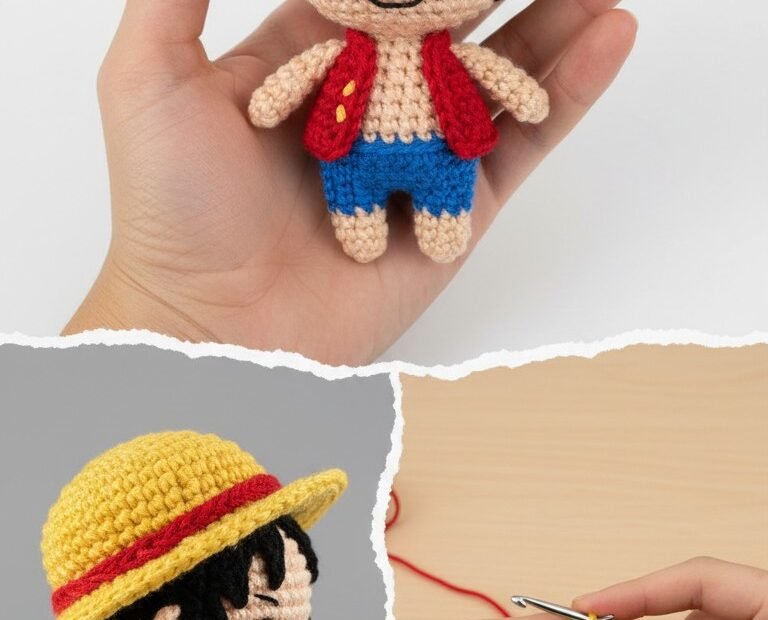
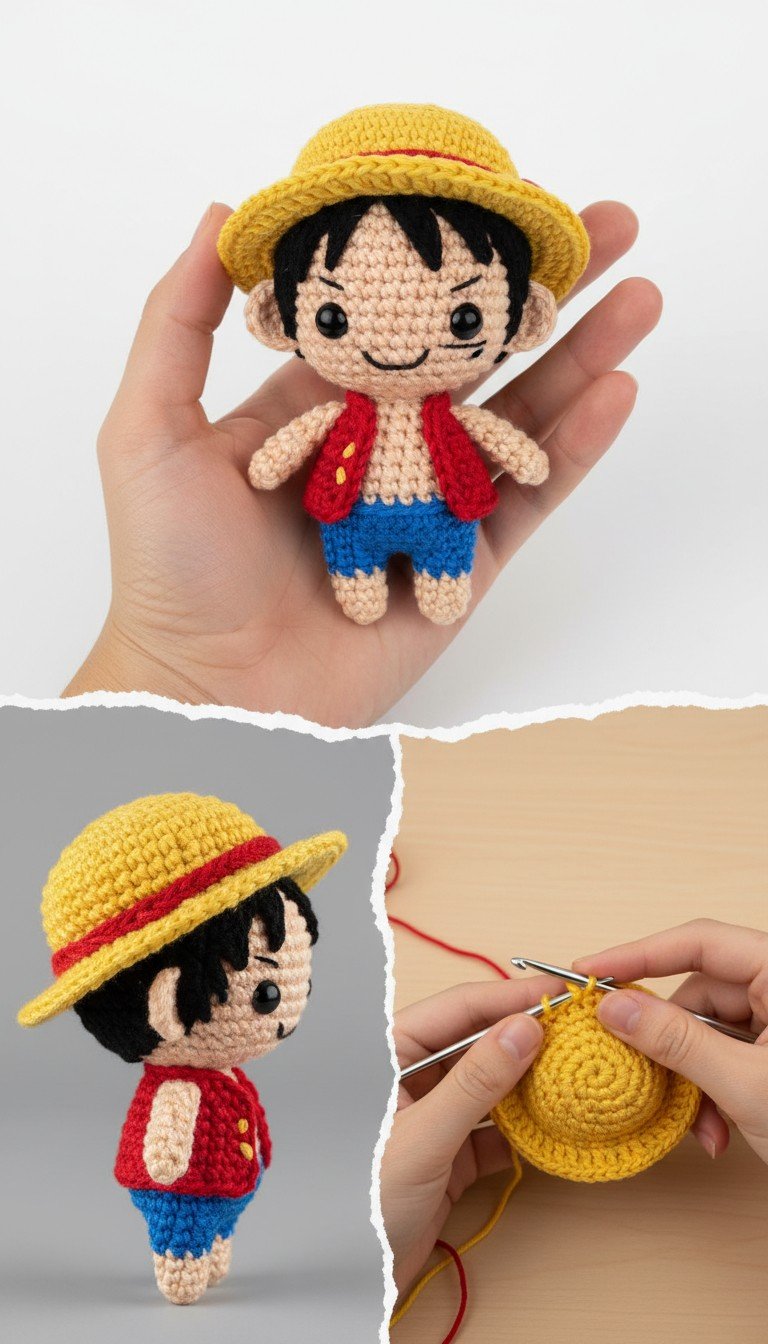
Ahoy, matey! Get ready to set sail on a crafting adventure as you bring the beloved captain of the Straw Hat Pirates to life. This free crochet pattern will guide you step-by-step to create your very own Monkey D. Luffy amigurumi doll, perfect for fans of One Piece and crochet enthusiasts alike. Grab your hook and join the Grand Line of yarn!
Embark on a Crochet Journey with Luffy!
There’s nothing quite like the satisfaction of crafting a character you adore. This Luffy amigurumi pattern allows you to capture the spirit of the future Pirate King in a cute, huggable form. Whether he’s guarding your treasure hoard, gracing your shelf, or becoming a cherished gift for a fellow fan, this little Luffy will bring a smile to anyone’s face.
Crochet Pattern: Craft Your Own One Piece Luffy Amigurumi: Free Crochet Pattern
Materials
Light Beige DK or Sport weight yarn (for skin)
Black DK or Sport weight yarn (for hair, eyebrows, mouth)
Red DK or Sport weight yarn (for vest, hat band)
Blue DK or Sport weight yarn (for shorts)
Yellow DK or Sport weight yarn (for hat)
2.5mm or 3.0mm crochet hook (or size suitable for your yarn)
6mm or 8mm safety eyes (black)
Polyester fiberfill for stuffing
Tapestry needle
Stitch marker
Scissors
Abbreviations
MR: Magic Ring
ch: Chain
sc: Single Crochet
inc: Increase (2 sc in one stitch)
dec: Decrease (sc 2 stitches together)
sl st: Slip Stitch
FO: Fasten Off
BLO: Back Loop Only
FLO: Front Loop Only
rnd/R: Round
st/sts: Stitch/Stitches
Instructions
Important Notes: Work in continuous rounds unless otherwise stated. Use a stitch marker to keep track of your first stitch in each round. Stuff firmly as you go, especially for the head and body.
Head (Light Beige yarn)
R1: MR 6 sc (6)
R2: 6 inc (12)
R3: (1 sc, inc) x 6 (18)
R4: (2 sc, inc) x 6 (24)
R5: (3 sc, inc) x 6 (30)
R6-R10: 30 sc (5 rounds)
Insert safety eyes between R7 and R8, approximately 6-7 stitches apart.
R11: (3 sc, dec) x 6 (24)
R12: (2 sc, dec) x 6 (18)
Start stuffing the head firmly.
R13: (1 sc, dec) x 6 (12)
R14: 6 dec (6)
FO, leave a long tail, and weave through the remaining 6 stitches to close. Pull tight and hide tail.
Body (Light Beige yarn, then Blue yarn)
Start with Light Beige yarn.
R1: MR 6 sc (6)
R2: 6 inc (12)
R3: (1 sc, inc) x 6 (18)
R4-R6: 18 sc (3 rounds)
Change to Blue yarn for the shorts.
R7 (BLO): 18 sc (18) (This creates a ridge for the shorts to stand out)
R8-R10: 18 sc (3 rounds)
Stuff the body lightly.
FO, leave a long tail for sewing.
Arms (Make 2 – Light Beige yarn)
R1: MR 6 sc (6)
R2-R6: 6 sc (5 rounds)
Sl st, FO, leave a tail for sewing. Do not stuff.
Legs (Make 2 – Light Beige yarn)
R1: MR 6 sc (6)
R2-R7: 6 sc (6 rounds)
Sl st, FO, leave a tail for sewing. Stuff lightly.
Hair (Black yarn)
Hair Cap Base
R1: MR 6 sc (6)
R2: 6 inc (12)
R3: (1 sc, inc) x 6 (18)
R4: (2 sc, inc) x 6 (24)
R5: (3 sc, inc) x 6 (30)
Sl st, FO.
Hair Strands
Using the black yarn, embroider or create small chain stitches for the bangs and sideburns directly onto the hair cap or separately and sew on. The image shows several short, spiky bangs and longer, slightly curved sideburns.
For bangs: Ch 4-5, sc in 2nd ch from hook and next 2-3 ch, sl st back into the cap. Repeat 5-6 times around the front.
For sideburns: Ch 6-7, sc in 2nd ch from hook and next 4-5 ch, sl st back into the cap. Repeat twice, one on each side.
Sew the finished hair cap onto the head.
Vest (Red yarn)
Worked in rows.
Row 1: Ch 18. Sc in 2nd ch from hook and across (17 sc). Ch 1, turn.
FO. Sew the vest ends together at the back, or leave open as shown in the image. Embroider two small yellow dots on the front for buttons using yellow yarn and a tapestry needle.
Straw Hat (Yellow yarn, then Red yarn)
Brim (Yellow yarn)
R1: MR 6 sc (6)
R2: 6 inc (12)
R3: (1 sc, inc) x 6 (18)
R4: (2 sc, inc) x 6 (24)
R5: (3 sc, inc) x 6 (30)
R6: (4 sc, inc) x 6 (36)
R7 (FLO): 36 sc (This creates a distinct edge for the brim to curve)
Crown (Yellow yarn)
Continue working in both loops from R6 for the crown.
R8: 36 sc
R9: (4 sc, dec) x 6 (30)
R10-R12: 30 sc (3 rounds)
Sl st, FO, weave in tail.
Hat Band (Red yarn)
Ch 30-32 (measure around R7/R8 of the hat to ensure a snug fit). Sl st to first ch to form a ring.
R1: Sc in each ch around. Sl st to join.
FO, leaving a long tail for sewing. Sew the red band neatly around the base of the hat crown, just above the brim.
Assembly
Sew the head firmly to the body.
Sew the arms to the sides of the body, just below the neck.
Sew the legs to the bottom of the body.
Dress your Luffy doll with the blue shorts (already part of the body) and the red vest.
Place the straw hat on his head.
Using black yarn and a tapestry needle, embroider small, slightly curved eyebrows above the safety eyes and a gentle smile below.
Using light beige yarn, embroider small ‘ears’ on either side of the head, poking out from under the hair.
Your Straw Hat Captain is now complete! Enjoy your new adventure buddy!