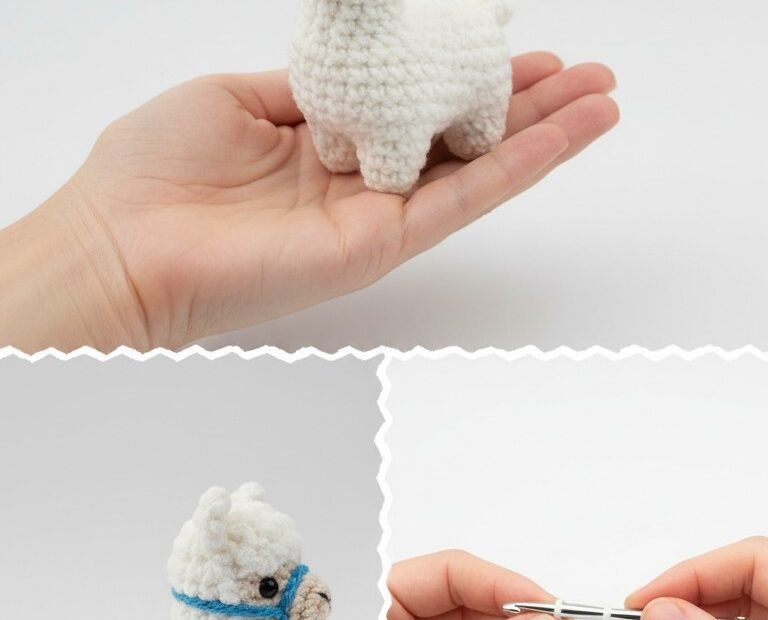
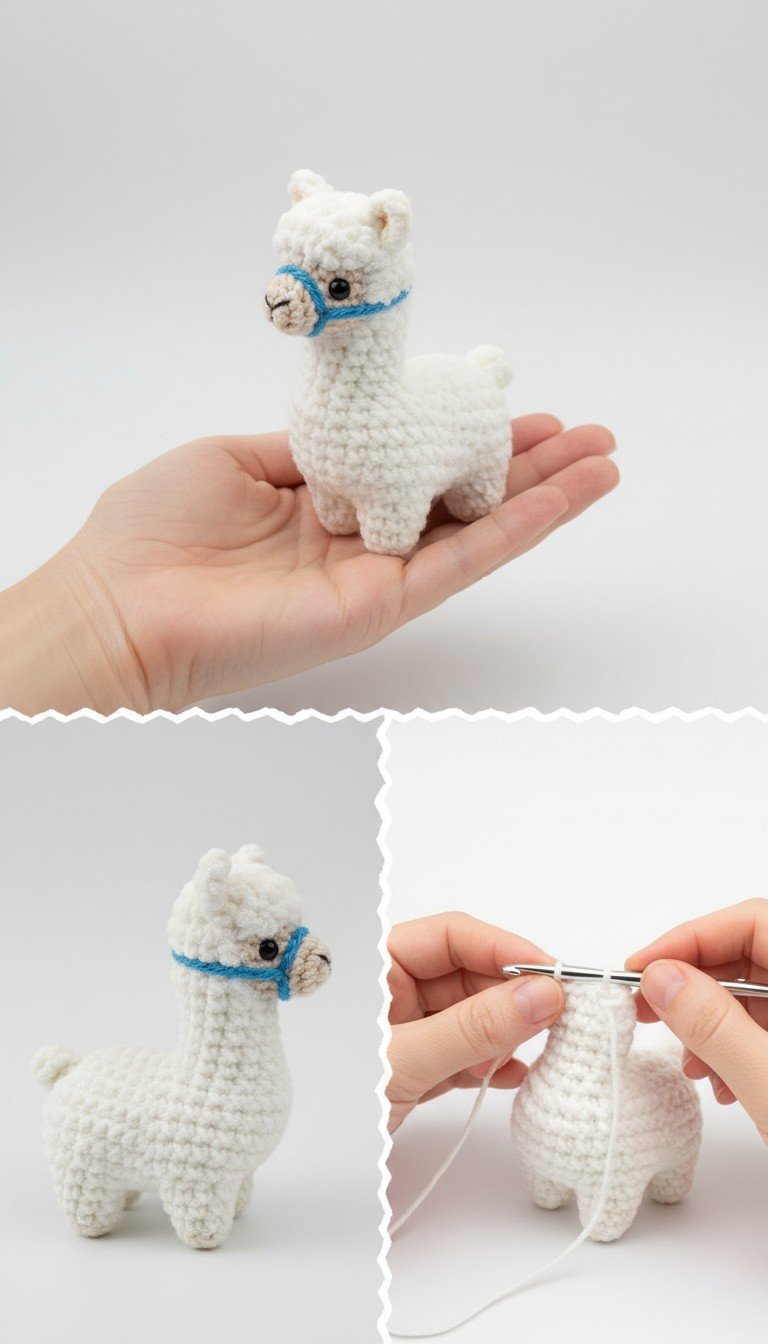
Get ready to crochet the cutest little companion! This free amigurumi llama pattern is perfect for creating an adorable stuffed friend. With its sweet expression and charming blue halter, this tiny alpaca makes a wonderful gift or a delightful addition to your own collection. Grab your hook and yarn, and let’s bring this lovable creature to life!
Craft Your Own Adorable Alpaca Friend
There’s something uniquely heartwarming about handmade toys, and this amigurumi llama is no exception. It’s a fantastic project for crocheters of all skill levels, offering a chance to practice basic stitches while creating a cherished keepsake. Imagine the joy of gifting this tiny llama or seeing it brighten up a desk or shelf. It’s more than just a pattern; it’s an opportunity to spread a little handmade happiness.
Crochet Pattern: Crochet a Cuddly Companion: Your Free Amigurumi Llama Pattern
Materials
Worsted weight yarn in Off-White (main body)
Worsted weight yarn in Light Tan (muzzle)
Sport/DK weight yarn or embroidery floss in Bright Blue (halter)
Black embroidery floss (nose/mouth)
2.5mm or 3.0mm crochet hook
6mm safety eyes (or embroidered eyes)
Polyester fiberfill for stuffing
Yarn needle
Scissors
Abbreviations
MR = Magic Ring
ch = chain
sc = single crochet
inc = increase (2 sc in next stitch)
dec = decrease (sc2tog)
sl st = slip stitch
st(s) = stitch(es)
FO = Fasten off
(…) = repeat instructions in parentheses
[…] = total number of stitches at end of round
Instructions
The llama is worked in continuous rounds unless otherwise stated. Use a stitch marker to keep track of the first stitch of each round.
BODY (Off-White)
Rnd 1: 6 sc in MR [6]
Rnd 2: (inc) x6 [12]
Rnd 3: (sc, inc) x6 [18]
Rnd 4: (2 sc, inc) x6 [24]
Rnd 5: (3 sc, inc) x6 [30]
Rnd 6-10: sc in each st around (5 rounds) [30]
Rnd 11: (3 sc, dec) x6 [24]
Rnd 12-14: sc in each st around (3 rounds) [24]
Rnd 15: (2 sc, dec) x6 [18]
Start stuffing firmly.
Rnd 16-18: sc in each st around (3 rounds) [18]
FO, leaving a long tail for sewing.
HEAD (Off-White)
Rnd 1: 6 sc in MR [6]
Rnd 2: (inc) x6 [12]
Rnd 3: (sc, inc) x6 [18]
Rnd 4: (2 sc, inc) x6 [24]
Rnd 5-8: sc in each st around (4 rounds) [24]
Insert safety eyes between Rnd 6 and 7, about 4-5 stitches apart.
Rnd 9: (2 sc, dec) x6 [18]
Start stuffing.
Rnd 10: (sc, dec) x6 [12]
Rnd 11: (dec) x6 [6]
FO, weave in tail. Finish stuffing.
MUZZLE (Light Tan)
Rnd 1: ch 4. sc in 2nd ch from hook, sc in next, 3 sc in last ch. Working on opposite side of chain: sc in next, 2 sc in last st [8]
Rnd 2: inc, sc, inc x3, sc, inc x2 [14]
Rnd 3: sc in each st around [14]
FO, leaving a long tail for sewing. Lightly stuff.
EARS (Make 2, Off-White)
Row 1: ch 5. sc in 2nd ch from hook and next 3 chs [4]
Row 2: ch 1, turn. dec, dec [2]
Row 3: ch 1, turn. dec [1]
FO, leaving a long tail for sewing. Pinch the bottom together to give it a slight fold.
LEGS (Make 4, Off-White)
Rnd 1: 6 sc in MR [6]
Rnd 2-5: sc in each st around (4 rounds) [6]
FO, leaving a long tail for sewing. Stuff lightly.
ASSEMBLY
Sew the Head to the top of the Body.
Sew the Muzzle onto the front of the Head, below the eyes.
Using black embroidery floss, embroider two small vertical lines on the Muzzle for the nose.
Sew the Ears to the top of the Head, folding them slightly.
Sew the four Legs evenly spaced on the bottom of the Body.
HALTER (Bright Blue)
Using Bright Blue yarn, ch 15.
Place the chain around the muzzle and secure with a slip stitch or by tying a knot and hiding the ends.
Ch another 10 stitches from the center top of the muzzle band, and secure this piece around the neck area, making sure it looks like a halter from the image. Adjust chain lengths as needed to fit.