Craft the cutest accessory with our free crochet panda bag pattern! This adorable amigurumi purse is perfect for kids and adults alike, bringing a touch of playful charm to any outfit. Follow our detailed instructions to create your very own lovable panda companion that’s not just a toy, but a functional and stylish bag.
Why You’ll Love This Adorable Panda Bag Project
This crochet panda bag is more than just a pattern; it’s an opportunity to create a unique, handmade gift or a delightful treat for yourself. Its charming design makes it a standout piece, and the satisfaction of crafting it stitch-by-stitch is immeasurable. Perfect for holding small treasures, it’s a project that brings joy from start to finish.
Crochet Pattern: Crochet a Kawaii Panda Bag: Adorable Amigurumi Purse Pattern
Materials
Worsted weight yarn in White (main color)
Worsted weight yarn in Black (contrast color)
Small amount of pink embroidery floss or thin yarn
4.0mm crochet hook (G/6)
2 safety eyes (12-15mm)
Yarn needle
Stitch markers
Scissors
Abbreviations
MR: Magic Ring
ch: Chain
sc: Single Crochet
inc: Increase (2 sc in one stitch)
dec: Decrease (sc two stitches together)
sl st: Slip Stitch
FO: Fasten Off
st(s): Stitch(es)
Rnd: Round
Instructions
This pattern is worked in continuous rounds unless otherwise specified. Use a stitch marker to keep track of the beginning of each round.
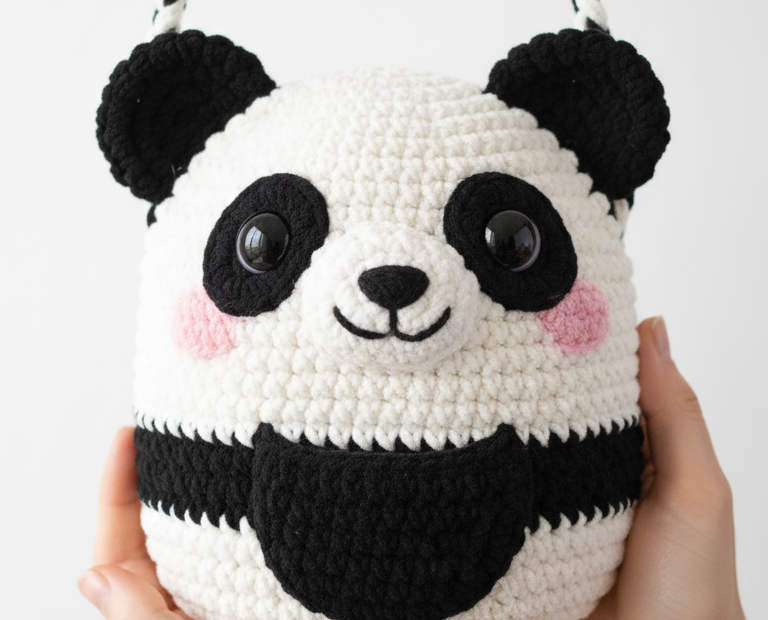
Bag Body (White & Black)
Start with White yarn.
Rnd 1: MR, 6 sc (6)
Rnd 2: inc in each st around (12)
Rnd 3: (sc 1, inc) x6 (18)
Rnd 4: (sc 2, inc) x6 (24)
Rnd 5: (sc 3, inc) x6 (30)
Rnd 6: (sc 4, inc) x6 (36)
Rnd 7: (sc 5, inc) x6 (42)
Rnd 8: (sc 6, inc) x6 (48)
Rnd 9: (sc 7, inc) x6 (54)
Rnd 10-18: sc in each st around (54) (9 rounds)
Switch to Black yarn.
Rnd 19-22: sc in each st around (54) (4 rounds)
Switch back to White yarn.
Rnd 23-31: sc in each st around (54) (9 rounds)
Rnd 32: (sc 7, dec) x6 (48)
Rnd 33: sc in each st around (48)
Rnd 34: (sc 6, dec) x6 (42)
Rnd 35: sc in each st around (42)
Rnd 36: (sc 5, dec) x6 (36)
Sl st to the next st and FO, leaving a long tail for sewing if needed.
Ears (Make 2, Black)
Start with Black yarn.
Rnd 1: MR, 6 sc (6)
Rnd 2: inc in each st around (12)
Rnd 3: (sc 1, inc) x6 (18)
Rnd 4: sc in each st around (18)
Sl st to the next st and FO, leaving a long tail for sewing. Flatten the ear.
Eye Patches (Make 2, Black)
Start with Black yarn.
Ch 5.
Rnd 1: sc in 2nd ch from hook, sc in next 2 ch, 3 sc in last ch. Now working on the other side of the chain: sc in next 2 ch, 2 sc in last ch (10)
Rnd 2: inc, sc 2, inc x3, sc 2, inc x2 (16)
Sl st to the next st and FO, leaving a long tail for sewing.
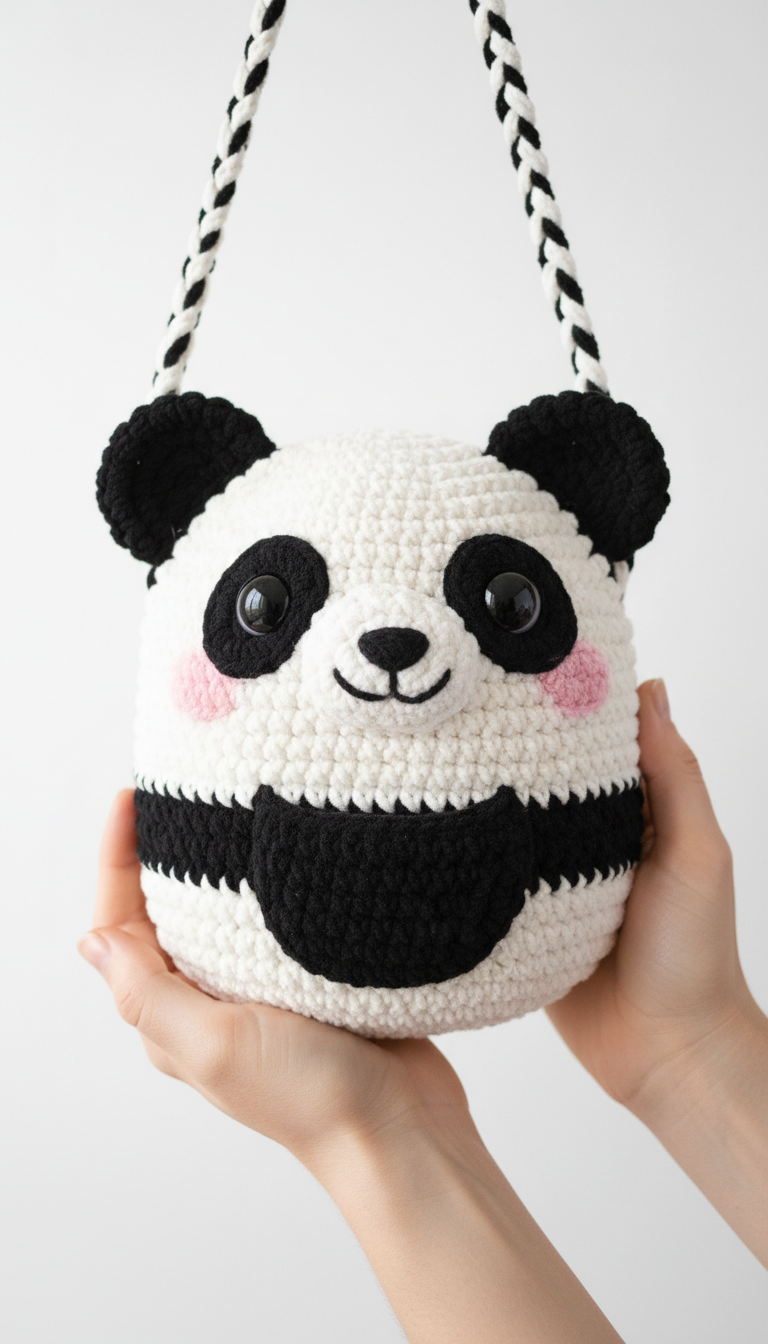
Strap (Black & White)
Cut 6 strands of yarn, each approximately 45 inches (115 cm) long (3 white, 3 black).
Gather the strands, knot them together at one end.
Braid the strands tightly until you reach your desired length for the strap (refer to image for approximate length).
Knot the other end to secure the braid. Trim excess.
Assembly
Attach Ears: Position the black ears on top of the white head section of the bag, roughly between Rnds 30-33 of the main body, ensuring they are evenly spaced. Sew securely with the tail left on the ears.
Attach Eye Patches: Pin the black eye patches to the white face area. Place them below the ears and slightly to the sides of the center. Sew them securely.
Insert Safety Eyes: Carefully make a small opening through the center of each black eye patch and insert the safety eyes. Secure the washers on the inside of the bag.
Embroider Face: With black yarn, embroider a small ‘V’ shape for the nose just below the center of the eyes. From the bottom of the nose, embroider a curved line for the mouth.
Embroider Cheeks: With pink embroidery floss or thin yarn, create a small horizontal satin stitch or a few small stitches on each side of the face, slightly below the eyes, to form the rosy cheeks.
Attach Strap: Securely sew each end of the braided strap to the top side edges of the bag opening. Reinforce stitches to ensure durability.