
Elevate your style with this exquisite floral lace crochet necklace, a true heirloom piece that blends intricate design with delicate beauty. Perfect for special occasions or adding a touch of vintage charm to everyday wear, this pattern guides you through creating a stunning accessory inspired by nature’s elegance. Craft a unique statement that showcases your passion for handmade artistry.
Craft Your Own Heirloom: The Beauty of Intricate Lace Crochet
There’s a unique satisfaction in creating something beautiful with your own hands. This lace necklace isn’t just an accessory; it’s a wearable piece of art, imbued with the love and skill of its maker. It makes a thoughtful gift or a cherished addition to your own jewelry collection, promising compliments and sparking conversations wherever you go. Embrace the timeless allure of handmade elegance.
Crochet Pattern: Crochet an Elegant Floral Lace Statement Necklace: Free Pattern
Materials
- Crochet cotton thread, size 20, in Cream/Ecru (MC), Pale Pink (PC), and Mint Green (GC)
- Steel crochet hook, 1.0mm (US 12)
- Small seed beads (clear iridescent or matching colors)
- Six 4mm freshwater pearls
- Jewelry pliers
- Two small jump rings
- One lobster clasp
- Tapestry needle
- Fabric stiffener (optional)
Abbreviations
- ch: chain
- sl st: slip stitch
- sc: single crochet
- hdc: half double crochet
- dc: double crochet
- tr: treble crochet
- picot: ch 3, sl st in 3rd ch from hook
- MC: Main Color (Cream/Ecru)
- PC: Pale Pink
- GC: Mint Green
- st(s): stitch(es)
- rnd: round
- rep: repeat
- sk: skip
Instructions
This pattern creates a delicate lace necklace by constructing individual motifs and joining them. Adjust the number of motifs and joining chains to achieve your desired necklace length and shape.
Part 1: Large Central Floral Motif (Make 1 – MC & PC)
Using PC:
- Rnd 1: Ch 5, sl st to first ch to form a ring. Ch 1, 10 sc in ring. Sl st to first sc. (10 sc)
- Rnd 2 (Petals): (Ch 3, dc in next st, ch 3, sl st in same st as dc) 5 times. Fasten off PC. (5 petals)
Join MC to any sl st between petals from Rnd 2.
- Rnd 3: (Ch 3, 2 dc in sl st, ch 2, 2 dc in same sl st, ch 1, sk next petal) 5 times. Sl st to 3rd ch to join. (20 dc, 5 ch-2 sps, 5 ch-1 sps)
- Rnd 4 (Outer Petals): Sl st into first ch-2 sp. (Ch 3, 4 dc in ch-2 sp, ch 3, sl st in same sp) 5 times, working into each ch-2 sp. Sl st to join. Fasten off MC.
- Embellishment: Carefully sew seed beads onto the center of the motif, covering Rnd 1 of PC.
Part 2: Small Floral Motifs (Make 6-8 – PC & MC, some with GC accents)
Using PC:
- Rnd 1: Ch 4, sl st to first ch to form a ring. Ch 1, 8 sc in ring. Sl st to first sc. (8 sc)
- Rnd 2 (Petals): (Ch 2, hdc in next st, ch 2, sl st in same st as hdc) 4 times. Fasten off PC. (4 petals)
Join MC (or GC for accent flowers) to any sl st between petals from Rnd 2.
- Rnd 3: (Ch 3, 2 dc in sl st, ch 3, sl st in same st) 4 times. Sl st to join. Fasten off.
- Embellishment: Sew one seed bead to the center of each motif.
Part 3: Leaf Connector Motifs (Make 8-10 – GC)
Using GC:
- Ch 7.
- Row 1: Sl st in 2nd ch from hook, sc in next ch, hdc in next 2 ch, sc in next ch, sl st in last ch. Fasten off. (This creates a flat, pointed leaf shape).
Part 4: Dangler Motifs (Make 4 – MC & PC/GC)
Using MC:
- Ch 5, sl st to first ch to form a ring.
- Rnd 1: Ch 1, 6 sc in ring. Sl st to first sc.
- Rnd 2 (Petals): (Ch 3, dc in next st, ch 3, sl st in same st) 3 times. Fasten off MC. (3 small petals)
Join PC or GC for a contrasting edge (optional):
- Rnd 3: Attach contrasting color with sl st in any ch-3 sp. Ch 1, (sc, picot, sc) in each ch-3 sp around. Sl st to join. Fasten off.
- Embellishment: Stitch a 4mm freshwater pearl securely to the bottom point of each dangler motif.
Part 5: Assembly and Finishing
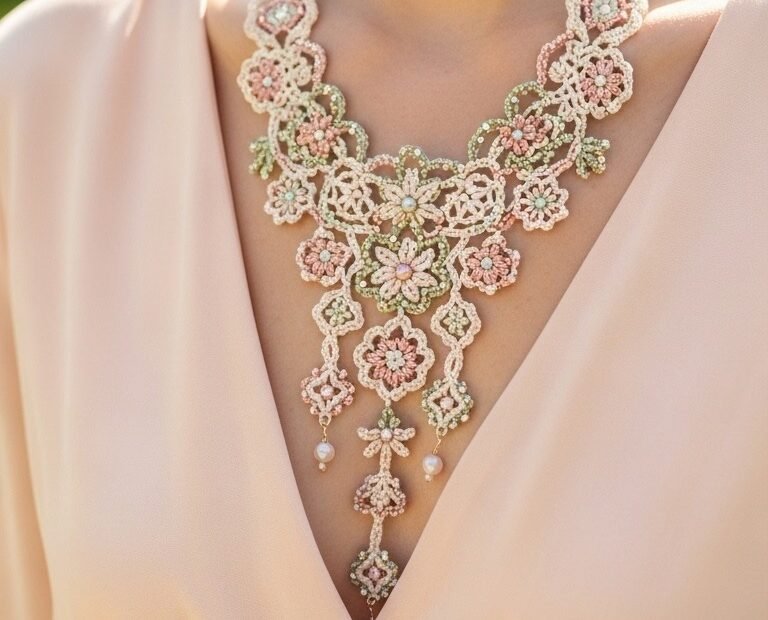
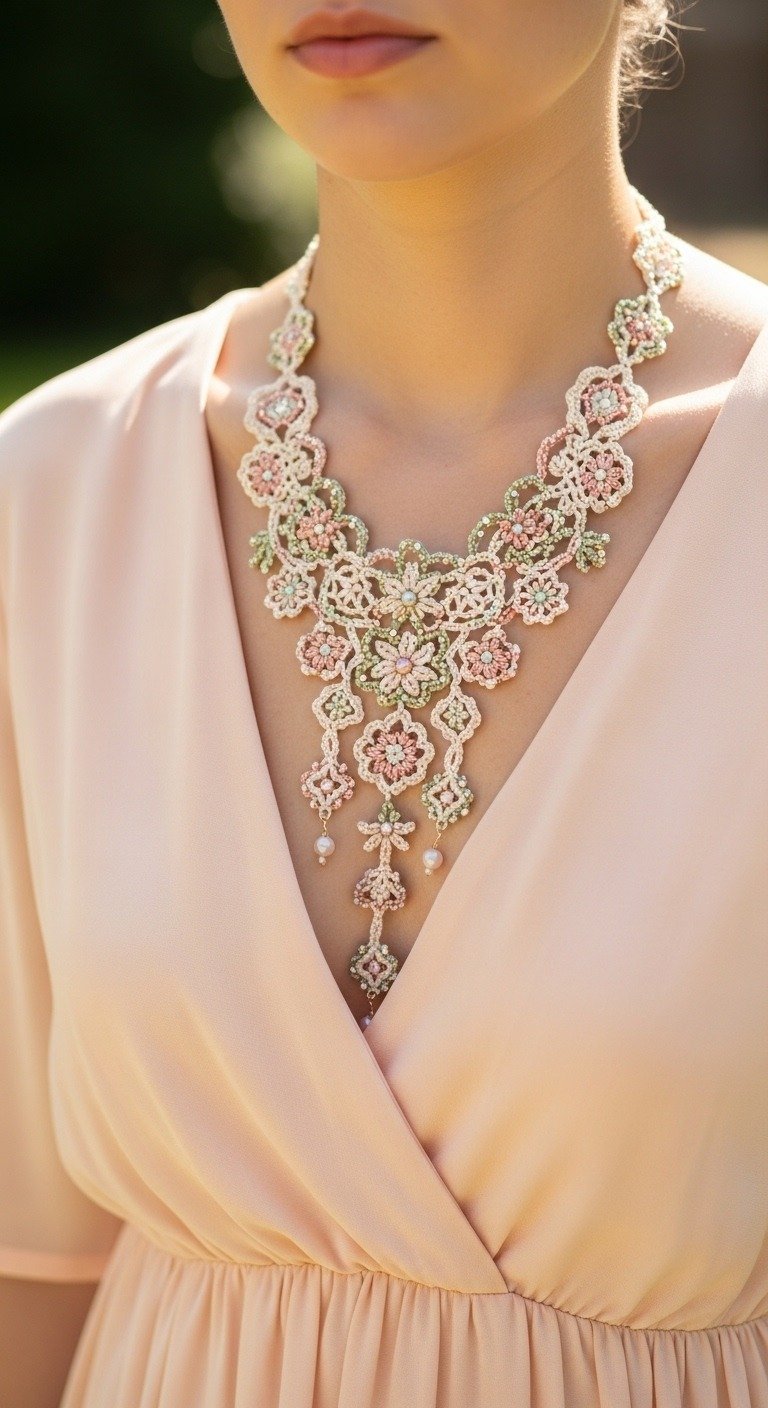
Step 1: Lay out your design. Carefully arrange all your crocheted motifs on a flat surface. Position the Large Central Floral Motif at the bottom center. Begin placing Small Floral Motifs and Leaf Connector Motifs symmetrically around it, building outwards and upwards to visualize the desired necklace shape. Refer to the image for inspiration on placement.
Step 2: Join the Central Cluster. Using a tapestry needle and matching thread (or by very small sl st joins if comfortable), securely attach 2-3 Small Floral Motifs and 2-3 Leaf Connector Motifs directly to the Large Central Floral Motif. Join them at petal tips, ch-spaces, or other strategic points to create a flowing, cohesive central cluster.
Step 3: Build the Necklace Sides. Continue attaching Small Floral Motifs and Leaf Connector Motifs in a symmetrical pattern from the central cluster. Work upwards to form the decorative part of the necklace band. Use short chains (e.g., ch 2-4) between motifs, along with sl st or sc joins, to ensure flexibility and secure connections. You want to create a graceful curve that will sit comfortably around the neck.
Step 4: Create the Necklace Band (Upper Section). Once the main decorative front is complete, transition to the simpler upper part of the necklace that goes around the back of the neck. This can be done by:
- Continuing with a repeating pattern of small Leaf Connector Motifs joined by short chains (e.g., ch 5-7).
- Or, creating a simple chain of approximately 60-80 chs (adjust to your desired length) on each side, attaching it to the outermost decorative motif. The image suggests continuing with small motifs.
Step 5: Add Danglers. Attach the four Dangler Motifs to the bottom edges of the central cluster. Use a short chain (e.g., ch 5-10) for each dangler to ensure they hang gracefully. Ensure the freshwater pearls are securely attached to the end of each dangler.
Step 6: Attach Clasps. At each end of the necklace band (the upper section), attach a small jump ring using jewelry pliers. Then, attach the lobster clasp to one of the jump rings. Ensure all connections are secure.
Step 7: Weave in Ends. Carefully weave in all loose yarn ends using your tapestry needle. For extra durability and shape retention, you may gently block the finished necklace or apply a very thin coat of fabric stiffener (follow product instructions) once dry.
Step 8: Final Embellishment (Optional). If desired, strategically sew additional seed beads onto the surface of various motifs for extra sparkle, mimicking the delicate shimmer seen in the original image. Focus on petal edges or centers.