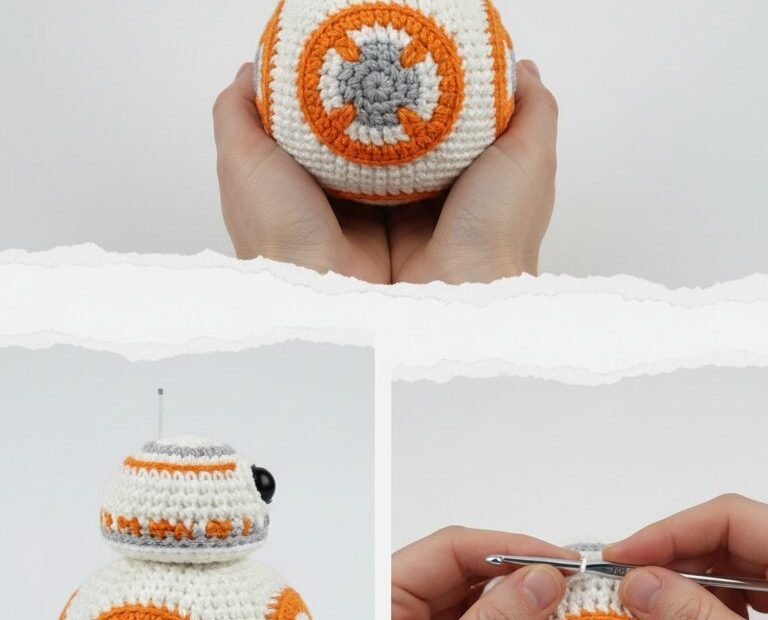
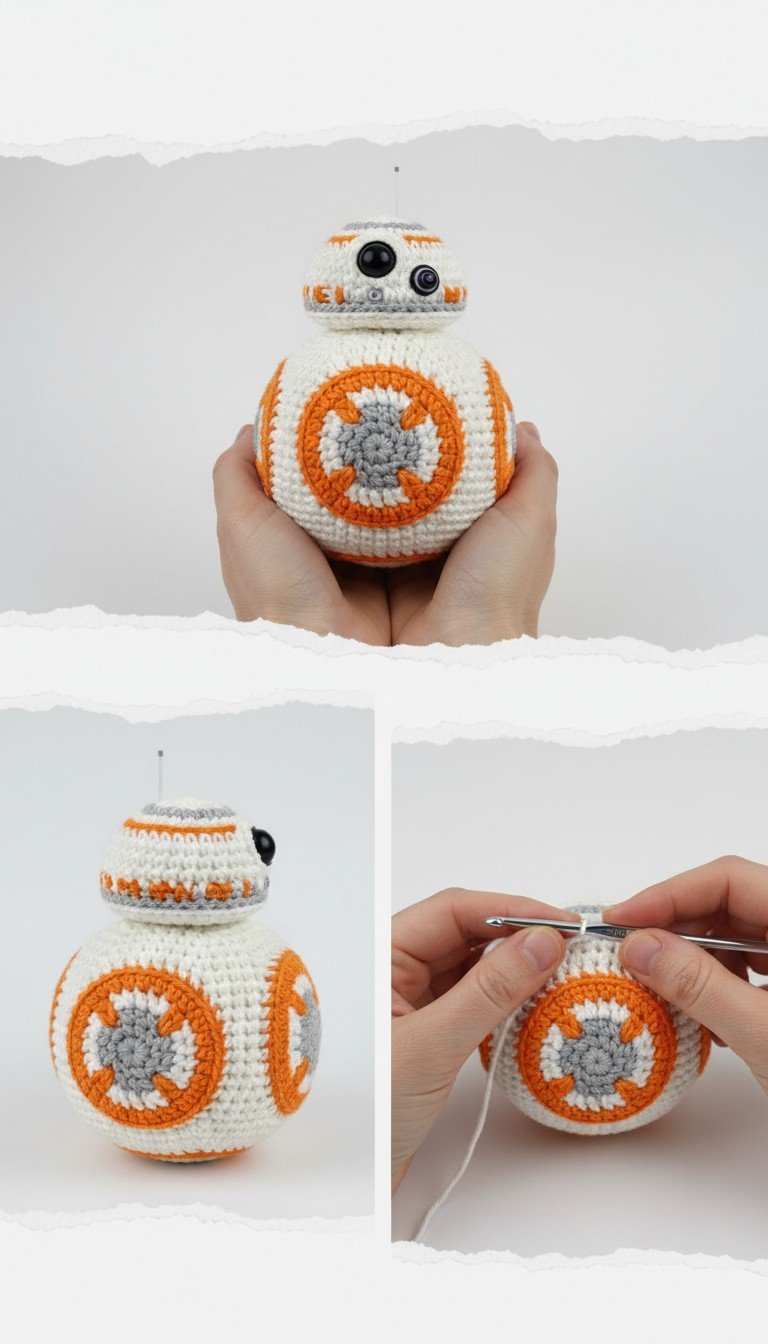
Bring the beloved astromech droid, BB-8, from a galaxy far, far away right into your home with this detailed amigurumi crochet pattern! Perfect for Star Wars enthusiasts and crochet lovers alike, this pattern allows you to craft your very own charming, rolling companion. With its signature white, orange, and grey markings, this BB-8 will capture hearts and add a touch of sci-fi whimsy to any collection or display.
Craft Your Own Droid Companion for Galactic Adventures
There’s nothing quite like the satisfaction of creating a beloved character with your own hands. This BB-8 amigurumi project is not just a fun crochet challenge; it’s a way to bring a piece of cinematic magic to life. Whether you’re making it as a unique gift for a fellow Star Wars fan or to adorn your own space, this adorable droid will spark joy and inspire imaginative adventures. Get ready to embark on your next crochet mission!
Crochet Pattern: Crochet BB-8 Amigurumi Droid Pattern: A Star Wars Fan Must-Have!
Materials
Sport or DK weight yarn in: White (Main Color), Orange (Contrast Color 1), Grey (Contrast Color 2), Black (Contrast Color 3)
2.5mm or 3.0mm crochet hook (or size suitable for your yarn to create tight stitches)
Polyester fiberfill for stuffing
8mm black safety eyes (x2)
6mm black safety eye (x1) or a small black bead for the camera lens
Yarn needle
Stitch markers
Small piece of thin wire or pipe cleaner for antenna
Abbreviations
MR: Magic Ring
sc: single crochet
inc: increase (2 sc in one stitch)
dec: decrease (sc 2 stitches together)
sl st: slip stitch
ch: chain
FO: Fasten Off
MC: Main Color (White)
CC1: Contrast Color 1 (Orange)
CC2: Contrast Color 2 (Grey)
CC3: Contrast Color 3 (Black)
BLO: back loop only
(X): stitch count at the end of the round
Instructions
Notes: Work in continuous rounds unless otherwise specified. Use a stitch marker to mark the beginning of each round. Change colors in the last yarn over of the previous stitch. When working color changes, carry the unused yarn loosely on the wrong side of your work to be picked up in the next round.
Body (Start with MC – White)
Round 1: 6 sc in MR (6)
Round 2: [inc] x 6 (12)
Round 3: [sc, inc] x 6 (18)
Round 4: [2 sc, inc] x 6 (24)
Round 5: [3 sc, inc] x 6 (30)
Round 6: [4 sc, inc] x 6 (36)
Round 7: [5 sc, inc] x 6 (42)
Round 8: [6 sc, inc] x 6 (48)
Round 9: [7 sc, inc] x 6 (54)
Round 10: (MC 8 sc, CC1 2 sc, MC 8 sc) x 3 (54)
Round 11: (MC 6 sc, CC1 6 sc, MC 6 sc) x 3 (54)
Round 12: (MC 5 sc, CC1 3 sc, CC2 4 sc, CC1 3 sc, MC 3 sc) x 3 (54) (This round introduces the grey center)
Round 13: (MC 4 sc, CC1 4 sc, CC2 6 sc, CC1 4 sc, MC 2 sc) x 3 (54)
Round 14: (MC 5 sc, CC1 3 sc, CC2 4 sc, CC1 3 sc, MC 3 sc) x 3 (54)
Round 15: (MC 6 sc, CC1 6 sc, MC 6 sc) x 3 (54)
Round 16: (MC 8 sc, CC1 2 sc, MC 8 sc) x 3 (54)
Round 17: [7 sc, dec] x 6 (48)
Round 18: [6 sc, dec] x 6 (42)
Round 19: [5 sc, dec] x 6 (36)
Round 20: [4 sc, dec] x 6 (30) Stuff the body firmly, shaping as you go.
Round 21: [3 sc, dec] x 6 (24)
Round 22: [2 sc, dec] x 6 (18)
Round 23: [sc, dec] x 6 (12)
Round 24: [dec] x 6 (6)
FO, leave a long tail, weave through remaining 6 sts and pull tight to close. Weave in ends.
Head (Start with MC – White)
Round 1: 6 sc in MR (6)
Round 2: [inc] x 6 (12)
Round 3: [sc, inc] x 6 (18)
Round 4: [2 sc, inc] x 6 (24)
Round 5: [3 sc, inc] x 6 (30)
Round 6: [4 sc, inc] x 6 (36)
Round 7-8: 36 sc (2 rounds)
Round 9: Switch to CC1 (Orange). 36 sc.
Round 10: Switch to MC (White). 36 sc.
Round 11: Switch to CC2 (Grey). 36 sc BLO (This creates a subtle ridge for the head base).
Round 12: Switch to MC (White). 36 sc.
Round 13: (MC 5 sc, CC1 2 sc, MC 5 sc) x 3 (36)
Round 14: (MC 4 sc, CC1 4 sc, MC 4 sc) x 3 (36)
Round 15: (MC 5 sc, CC1 2 sc, MC 5 sc) x 3 (36)
Round 16: [4 sc, dec] x 6 (30)
Round 17: [3 sc, dec] x 6 (24) Start stuffing the head firmly.
Attach the 8mm black safety eyes for the main lens and secondary lens. Attach the 6mm black safety eye (or bead) for the smaller camera lens. Refer to the image for placement (approx. between R12 and R15, spaced centrally).
Round 18: [2 sc, dec] x 6 (18)
Round 19: [sc, dec] x 6 (12)
Round 20: [dec] x 6 (6)
FO, leave a long tail, weave through remaining 6 sts and pull tight to close. Weave in ends.
Antenna
Cut a small piece of thin wire or pipe cleaner, about 1-1.5 inches long.
Carefully insert into the top-center of the head. Secure with a dab of fabric glue if desired.
Assembly
Using the long tail from the head, sew the head securely to the top-center of the body. Ensure it’s centered and stable.
Using CC2 (Grey) yarn, embroider small grey lines or details on the head around the safety eyes as seen in the reference image.