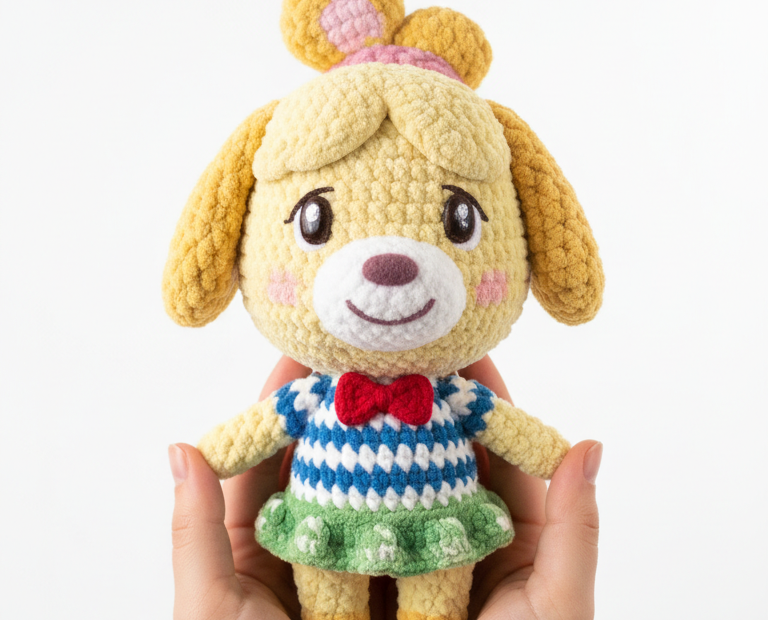
Get ready to crochet the sunniest and most helpful assistant from Animal Crossing! This detailed Isabelle Amigurumi pattern will guide you through creating your own charming plushie, perfect for fans of the game. With her signature uniform, cheerful smile, and iconic hair bun, this project is a delightful way to bring a piece of your virtual island into the real world. Start hooking your new best friend today!
Craft Your Own Loyal Companion: Why You’ll Love Crocheting Isabelle There’s immense satisfaction in crafting a beloved character by hand, and Isabelle is no exception. This pattern allows you to create a unique, handmade collectible that celebrates your passion for Animal Crossing. Whether it’s a gift for a fellow gamer or a new addition to your own collection, this adorable Isabelle plushie is sure to bring joy and a touch of Nook Inc. charm to any space, making it a truly rewarding project.
Pattern Here
Crochet Pattern: Crochet Isabelle Amigurumi Pattern: Bring Your Favorite Animal Crossing Assistant to Life! Materials Worsted weight yarn in Light Yellow (for main body/head) Worsted weight yarn in Gold/Dark Yellow (for hair bun, inner ears, feet, tail) Worsted weight yarn in White (for snout, dress stripes) Worsted weight yarn in Blue (for dress stripes) Worsted weight yarn in Green (for dress skirt) Worsted weight yarn in Red (for bow) Worsted weight yarn in Pink (for inner ear detail, cheeks, hair bun band) Worsted weight yarn in Dark Brown/Maroon (for nose embroidery) 2.75mm or 3.0mm crochet hook (or hook suitable for your yarn weight) 9mm safety eyes (or size appropriate for your chosen yarn) Polyester fiberfill for stuffing Tapestry needle Stitch markers Scissors Abbreviations MR: Magic Ring ch: chain sc: single crochet inc: increase (2 sc in one stitch) dec: decrease (sc 2 stitches together) sl st: slip stitch FO: Fasten off BLO: Back loop only FLO: Front loop only (…) x N: Repeat instructions in parenthesis N times [N]: Total number of stitches in round/row Instructions Important Note: Work in continuous rounds unless otherwise specified. Stuff firmly as you go.
Head (Light Yellow) R1: 6 sc in MR [6]R2: (inc) x 6 [12]R3: (sc, inc) x 6 [18]R4: (2 sc, inc) x 6 [24]R5: (3 sc, inc) x 6 [30]R6: (4 sc, inc) x 6 [36]R7-R13: sc around (7 rounds) [36]Insert safety eyes between R10 and R11, about 6-7 stitches apart. Embroider a small smile with black yarn and cheeks with pink yarn under the eyes. Embroider nose with dark brown/maroon yarn. R14: (4 sc, dec) x 6 [30]R15: (3 sc, dec) x 6 [24]R16: (2 sc, dec) x 6 [18]R17: (sc, dec) x 6 [12]R18: (dec) x 6 [6]FO, weave in tail to close hole. Snout (White) R1: Ch 4. sc in 2nd ch from hook, sc in next, 3 sc in last ch. Continue on other side of ch: sc in next, 2 sc in last [8]R2: inc, sc, inc x 3, sc, inc x 2 [14]R3: sc around [14]FO, leaving a long tail for sewing. Lightly stuff and sew to the front of the head, centered below the eyes. Ears (Make 2 – Light Yellow, Gold, Pink) Inner Ear (Gold):
R1: 6 sc in MR [6]R2: (sc, inc) x 3 [9]R3: sc around [9]Switch to Pink yarn. Ch 6, sl st into each stitch back along the edge of the ear to create the pink detail. FO, weave in ends. Outer Ear (Light Yellow):
R1: 6 sc in MR [6]R2: (sc, inc) x 3 [9]R3: (2 sc, inc) x 3 [12]R4-R5: sc around [12]Insert the gold/pink inner ear into the light yellow outer ear, folding slightly. Pin and sew securely to the top sides of the head. Hair Bun (Make 2 – Gold, Pink) Bun (Gold): R1: 6 sc in MR [6]R2: (inc) x 6 [12]R3-R4: sc around [12]R5: (dec) x 6 [6]FO, stuff lightly, and close. Pink Band: Ch 15 in Pink yarn. FO. Wrap around the base of each bun and secure.Sew the two buns to the top of the head, slightly angled. Body (Light Yellow) R1: 6 sc in MR [6]R2: (inc) x 6 [12]R3: (sc, inc) x 6 [18]R4: (2 sc, inc) x 6 [24]R5: (3 sc, inc) x 6 [30]R6-R12: sc around (7 rounds) [30]R13: (3 sc, dec) x 6 [24]R14-R16: sc around (3 rounds) [24]FO, leaving a long tail for sewing to the head. Dress (Blue, White, Green, Red) Dress Top (Blue & White):
Start with Blue yarn. Ch 25. Join with sl st to form a ring. (Ensure chain is not twisted) R1: Ch 1, sc in each ch around. Join with sl st [24]R2-R3: Ch 1, sc around. Join.Switch to White yarn. R4-R5: Ch 1, sc around. Join.Switch to Blue yarn. R6-R7: Ch 1, sc around. Join.Switch to White yarn. R8-R9: Ch 1, sc around. Join.Switch to Blue yarn. R10: Ch 1, sc around. Join. FO.Dress Skirt (Green):
Attach Green yarn to the FLO of R1 of the Dress Top. R1: Ch 1, (sc, ch 1, sc) in each FLO stitch around. Join with sl st [48 sc, 24 ch-1 spaces]R2: Ch 1, (sc in sc, 2 sc in ch-1 space) x 24. Join [72]R3-R5: Ch 1, sc around. Join (3 rounds) [72]FO. Red Bow:
With Red yarn, ch 6. Row 1-3: sc in 2nd ch from hook, sc across [5]. Ch 1, turn.FO, leaving a long tail. Pinch the center of the rectangle and wrap the tail around it several times to create a bow shape. Secure. Sew the bow to the front of the dress top, centered. Arms (Make 2 – Light Yellow) R1: 6 sc in MR [6]R2: (sc, inc) x 3 [9]R3-R10: sc around (8 rounds) [9]Stuff lightly. Sl st to close the opening. FO, leaving a long tail for sewing. Sew to the sides of the body at the shoulder level. Legs (Make 2 – Light Yellow, Gold) R1: 6 sc in MR [6]R2: (inc) x 6 [12]R3-R6: sc around (4 rounds) [12]Stuff firmly. Switch to Gold/Dark Yellow yarn. R7-R9: sc around (3 rounds) [12]R10: (dec) x 6 [6]FO, weave in tail to close. Sew to the bottom of the body, evenly spaced. Tail (Gold) R1: 6 sc in MR [6]R2: (sc, inc) x 3 [9]R3: sc around [9]R4: (sc, dec) x 3 [6]Stuff lightly. FO, leaving a long tail. Sew to the back of the body, just below the dress. Assembly Sew the Head to the Body securely. Dress the body with the crocheted dress. Sew the Arms to the sides of the body. Sew the Legs to the bottom of the body. Attach the Tail to the back of the body. Ensure all parts are securely attached and stuffing is evenly distributed.