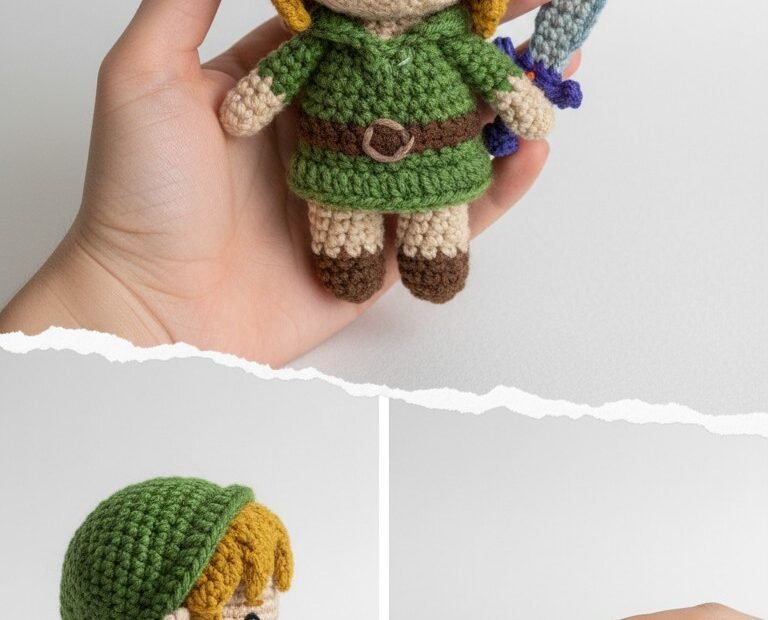
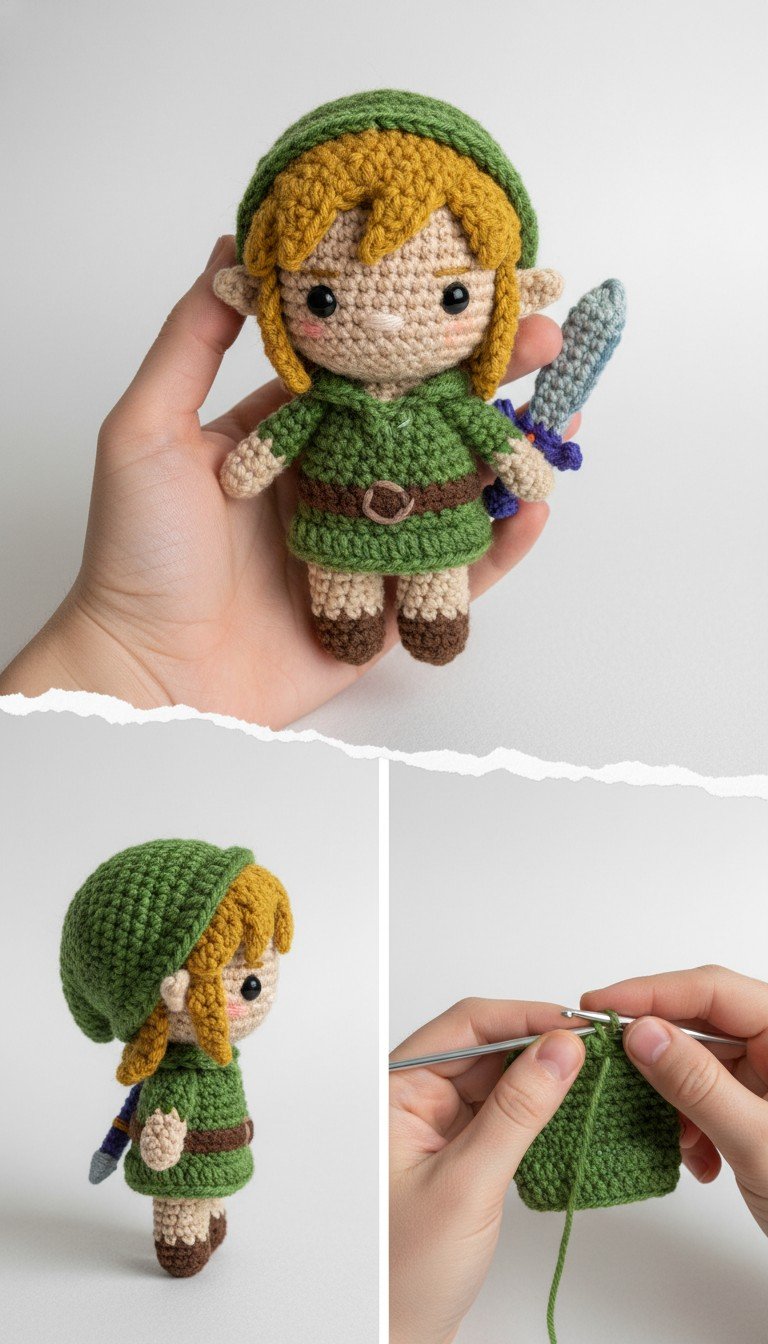
Embark on an epic crafting adventure with this detailed crochet pattern to create your very own Link amigurumi! Inspired by the beloved hero from The Legend of Zelda, this charming doll captures all his iconic features, from his green tunic and hat to his trusty Master Sword. Perfect for fans and crafters alike, this pattern will guide you to bring a piece of Hyrule into your home.
Bring the Spirit of Adventure to Life with Yarn!
Crafting your own Link amigurumi is more than just following a pattern; it’s an opportunity to create a tangible representation of courage and heroism. This project offers immense satisfaction as you watch the legendary character take shape, stitch by stitch. Whether for gifting to a fellow gamer or adding to your own collection, this crocheted Link will be a cherished symbol of your crafting prowess and love for adventure.
Crochet Pattern: Crochet Link Amigurumi Pattern: Craft Your Own Hero of Hyrule!
Materials
DK weight yarn in: Beige (Skin), Golden Yellow (Hair), Forest Green (Tunic/Hat), Brown (Belt/Boots), Light Blue-Grey (Sword Blade), Dark Purple/Blue (Sword Hilt), Yellow (Sword Detail)
2.5mm crochet hook
6mm black safety eyes
Polyester fiberfill
Tapestry needle
Stitch marker
Pink embroidery floss (for cheeks)
Abbreviations
MR = Magic Ring
ch = chain
sc = single crochet
inc = increase (2 sc in one stitch)
dec = decrease (sc 2 together)
sl st = slip stitch
FO = Fasten off
BLO = Back Loop Only
( ) = repeat instructions in parentheses
[ ] = total number of stitches at end of round
Instructions
Head & Body (Start with Beige yarn)
Round 1: 6 sc in MR [6]
Round 2: (inc) x6 [12]
Round 3: (sc, inc) x6 [18]
Round 4: (2 sc, inc) x6 [24]
Round 5: (3 sc, inc) x6 [30]
Round 6: (4 sc, inc) x6 [36]
Rounds 7-13: sc in each stitch around [36]
Round 14: (4 sc, dec) x6 [30]
Round 15: (3 sc, dec) x6 [24]
Insert safety eyes between Rounds 11 and 12, about 6 stitches apart. Begin stuffing firmly.
Round 16: (2 sc, dec) x6 [18]
Round 17: (sc, dec) x6 [12]
Round 18: sc in each stitch around (neck) [12]
Change to Forest Green yarn.
Round 19: (sc, inc) x6 [18]
Round 20: (2 sc, inc) x6 [24]
Round 21: (3 sc, inc) x6 [30]
Rounds 22-26: sc in each stitch around [30]
Round 27: (3 sc, dec) x6 [24]
Continue stuffing as you go.
Round 28: (2 sc, dec) x6 [18]
Round 29: (sc, dec) x6 [12]
Round 30: (dec) x6 [6]
FO, weave in tail to close the hole.
Arms (Make 2 – Beige yarn)
Round 1: 5 sc in MR [5]
Round 2: (inc) x5 [10]
Rounds 3-8: sc in each stitch around [10]
Stuff lightly. FO, leaving a long tail for sewing.
Legs (Make 2 – Start with Brown yarn)
Round 1: 6 sc in MR [6]
Round 2: (inc) x6 [12]
Round 3: BLO sc in each stitch around [12]
Round 4: (2 sc, dec) x3 [9]
Stuff foot firmly.
Change to Beige yarn.
Rounds 5-10: sc in each stitch around [9]
Stuff lightly. FO, leaving a long tail for sewing.
Ears (Make 2 – Beige yarn)
Row 1: Ch 5, sc in 2nd ch from hook, sc in next 2 ch, 3 sc in last ch. Continue on other side of chain: sc in next 3 ch. [9]
FO, leaving a long tail. Fold the ear in half and sew the bottom edges together to create a slight curve.
Hair (Golden Yellow yarn)
Round 1: 6 sc in MR [6]
Round 2: (inc) x6 [12]
Round 3: (sc, inc) x6 [18]
Round 4: (2 sc, inc) x6 [24]
Round 5: (3 sc, inc) x6 [30]
Round 6: (4 sc, inc) x6 [36]
Rounds 7-9: sc in each stitch around [36]
For bangs: Ch 6, sc in 2nd ch from hook and next 4 ch. Sl st into next stitch on wig cap. (Repeat 2-3 times for desired bang thickness).
For sideburns: Ch 10, sc in 2nd ch from hook and next 8 ch. Sl st into next stitch on wig cap. (Repeat on other side).
FO, leaving a long tail for sewing.
Hat (Forest Green yarn)
Round 1: 6 sc in MR [6]
Round 2: (sc, inc) x3 [9]
Round 3: sc in each stitch around [9]
Round 4: (2 sc, inc) x3 [12]
Round 5: sc in each stitch around [12]
Round 6: (3 sc, inc) x3 [15]
Round 7: sc in each stitch around [15]
Round 8: (4 sc, inc) x3 [18]
Round 9: sc in each stitch around [18]
Round 10: (5 sc, inc) x3 [21]
Round 11: sc in each stitch around [21]
Round 12: (6 sc, inc) x3 [24]
Round 13: sc in each stitch around [24]
Round 14: (7 sc, inc) x3 [27]
Rounds 15-17: sc in each stitch around [27]
FO, leaving a long tail for sewing.
Belt (Brown yarn)
Ch 25 (or adjust to fit body), sc in 2nd ch from hook and across. [24 sc]
FO, leaving a tail.
Master Sword (Start with Dark Purple/Blue yarn)
Hilt (Dark Purple/Blue):
Round 1: 4 sc in MR [4]
Round 2: sc in each stitch around [4]
Stuff lightly.
Guard (Yellow): Ch 7, sl st into first ch to form a ring. Sc in each ch around. [7]
Attach the guard around Round 1 of the hilt.
Change to Light Blue-Grey yarn.
Blade:
Round 1: 4 sc in MR [4]
Round 2: (sc, inc) x2 [6]
Rounds 3-6: sc in each stitch around [6]
Round 7: (2 sc, inc) x2 [8]
Rounds 8-10: sc in each stitch around [8]
Round 11: (3 sc, inc) x2 [10]
Rounds 12-14: sc in each stitch around [10]
Stuff blade lightly. Sl st into next stitch, FO, leaving a long tail. Flatten the top and sew closed.
Assemble the sword by sewing the blade to the hilt with the guard in between.
Assembly
Sew the hair wig cap onto the head, positioning the bangs and sideburns as desired.
Sew the ears onto the sides of the head, slightly under the hair.
Embroider a small ‘v’ shape for the nose between the eyes, and two small pink lines for cheeks under the eyes using pink embroidery floss.
Sew the arms to the sides of the body, just below the neck.
Sew the legs to the bottom of the body.
Wrap the brown belt around the body at the waistline (around R22-23) and sew the ends together, then secure to the body.