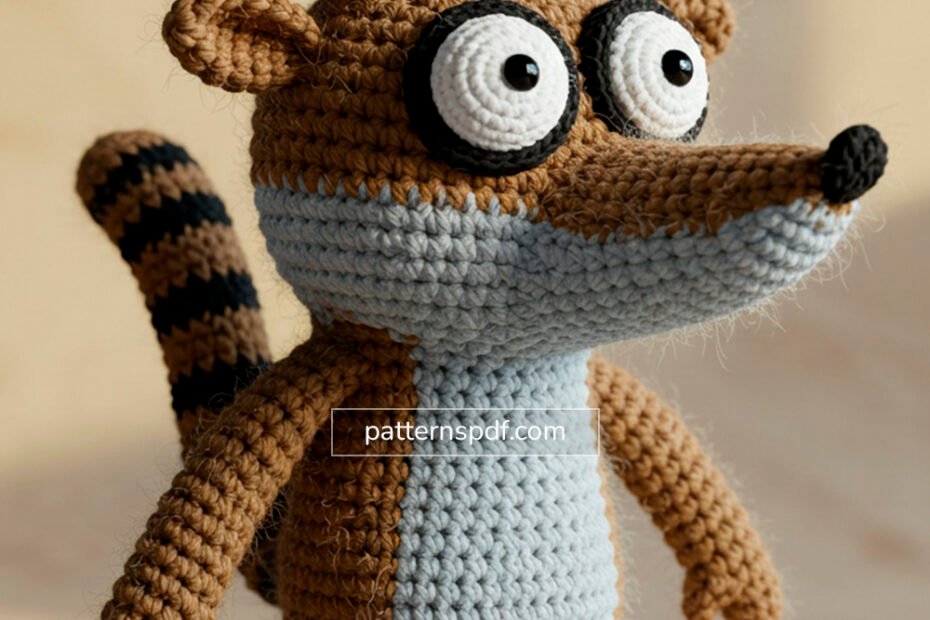
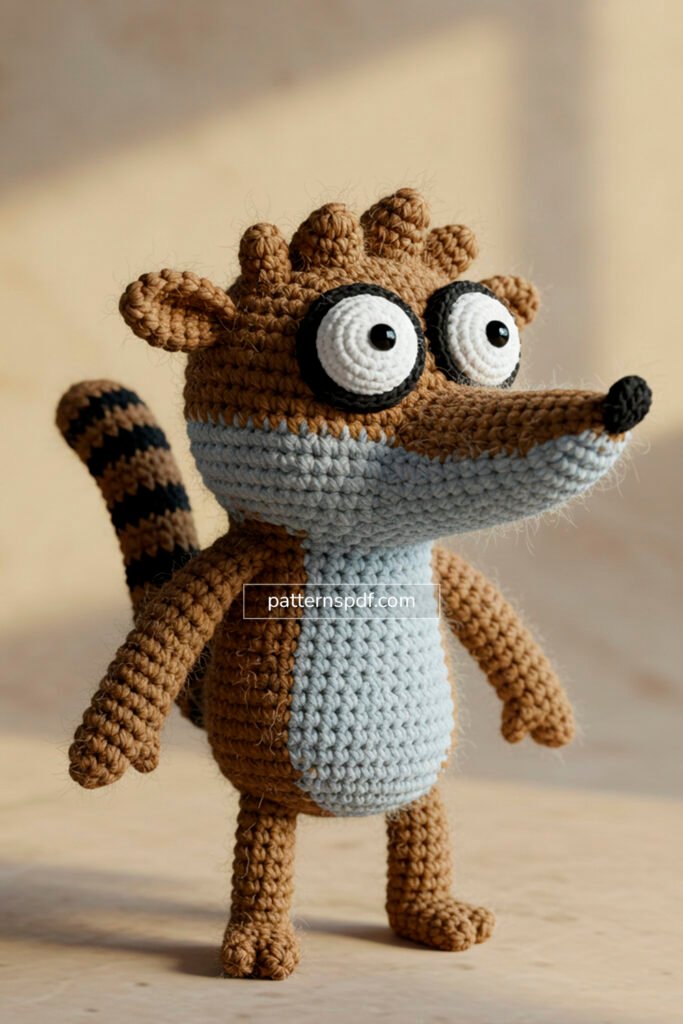
Fans of the beloved animated series Regular Show will instantly recognize this charming crochet creation: Rigby the Raccoon, immortalized in cuddly amigurumi form. This meticulously crafted piece captures Rigby’s signature features, from his distinctive facial markings and large, expressive eyes to his bushy, striped tail and scruffy head. Made with care and attention to detail, this Rigby amigurumi is not just a toy but a delightful piece of fan art, perfect for display or gifting to a fellow enthusiast. Its earthy brown tones, light blue belly, and black accents faithfully replicate the character’s appearance, making it an ideal project for intermediate crocheters looking to bring a touch of cartoon fun into their craft.
Crafting Your Own Rigby: A Crochet Adventure
Embarking on a Rigby amigurumi project offers a rewarding challenge for those familiar with basic crochet stitches. While the exact pattern details aren’t provided, observing the image reveals key elements that a dedicated crafter could reverse-engineer or adapt from similar patterns. The body, head, and limbs are typically worked in continuous rounds of single crochet, building up the shape. The defining features like the snout and eye patches would be separate pieces sewn on, adding dimension. The textured hair on Rigby’s head can be achieved through techniques like surface crochet or strategically placed stitches, while his iconic striped tail would involve color changes. With patience and a keen eye for detail, crocheters can recreate this lovable, lazy raccoon, transforming yarn into a tangible piece of their favorite animated world.
Rigby the Raccoon Amigurumi Pattern
Skill Level: Intermediate
Finished Size: Approximately [X] inches tall (when made with specified yarn and hook)
Materials:
Worsted weight yarn in:
Brown (main body, head, limbs, ears, tail stripes)
Light Blue/Grey (belly, snout base)
Black (eye outlines, pupils, nose, tail stripes)
White (eyes)
Crochet hook: [Hook Size, e.g., 3.5mm (E)]
Stitch marker
Tapestry needle
Polyester fiberfill for stuffing
Scissors
Abbreviations (US Crochet Terms):
MR: Magic Ring
ch: chain
sc: single crochet
inc: single crochet increase (2 sc in one stitch)
dec: single crochet decrease (sc2tog)
sl st: slip stitch
FO: Fasten off
st(s): stitch(es)
[…] : repeat instructions in brackets
(…) : stitch count at the end of the round/row
BLO: Back Loop Only
Important Notes:
This pattern is worked in continuous rounds unless otherwise specified. Use a stitch marker to mark the first stitch of each round.
Stuff pieces firmly as you go, unless stated otherwise.
Gauge is not critical for this project, but consistent tension will ensure a neat finish.
Color changes should be made on the last pull-through of the previous stitch.
PATTERN INSTRUCTIONS
Head (Brown Yarn)
Round 1: 6 sc in MR. (6)
Round 2: [Inc] x6. (12)
Round 3: [Sc, inc] x6. (18)
Round 4: [2 sc, inc] x6. (24)
Round 5: [3 sc, inc] x6. (30)
Round 6: [4 sc, inc] x6. (36)
Round 7: [5 sc, inc] x6. (42)
Rounds 8-15: Sc in each st around. (42) – Adjust number of rounds for desired head height.
Round 1: Sc in 2nd ch from hook, 3 sc, 3 sc in last ch. Working down other side of ch: 4 sc. (11)
Round 2: Inc, 3 sc, inc x3, 3 sc, inc x2. (17)
Round 3: Sc around. (17) – Adjust if more rounds are needed to match image.
Change to Brown Yarn.
Round 4: Sc around. (17) – Or more rounds if needed for the brown section.
FO, leaving a long tail for sewing. Stuff lightly.
Eyes (Make 2 – Start with White Yarn)
Round 1: 6 sc in MR. (6)
Round 2: [Inc] x6. (12)
Round 3: [Sc, inc] x6. (18)
FO, leaving a long tail for sewing.
Eye Patches (Make 2 – Black Yarn)
Chain 7.
Row 1: Sc in 2nd ch from hook, 5 sc. Ch 1, turn. (6)
Row 2: Sc across. Ch 1, turn. (6) – Repeat Row 2 for 1-2 more rows for desired height.
FO, leaving a long tail for sewing. Shape as an oval/rectangle as you sew onto the white eye.
Ears (Make 2 – Brown Yarn)
Round 1: 6 sc in MR. (6)
Round 2: [Sc, inc] x3. (9)
Round 3: Sc in each st around. (9)
FO, leaving a long tail for sewing. Pinch flat and do not stuff.
Arms (Make 2 – Brown Yarn)
Round 1: 6 sc in MR. (6)
Round 2: [Sc, inc] x3. (9)
Rounds 3-12: Sc in each st around. (9) – Adjust number of rounds for desired arm length.
FO, leaving a long tail for sewing. Stuff lightly, leaving the top open.
Legs (Make 2 – Brown Yarn)
Round 1: 6 sc in MR. (6)
Round 2: [Inc] x6. (12)
Rounds 3-12: Sc in each st around. (12) – Adjust number of rounds for desired leg length.
FO, leaving a long tail for sewing. Stuff firmly.
Tail (Start with Brown Yarn)
Round 1: 6 sc in MR. (6)
Round 2: [Sc, inc] x3. (9)
Round 3: Sc in each st around. (9)
Round 4: [2 sc, inc] x3. (12)
Round 5: Sc in each st around. (12)
Change to Black Yarn.
Round 6: Sc in each st around. (12)
Change to Brown Yarn.
Round 7: Sc in each st around. (12)
Change to Black Yarn.
Round 8: Sc in each st around. (12)
Change to Brown Yarn.
Round 9: Sc in each st around. (12)
Round 10: [Sc, dec] x4. (8) – Start stuffing tail firmly as you go.
Change to Black Yarn.
Round 11: Sc in each st around. (8)
Change to Brown Yarn.
Round 12: Sc in each st around. (8)
Change to Black Yarn.
Round 13: Sc in each st around. (8)
Change to Brown Yarn.
Rounds 14-16: Sc in each st around. (8)
Round 17: [Dec] x4. (4)
FO, leaving a long tail for sewing. Close the opening and weave in ends.
Assembly:
Attach Head to Body: Sew the head to the body, centering it.
Attach Snout: Pin the snout to the lower-middle part of the head, ensuring the light blue/grey section is visible. Sew securely.
Assemble Eyes: Sew the black eye patches onto the white eye circles.
Attach Eyes: Pin the assembled eyes above the snout, evenly spaced. Sew securely.
Embroider Features (Black Yarn):
Pupils: Embroider small black circles or French knots onto the center of the white eye pieces (through the black patch).
Nose: Embroider a small oval or inverted triangle onto the tip of the snout.
Mouth: Embroider a small, curved line below the nose for the mouth.
Face Markings: Using black yarn, embroider lines or shapes around the eyes and along the side of the snout to replicate Rigby’s facial markings from the cartoon. Refer to the image for placement.
Attach Ears: Sew the folded ears to the top sides of the head.
Attach Arms: Sew the arms to the sides of the body, just below the neck seam.
Attach Legs: Sew the legs to the bottom of the body, ensuring the doll can stand.
Attach Tail: Sew the striped tail to the back of the body, securely.
Head “Hair” (Optional – Brown Yarn): Using a technique like surface crochet or by creating small chains and attaching them, add small tufts or spikes of yarn to the top of Rigby’s head for his signature scruffy look.
Weave in all remaining loose ends securely.
Copyright and Selling:
This pattern is for personal use only.
Please do not sell, distribute, or reproduce this pattern in any form, in whole or in part.
You may sell finished items made from this pattern, but please give credit to [Your Name/Pattern Name] as the designer.
To finalize this as a truly professional pattern, you would need to:
Perform precise stitch counts and shaping: The provided numbers are a starting point; you’d need to fine-tune them by crocheting the item yourself.
Test the pattern thoroughly: Have other crocheters follow it to catch any ambiguities or errors.
Include high-quality photographs: Images of the finished product, and possibly key steps, are essential.
Consider a clear, aesthetically pleasing layout: Use consistent formatting, font, and spacing.