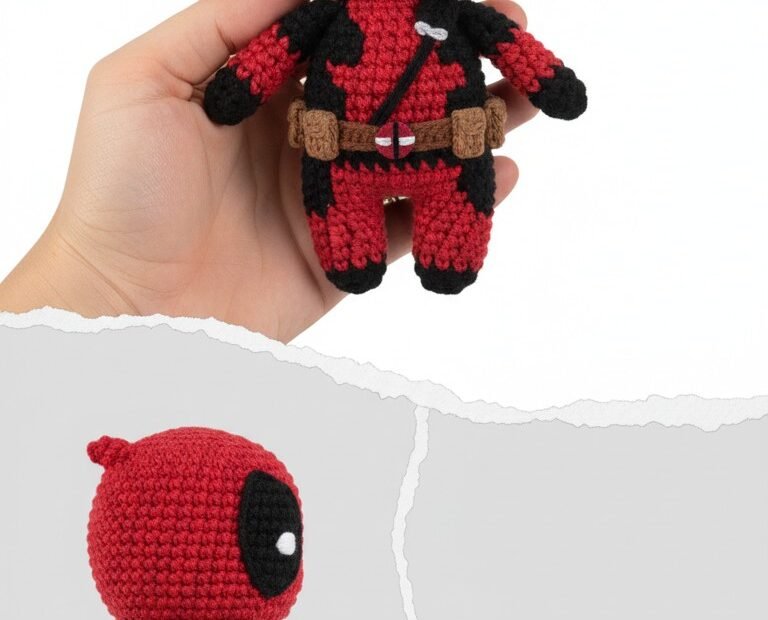
Unleash your inner anti-hero with this awesome Deadpool amigurumi pattern! Perfect for Marvel fans and crochet enthusiasts alike, this detailed guide will help you create your very own mini Merc with a Mouth. Whether you’re making a unique gift or adding to your collection, this fun project is sure to bring a smile (and maybe a few fourth-wall breaks) to anyone who sees it. Get ready to crochet!
Bring Your Favorite Anti-Hero to Life!
Imagine the satisfaction of crafting a beloved character with your own hands. This Deadpool amigurumi isn’t just a toy; it’s a testament to your crochet skills and fandom. It makes a fantastic display piece for your desk or shelf, a one-of-a-kind present for a fellow comic book lover, or even a quirky companion for your own adventures. Dive in and create something truly special!
Crochet Pattern: Crochet the Merc with a Mouth: An Epic Deadpool Amigurumi Pattern!
Materials
DK (Light Worsted) yarn in Red
DK (Light Worsted) yarn in Black
DK (Light Worsted) yarn in Brown
Small amount of White yarn for embroidery
2.5mm crochet hook
Polyester fiberfill for stuffing
Tapestry needle
Stitch marker
Scissors
Abbreviations
MR: Magic Ring
ch: chain
sc: single crochet
inc: increase (2 sc in one stitch)
dec: decrease (sc two stitches together)
sl st: slip stitch
FO: Fasten off
rnd: round
BLO: Back Loop Only
Instructions
Welcome, fellow crafter! Let’s bring Deadpool to life with yarn and hook.
HEAD (Red)
Rnd 1: Start with Red yarn. 6 sc in a MR (6)
Rnd 2: Inc in each st around (12)
Rnd 3: (1 sc, inc) x6 (18)
Rnd 4: (2 sc, inc) x6 (24)
Rnd 5: (3 sc, inc) x6 (30)
Rnd 6: (4 sc, inc) x6 (36)
Rnd 7-13: Sc in each st around (36) (7 rounds)
Rnd 14: (4 sc, dec) x6 (30)
Rnd 15: (3 sc, dec) x6 (24)
Rnd 16: (2 sc, dec) x6 (18)
Stuff head firmly.
Rnd 17: (1 sc, dec) x6 (12)
Rnd 18: Dec x6 (6)
FO, weave in tail to close the hole.
BODY (Red)
Rnd 1: Start with Red yarn. 6 sc in a MR (6)
Rnd 2: Inc in each st around (12)
Rnd 3: (1 sc, inc) x6 (18)
Rnd 4: (2 sc, inc) x6 (24)
Rnd 5: (3 sc, inc) x6 (30)
Rnd 6: (4 sc, inc) x6 (36)
Rnd 7-12: Sc in each st around (36) (6 rounds)
Rnd 13: (4 sc, dec) x6 (30)
Rnd 14-15: Sc in each st around (30) (2 rounds)
Stuff body firmly. FO, leaving a long tail for sewing.
ARMS (Make 2 – Red & Black)
Rnd 1: Start with Red yarn. 6 sc in a MR (6)
Rnd 2: (1 sc, inc) x3 (9)
Rnd 3-5: Sc in each st around (9) (3 rounds)
Change to Black yarn.
Rnd 6-8: Sc in each st around (9) (3 rounds)
Stuff lightly. Pinch opening flat and sc across to close (4 sc). FO, leaving a long tail for sewing.
LEGS (Make 2 – Black & Red)
Rnd 1: Start with Black yarn. Ch 6. Sc in 2nd ch from hook, 3 sc, 3 sc in last ch. Continue on other side of chain: 3 sc, 2 sc in last st (13)
Rnd 2: Inc, 3 sc, inc x3, 3 sc, inc x2 (19)
Rnd 3: Sc in BLO for this round (19)
Rnd 4: Sc in each st around (19)
Rnd 5: 4 sc, dec x6, 3 sc (13)
Stuff foot.
Rnd 6: 4 sc, dec x3, 3 sc (10)
Change to Red yarn.
Rnd 7-14: Sc in each st around (10) (8 rounds)
Stuff leg firmly. Pinch opening flat and sc across to close (5 sc). FO, leaving a long tail for sewing.
BELT (Brown)
Row 1: With Brown yarn, Ch 31. Sc in 2nd ch from hook and across (30)
FO, leaving a long tail for sewing around the body.
Pouches (Make 3-4, Brown): Ch 3, sc in 2nd ch from hook, 1 sc (2). Ch 1, turn. Sc 2. FO, leave tail for sewing.
SHOULDER STRAP (Black)
Row 1: With Black yarn, Ch 20 (adjust length as needed). Sc in 2nd ch from hook and across (19)
FO, leaving tails for sewing.
HEAD NUBS (Make 2 – Red)
Ch 3. Sc in 2nd ch from hook, sc in next ch (2)
FO, leaving tails for sewing.
EYE PATCHES (Make 2 – Black)
Rnd 1: With Black yarn, Ch 4. Sc in 2nd ch from hook, 1 sc, 3 sc in last ch. Continue on other side of chain: 1 sc, 2 sc in last st (8)
Rnd 2: Sc in each st around (8)
FO, leaving a tail for sewing.
ASSEMBLY
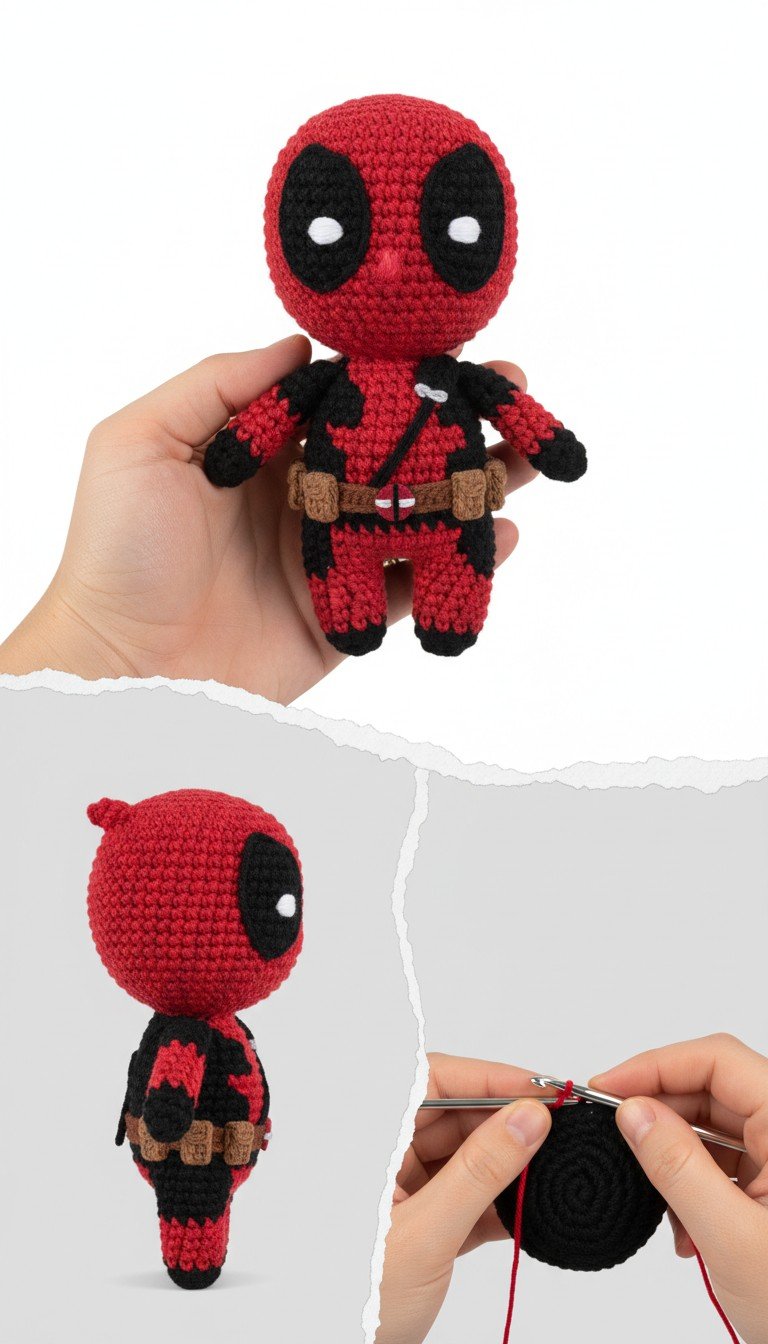
1. Head Details: Sew the Black eye patches onto the head. Using White yarn, embroider small dots onto the center of the black patches for pupils. Sew the two small Red head nubs on top of the head.
2. Attach Limbs: Sew the Head securely to the top of the Body. Sew the Arms to the sides of the Body, just below the neck. Sew the Legs to the bottom of the Body.
3. Belt & Pouches: Wrap the Brown Belt around Deadpool’s waist and sew securely. Sew the small Brown pouches onto the belt.
4. Body Markings: Using Black yarn and a tapestry needle, embroider the distinct black markings onto Deadpool’s chest and back as seen in the reference image. These are typically irregular, almost blob-like shapes.
5. Shoulder Strap: Sew one end of the Black shoulder strap to the top back of the body/shoulder and the other end diagonally across the chest to the opposite hip.