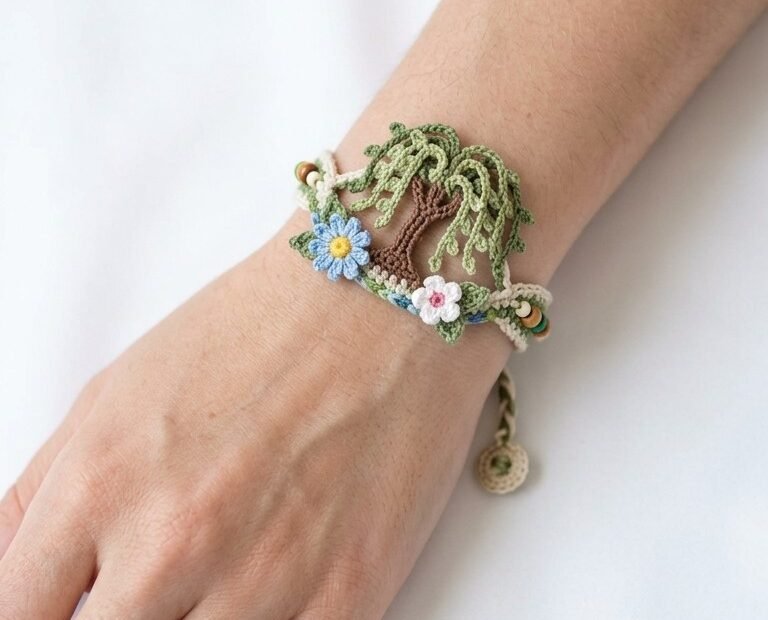
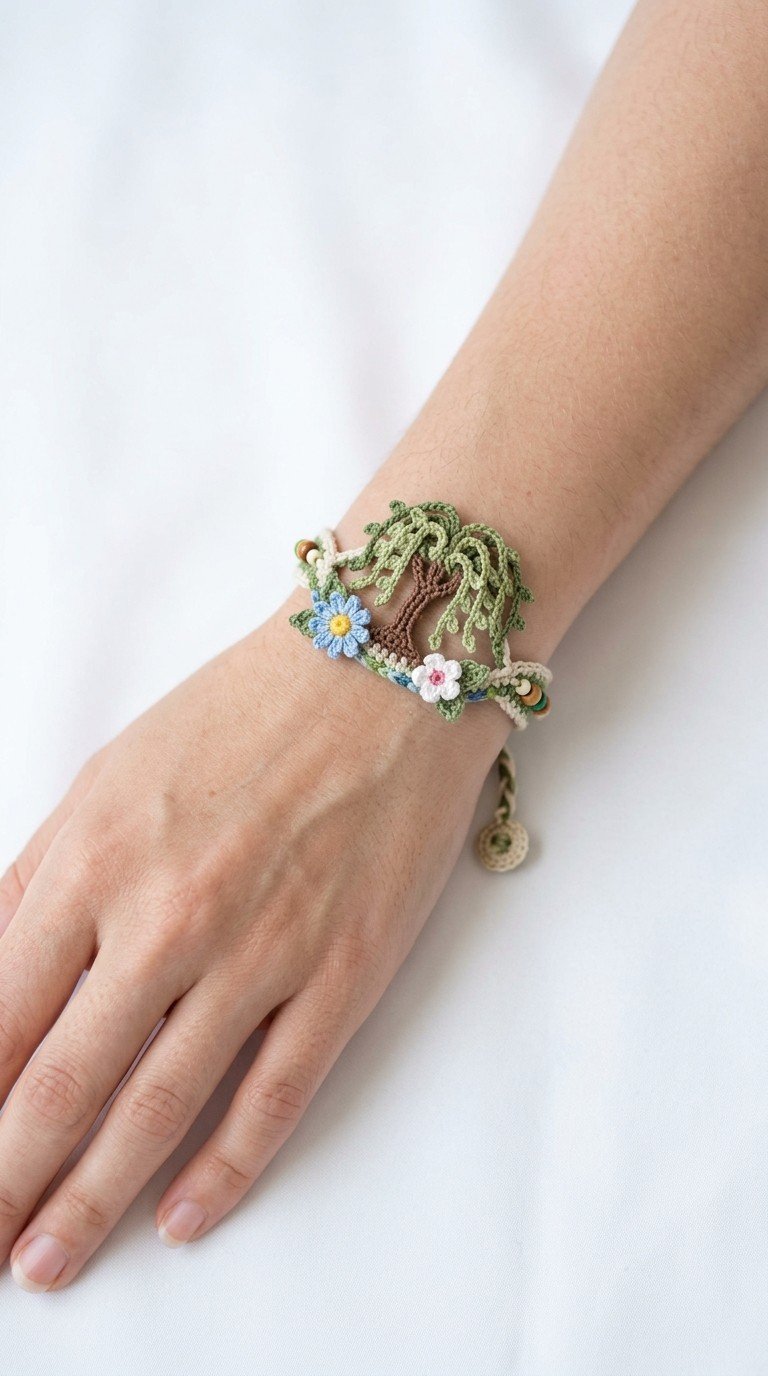
Embrace the serene beauty of nature with this enchanting Crochet Weeping Willow Tree Bracelet pattern. This unique design captures the grace of a willow tree, complemented by tiny, colorful blossoms, creating a wearable piece of art. Perfect for nature lovers and crafters alike, this bracelet adds a touch of bohemian elegance and handmade charm to any outfit, making it an ideal gift or personal keepsake.
Weave the Beauty of Nature into Your Style
Crafting this intricate bracelet allows you to carry a miniature landscape on your wrist, a constant reminder of the tranquility and beauty found in nature. The delicate details of the willow tree and vibrant flowers will spark conversations and admiration, showcasing your skill and unique sense of style. Enjoy the meditative process of bringing this charming woodland scene to life with your own hands.
Crochet Pattern: Crochet Weeping Willow Tree Bracelet Pattern: Nature’s Charm on Your Wrist
Materials
Crochet thread, size 10 (or fine sport weight yarn) in: Brown (for trunk), Light Green (for leaves, base), Dark Green (for leaves), Cream/Beige (for main cord), Light Blue (for flower), Yellow (for flower center), White (for flower), Pink (for flower center, small flower)
Crochet Hook: 1.75mm or 2.0mm (adjust to thread/yarn weight)
Small wooden beads (approx. 4-6mm, 4-6 pieces)
Tapestry needle
Scissors
Small decorative button (for closure)
Abbreviations
ch: chain
sl st: slip stitch
sc: single crochet
hdc: half double crochet
dc: double crochet
tr: treble crochet
MR: Magic Ring
st(s): stitch(es)
FO: Fasten Off
Instructions
Tree Trunk (Brown):
Ch 5.
Row 1: Sc in 2nd ch from hook and in next 3 chs (4 sc). Ch 1, turn.
Row 2-5: 4 sc. Ch 1, turn.
Row 6 (increase): Sc in first st, 2 sc in next st, sc in next 2 sts (5 sc). Ch 1, turn.
Row 7-8: 5 sc. Ch 1, turn.
Row 9 (increase): Sc in first 2 sts, 2 sc in next st, sc in next 2 sts (6 sc). Ch 1, turn.
Row 10-12: 6 sc. Ch 1, turn.
FO, leave a long tail for sewing.
Tree Foliage (Light Green and Dark Green):
(Work these directly onto the top edge of the trunk using a sl st to attach each strand.)
Attach Light Green yarn to the top right corner of the trunk.
Leaf Strand: Ch 7, sl st in 2nd ch from hook, sc in next ch, hdc in next ch, dc in next 2 ch, tr in last ch. Sl st into the top edge of the trunk a short distance from where you started.
Repeat this 3-4 more times across the top of the trunk, varying chain lengths (e.g., Ch 5, Ch 9) for different leaf sizes.
Attach Dark Green yarn and repeat the process, overlapping the light green strands and filling in gaps to create a full, layered canopy.
FO. Weave in ends.
Blue Flower (Light Blue, Yellow):
Using Light Blue yarn, MR.
Rnd 1: Ch 1, 6 sc in MR. Sl st to first sc.
Rnd 2 (Petals): *[Ch 2, dc in same st, ch 2, sl st in same st], sl st in next sc.* Repeat from * to * 6 times. FO, leave tail.
Sew a few stitches with Yellow yarn in the center for the pistil.
White Flower (White, Pink):
Using White yarn, MR.
Rnd 1: Ch 1, 5 sc in MR. Sl st to first sc.
Rnd 2 (Petals): *[Ch 2, dc in same st, ch 2, sl st in same st], sl st in next sc.* Repeat from * to * 5 times. FO, leave tail.
Sew a few stitches with Pink yarn in the center for the pistil.
Small Pink Flower (Pink):
Using Pink yarn, MR.
Rnd 1: Ch 1, 3 sc in MR. Sl st to first sc.
Rnd 2 (Petals): *[Ch 1, sc in same st, ch 1, sl st in same st], sl st in next sc.* Repeat from * to * 3 times. FO, leave tail.
Central Green Base (Light Green):
Ch 15.
Row 1: Sc in 2nd ch from hook and in next 13 chs (14 sc). Ch 1, turn.
Row 2: Sc in each st across (14 sc). FO, leave long tails for attaching cords.
Bracelet Cords (Cream/Beige & Light Green for a variegated look – make 2 identical cords):
Cut one strand of Cream/Beige yarn (approx. 30 inches / 75 cm).
Cut one strand of Light Green yarn (approx. 30 inches / 75 cm).
Hold both strands together and make a slip knot.
Ch 60.
Sl st in 2nd ch from hook and in each ch across. FO. Leave a long tail (approx. 10 inches / 25 cm) for attaching to the central base.
Before fastening off, string 2-3 small wooden beads onto each cord from the free end. Slide them down towards the working end.
Repeat for the second cord.
Assembly:
1. Attach Tree and Flowers to Green Base:
Using the long tail from the Tree Trunk, sew the tree securely onto the center of the Light Green Bracelet Base.
Sew the Blue Flower to the left side of the tree, slightly overlapping the base.
Sew the White Flower to the right side of the tree, slightly overlapping the base.
Sew the Small Pink Flower near the base of the tree, between the blue and white flowers.
Weave in all remaining tails from the motifs into the back of the central base.
2. Attach Cords to Green Base:
Take one Bracelet Cord. Using the long tail, sew one end of the cord securely to one short side of the Light Green Bracelet Base. Ensure the beads are positioned on the cord as desired.
Repeat for the second Bracelet Cord, attaching it to the other short side of the Green Base.
3. Create Closure:
On one free end of a Bracelet Cord (the end without the central base), tie a secure knot to prevent unraveling. Create a small loop (e.g., ch 5, sl st to first ch, then sew securely to form loop) or directly attach the small decorative button.
On the other free end of the second Bracelet Cord, knot the yarn tail securely. Attach the small decorative button or create a small crocheted disc (MR, 6 sc, sl st, FO) to serve as the button for the loop. Adjust length by tying knots as needed.