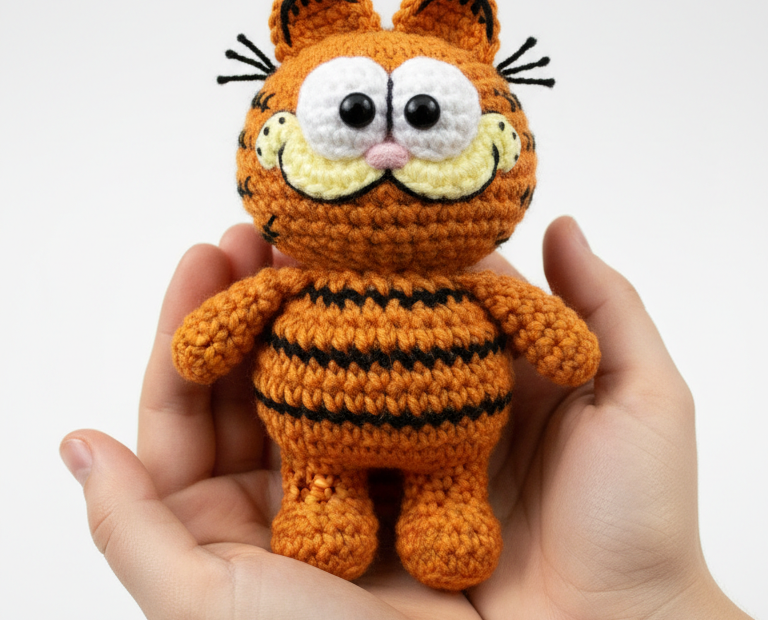
Bring the beloved, lasagna-loving cat to life with this delightful Garfield amigurumi pattern! Perfect for fans of the classic comic strip, this crochet project captures Garfield’s iconic orange fur, mischievous grin, and signature stripes. Whether for a gift or to adorn your own space, this grumpy yet charming cat will surely add a touch of cartoon fun.
Why You’ll Love Crocheting This Classic Character
There’s something uniquely satisfying about crafting a character from your favorite childhood memories. This Garfield amigurumi isn’t just a toy; it’s a nostalgic piece of art. The detailed design ensures a recognizable and adorable finished product, making it a fantastic conversation starter and a testament to your crochet skills. Get ready to create a truly special keepsake!
Crochet Pattern: Crochet Your Own Grumpy Garfield: An Amigurumi Pattern for the Iconic Cat
Materials
Worsted weight yarn in: Orange (main color), Black, White, Yellow, and a tiny bit of Pink
Crochet hook (suggested size: 3.0mm)
Safety eyes (approx. 10-12mm, black)
Fiberfill stuffing
Tapestry needle
Scissors
Abbreviations
MR: Magic Ring
ch: chain
sc: single crochet
inc: increase (2 sc in one stitch)
dec: decrease (sc two stitches together)
sl st: slip stitch
FO: Fasten off
R: Round/Row
st(s): stitch(es)
Instructions
Head (Orange Yarn)
R1: Start with a MR, 6 sc into the ring. [6]
R2: Inc in each st around. [12]
R3: (1 sc, inc) x 6. [18]
R4: (2 sc, inc) x 6. [24]
R5: (3 sc, inc) x 6. [30]
R6: (4 sc, inc) x 6. [36]
R7: (5 sc, inc) x 6. [42]
R8-14: Sc in each st around (7 rounds). [42]
R15: (5 sc, dec) x 6. [36]
R16: (4 sc, dec) x 6. [30]
Start stuffing the head firmly.
R17: (3 sc, dec) x 6. [24]
R18: (2 sc, dec) x 6. [18]
FO, leaving a long tail for sewing. Finish stuffing.
Body (Orange Yarn)
R1: Start with a MR, 6 sc into the ring. [6]
R2: Inc in each st around. [12]
R3: (1 sc, inc) x 6. [18]
R4: (2 sc, inc) x 6. [24]
R5: (3 sc, inc) x 6. [30]
R6-7: Sc in each st around (2 rounds). [30]
R8: Attach Black yarn. Sc in each st around. [30]
R9: Attach Orange yarn. Sc in each st around. [30]
R10-11: Sc in each st around (2 rounds). [30]
R12: Attach Black yarn. Sc in each st around. [30]
R13: Attach Orange yarn. Sc in each st around. [30]
R14-16: Sc in each st around (3 rounds). [30]
R17: (3 sc, dec) x 6. [24]
Start stuffing the body.
R18: (2 sc, dec) x 6. [18]
FO, leaving a long tail for sewing. Finish stuffing.
Arms (Make 2 – Orange Yarn)
R1: Start with a MR, 6 sc into the ring. [6]
R2: (1 sc, inc) x 3. [9]
R3-8: Sc in each st around (6 rounds). [9]
Stuff lightly. Sl st to close the opening, FO, leaving a long tail for sewing.
Legs (Make 2 – Orange Yarn)
R1: Start with a MR, 6 sc into the ring. [6]
R2: Inc in each st around. [12]
R3: Sc in each st around. [12]
R4: Attach Black yarn. Sc in each st around. [12]
R5: Attach Orange yarn. Sc in each st around. [12]
R6: Attach Black yarn. Sc in each st around. [12]
R7: Attach Orange yarn. Sc in each st around. [12]
R8: (2 sc, dec) x 3. [9]
Stuff lightly. Sl st to close the opening, FO, leaving a long tail for sewing.
Ears (Make 2 – Orange Yarn)
R1: Ch 5. Sc in 2nd ch from hook, sc in next 2 ch, 3 sc in last ch. Work down other side of chain: sc in next 3 ch. [9]
R2: Sc in first 3 sts, 3 sc in next st, sc in next 5 sts. [11]
R3: Sc in first 4 sts, 3 sc in next st, sc in next 6 sts. [13]
FO, leaving a long tail for sewing. Flatten the ear.
Eyes (Make 2 – White Yarn)
R1: Ch 4. Sc in 2nd ch from hook, sc in next ch, 3 sc in last ch. Work down other side of chain: sc in next st, 2 sc in last st. [8]
R2: Inc, sc, 3 inc, sc, 2 inc. [14]
Sl st to next st, FO, leaving a long tail for sewing.
Cheek Patches (Make 2 – Yellow Yarn)
R1: Ch 4. Sc in 2nd ch from hook, sc in next ch, 3 sc in last ch. Work down other side of chain: sc in next st, 2 sc in last st. [8]
Sl st to next st, FO, leaving a long tail for sewing.
Assembly
1. Sew the Head to the Body, ensuring it’s centered.
2. Attach the white Eye pieces to the head. Insert safety eyes into the center of the white eye pieces.
3. Sew the yellow Cheek Patches slightly below and to the sides of the eyes.
4. With Black yarn and a tapestry needle, embroider Garfield’s eyebrows above the eyes, whiskers on the yellow cheek patches, and the mouth line curving up from the nose. Add small black lines to the inside of the ears for detail.
5. With Pink yarn, embroider a small triangular nose above the mouth line.
6. Sew the Arms to the sides of the body, just below the neck.
7. Sew the Legs to the bottom front of the body.
8. Attach the Ears to the top of the head, slightly to the sides, folding them slightly at the base for a realistic look.