
Bring the sunny disposition of Animal Crossing’s beloved secretary right into your home with this adorable Isabelle amigurumi pattern! Perfect for fans of the game and crochet enthusiasts alike, this detailed guide will help you craft your very own faithful assistant. Get ready to hook up some island charm and enjoy creating this iconic character.
Crafting Your Favorite Island Resident: The Isabelle Crochet Doll
There’s nothing quite like the joy of bringing a beloved character to life with your own hands. This Isabelle amigurumi isn’t just a toy; it’s a huggable piece of your favorite game, a charming desk companion, or a heartfelt gift. Dive into the world of amigurumi and create a treasure that captures the spirit of Animal Crossing, one stitch at a time.
Crochet Pattern: Crochet Your Own Isabelle Amigurumi: A Free Animal Crossing Pattern
Materials
- Worsted weight yarn in Bright Yellow (Yarn A)
- Worsted weight yarn in White (Yarn B)
- Worsted weight yarn in Teal/Turquoise (Yarn C)
- Worsted weight yarn in Dark Green (Yarn D)
- Worsted weight yarn in Red (Yarn E)
- Worsted weight yarn in Light Pink (Yarn F)
- Black embroidery floss
- 3.0mm crochet hook
- Polyester fiberfill stuffing
- Tapestry needle
- Stitch markers
- Small black buttons (2)
- Scissors
Abbreviations
- MR: Magic Ring
- ch: chain
- sl st: slip stitch
- sc: single crochet
- inc: increase (2 sc in one stitch)
- dec: decrease (sc 2 stitches together)
- FO: Fasten off
- st(s): stitch(es)
- rnd(s): round(s)
- row(s): row(s)
Instructions
Important Notes: Work in continuous rounds unless otherwise specified. Use a stitch marker to mark the first stitch of each round.
HEAD (Yarn A)
- Rnd 1: 6 sc in MR (6)
- Rnd 2: [inc] x6 (12)
- Rnd 3: [sc, inc] x6 (18)
- Rnd 4: [2 sc, inc] x6 (24)
- Rnd 5: [3 sc, inc] x6 (30)
- Rnd 6: [4 sc, inc] x6 (36)
- Rnd 7: [5 sc, inc] x6 (42)
- Rnds 8-15: sc around (42)
- Rnd 16: [5 sc, dec] x6 (36)
- Rnd 17: [4 sc, dec] x6 (30)
- Rnd 18: [3 sc, dec] x6 (24)
- Start stuffing the head firmly.
- Rnd 19: [2 sc, dec] x6 (18)
- Rnd 20: [sc, dec] x6 (12)
- Rnd 21: [dec] x6 (6)
- FO, leaving a long tail for closing the hole. Finish stuffing and close the hole.
SNOUT (Yarn B then Yarn A)
- Rnd 1: In Yarn B, 6 sc in MR (6)
- Rnd 2: [inc] x6 (12)
- Rnd 3: [sc, inc] x6 (18)
- Rnd 4: [2 sc, inc] x6 (24)
- Rnd 5: sc around (24)
- Rnd 6: Change to Yarn A, sc around (24)
- Rnd 7: [2 sc, dec] x6 (18)
- FO, leaving a long tail for sewing. Stuff lightly and sew to the front of the head between Rnds 12 and 16.
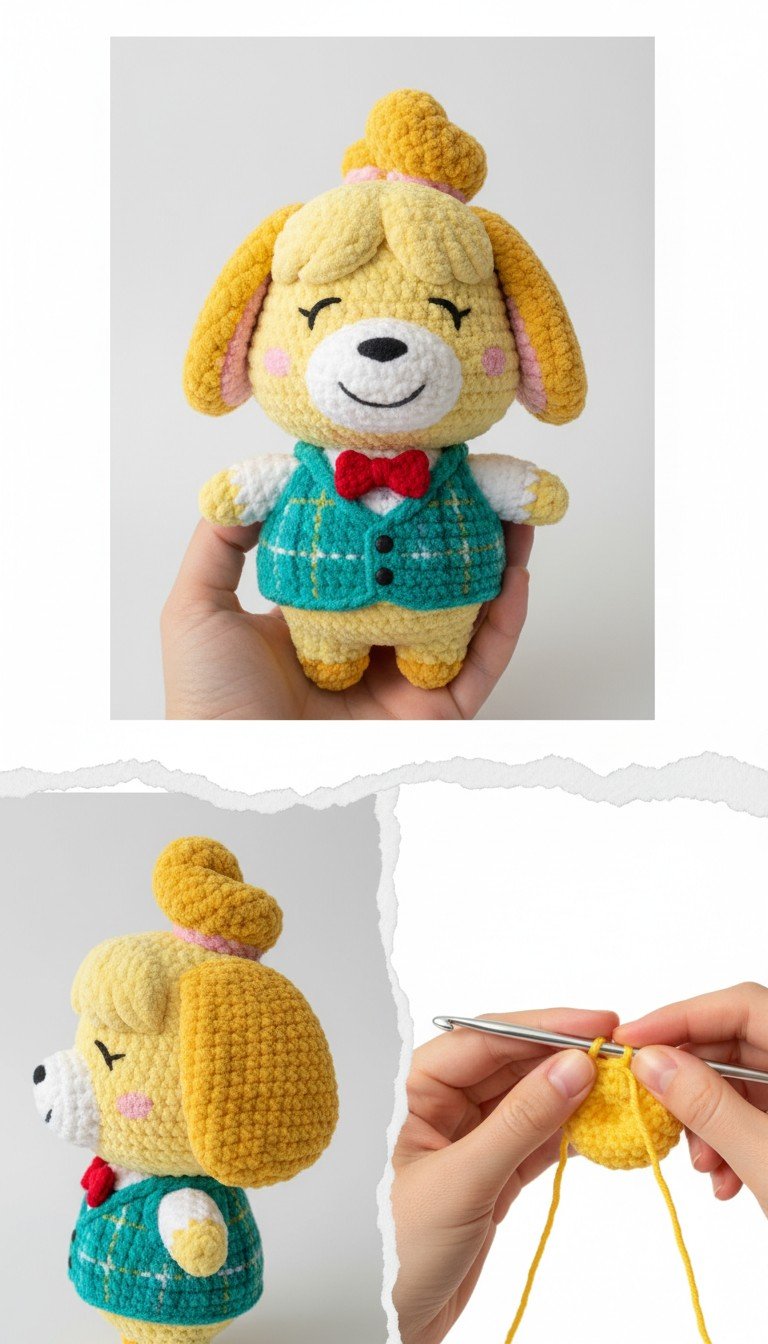
EARS (Make 2, Yarn A)
- Rnd 1: 6 sc in MR (6)
- Rnd 2: [inc] x6 (12)
- Rnd 3: [sc, inc] x6 (18)
- Rnds 4-8: sc around (18)
- Rnd 9: [sc, dec] x6 (12)
- Rnds 10-14: sc around (12)
- Rnd 15: [dec] x6 (6)
- FO, leaving a long tail for sewing. Flatten the ear and sew closed. Do not stuff. Sew to the top sides of the head.
HAIR BUN / TOPKNOT (Yarn A)
- Rnd 1: 6 sc in MR (6)
- Rnd 2: [inc] x6 (12)
- Rnd 3: [sc, inc] x6 (18)
- Rnds 4-6: sc around (18)
- Rnd 7: [sc, dec] x6 (12)
- Stuff lightly.
- Rnd 8: [dec] x6 (6)
- FO, leaving a long tail. Close the hole.
BODY (Yarn A)
- Rnd 1: 6 sc in MR (6)
- Rnd 2: [inc] x6 (12)
- Rnd 3: [sc, inc] x6 (18)
- Rnd 4: [2 sc, inc] x6 (24)
- Rnd 5: [3 sc, inc] x6 (30)
- Rnd 6: [4 sc, inc] x6 (36)
- Rnds 7-10: sc around (36)
- Rnd 11: [4 sc, dec] x6 (30)
- Rnds 12-14: sc around (30)
- Rnd 15: [3 sc, dec] x6 (24)
- Rnds 16-17: sc around (24)
- Start stuffing. Continue stuffing firmly as you go.
- Rnd 18: [2 sc, dec] x6 (18)
- Rnd 19: sc around (18)
- FO, leaving a long tail for sewing to the head.
ARMS (Make 2, Yarn B then Yarn A)
- Rnd 1: In Yarn B, 6 sc in MR (6)
- Rnd 2: [inc] x6 (12)
- Rnds 3-4: sc around (12)
- Rnd 5: [dec] x6 (6)
- Rnd 6: Change to Yarn A, sc around (6)
- Rnds 7-12: sc around (6)
- FO, leaving a long tail for sewing. Stuff very lightly at the hand part. Flatten the arm opening and sew to the sides of the body around Rnd 17-18.
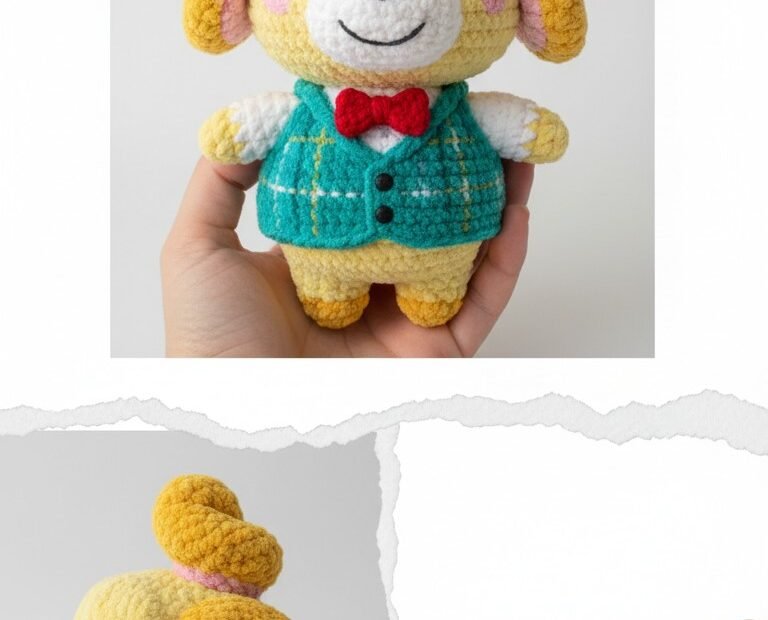
VEST (Yarn C for base, Yarn D for plaid details)
The vest is worked in rows, then seamed and edged. The plaid pattern is embroidered on top.
Back Panel (Yarn C):
- Ch 13.
- Row 1: Sc in 2nd ch from hook and across (12 sc). Ch 1, turn.
- Rows 2-8: Sc across (12 sc). Ch 1, turn.
- Shape Armholes:
- Row 9: Sl st in first st, sc in next 10 sts, sl st in last st (10 sc). Ch 1, turn.
- Rows 10-14: Sc across (10 sc). Ch 1, turn.
- FO.
Front Panels (Make 2, Yarn C):
- Ch 7.
- Row 1: Sc in 2nd ch from hook and across (6 sc). Ch 1, turn.
- Rows 2-8: Sc across (6 sc). Ch 1, turn.
- Shape Neckline/Armhole:
- Row 9: Sc in first 5 sts, dec (5 sc). Ch 1, turn. (For second panel, dec, sc in next 5 sts)
- Rows 10-14: Sc across (5 sc). Ch 1, turn.
- FO, leaving a long tail on one panel for sewing.
Assembly & Edging for Vest:
- Sew the front panels to the back panel along the shoulder seams and side seams, leaving armholes open.
- With Yarn C, attach yarn at the bottom corner of one front panel. Sc evenly around the entire vest opening (front edges, neckline, bottom edge). Join with sl st. FO.
Plaid Effect & Buttons:
- Using Yarn D and a tapestry needle, embroider horizontal and vertical lines onto the vest to create the plaid pattern visible in the image. Use simple backstitch or surface slip stitch.
- Sew two small black buttons onto the front panels of the vest.
BOW TIE (Yarn E)
- Ch 6.
- Row 1: Sc in 2nd ch from hook and across (5 sc). Ch 1, turn.
- Rows 2-4: Sc across (5 sc). Ch 1, turn.
- FO, leaving a long tail. Pinch the center of the rectangle and wrap the yarn tail tightly a few times to create the bow shape. Secure.
ASSEMBLY & EMBROIDERY
- Sew the head firmly to the body.
- Sew the snout to the head.
- Sew the ears to the head.
- Wrap Yarn F a few times around the base of the hair bun to create the pink hair tie, secure. Sew the hair bun/topknot to the top of the head.
- Sew the arms to the sides of the body.
- Using black embroidery floss, embroider the closed eyes (small ‘v’ shapes) on the head just above the snout.
- Embroider a small ‘U’ or smiling mouth below the nose on the snout with black floss.
- Embroider a small black nose at the top of the snout.
- With Yarn F (Light Pink), embroider small oval blush marks on Isabelle’s cheeks.
- Dress Isabelle in her vest.
- Sew the red bow tie onto the center of the vest.