
Embrace adorable functionality with our charming Crochet Sloth Backpack pattern! This delightful DIY project lets you create a whimsical bag that’s perfect for carrying your essentials with a touch of playful personality. Whether it’s for school, errands, or a fun day out, this handmade sloth companion will bring smiles wherever you go.

Unleash Your Inner Crafter with This Adorable Sloth Companion
Imagine the joy of showcasing your unique, handmade accessory! This sloth backpack isn’t just practical; it’s a statement piece that reflects your creativity and love for all things cute. It’s also an excellent gift idea, offering a personal touch that store-bought items simply can’t match.
Crochet Pattern: Cuddle-Worthy Crochet Sloth Backpack Pattern: Your New Favorite DIY Bag!
Materials
- Worsted weight yarn in Cream (Color A)
- Worsted weight yarn in Light Brown (Color B)
- Worsted weight yarn in Olive Green (Color C)
- Worsted weight yarn in Black (Color D)
- Crochet Hook (5.0mm / H-8)
- Yarn needle
- Scissors
- Stitch markers
Abbreviations
- ch: chain
- sc: single crochet
- hdc: half double crochet
- dc: double crochet
- sl st: slip stitch
- inc: increase (2 sc in one stitch)
- dec: decrease (sc2tog)
- FO: Fasten off
- MR: Magic Ring
- st(s): stitch(es)
- rnd: round
Instructions
This pattern is worked in continuous rounds unless otherwise specified. Use a stitch marker to mark the beginning of each round.
Main Bag Body (Color A)
Base:
- Ch 30.
- Rnd 1: Hdc in 3rd ch from hook and in next 26 ch, 5 hdc in last ch. Working down the other side of the chain, hdc in next 26 ch, 3 hdc in last ch. Join with sl st to first hdc. (60 sts)
- Rnd 2: Ch 2 (does not count as st). Hdc in same st, hdc in next 27 sts, (2 hdc in next st, hdc in next st) 2 times, 2 hdc in next st, hdc in next 27 sts, (2 hdc in next st, hdc in next st) 2 times. Join with sl st. (70 sts)
- Rnd 3: Ch 2. Hdc in same st, hdc in next 28 sts, (2 hdc in next st, hdc in next 2 sts) 2 times, 2 hdc in next st, hdc in next 28 sts, (2 hdc in next st, hdc in next 2 sts) 2 times. Join with sl st. (80 sts)
- Rnd 4: Ch 2. Hdc in same st, hdc in next 29 sts, (2 hdc in next st, hdc in next 3 sts) 2 times, 2 hdc in next st, hdc in next 29 sts, (2 hdc in next st, hdc in next 3 sts) 2 times. Join with sl st. (90 sts)
Body Walls:
- Rnd 5 – Rnd 25 (or until desired height, approx. 8-9 inches tall): Hdc in each st around. (90 sts)
Drawstring Casing (Color A)
- Rnd 26: Ch 1, sc in each st around. Join with sl st. (90 sts)
- Rnd 27: Ch 3 (counts as 1 dc), dc in next 2 sts, ch 2, skip 2 sts, *dc in next 3 sts, ch 2, skip 2 sts*. Repeat from * around, ending with dc in last st before joining. Join with sl st to top of ch 3. (18 ch-2 spaces)
- Rnd 28: Ch 1, sc in each dc and 2 sc in each ch-2 space around. Join with sl st. (90 sts) FO.
Sloth Face Appliqué
Head Base (Color A):
- Rnd 1: MR, ch 1, 6 sc into MR. (6 sts)
- Rnd 2: Inc in each st around. (12 sts)
- Rnd 3: (Sc in next st, inc in next st) 6 times. (18 sts)
- Rnd 4: (Sc in next 2 sts, inc in next st) 6 times. (24 sts)
- Rnd 5: (Sc in next 3 sts, inc in next st) 6 times. (30 sts)
- Rnd 6: (Sc in next 4 sts, inc in next st) 6 times. (36 sts)
- Rnd 7: (Sc in next 5 sts, inc in next st) 6 times. (42 sts)
- Rnd 8: (Sc in next 6 sts, inc in next st) 6 times. (48 sts) FO, leaving a long tail for sewing.
Eye Patches (Make 2 – Color B):
- Rnd 1: MR, ch 1, 6 sc into MR. (6 sts)
- Rnd 2: Inc in each st around. (12 sts)
- Rnd 3: Sc in each st around. (12 sts) FO, leaving a long tail for sewing. Slightly shape into an oval if desired.
Muzzle (Color A):
- Rnd 1: MR, ch 1, 6 sc into MR. (6 sts)
- Rnd 2: Inc in each st around. (12 sts)
- Rnd 3: (Sc in next st, inc in next st) 6 times. (18 sts) FO, leaving a long tail for sewing.
Sloth Arms/Legs (Make 2)
Start with Color B.
- Rnd 1: MR, ch 1, 6 sc into MR. (6 sts)
- Rnd 2: Inc in each st around. (12 sts)
- Rnd 3-15: Sc in each st around. (12 sts)
- Change to Color C.
- Rnd 16-20: Sc in each st around. (12 sts)
- Change to Color A.
- Rnd 21: Sc in each st around. (12 sts) FO, leaving a long tail for sewing.
Claws (Make 3 per arm/leg – Color A): Cut 3 strands of Color A yarn, each about 6 inches long. Fold each strand in half and attach to the end of the arm/leg using your hook, pulling the loop through a stitch and then pulling the ends through the loop to create a fringe. Trim to desired claw length.
Drawstring & Straps (One Continuous Cord)
Cut 6 strands of yarn (2x Color A, 2x Color B, 2x Color C), each approximately 150 inches (380 cm) long. Hold all 6 strands together and tightly braid them to create one long, sturdy cord. Tie off the ends securely. This cord will be approximately 60-75 inches (150-190 cm) long when braided.
Assembly
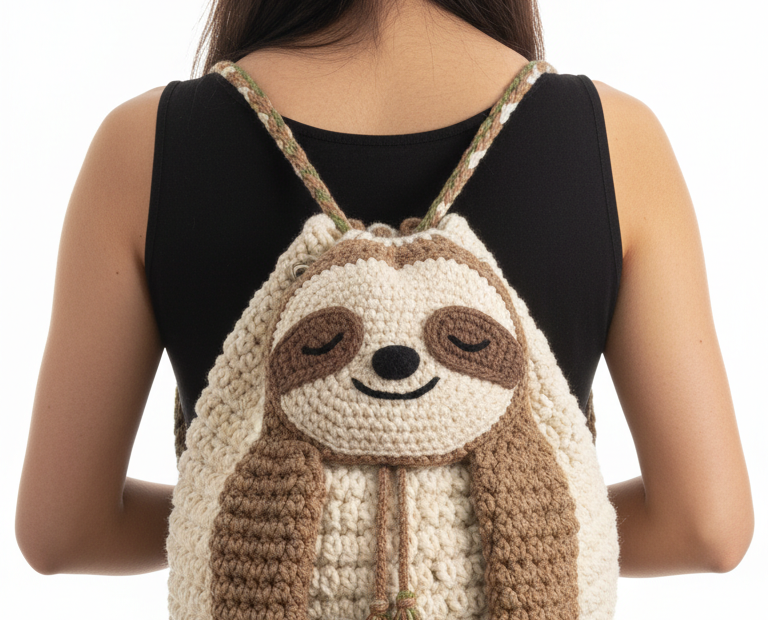
- Sloth Face: Pin the Color A Head Base onto the top center of the main bag body. Sew in place using the long tail. Pin the two Color B Eye Patches onto the Head Base, positioning them for the eyes. Sew in place. Pin the Color A Muzzle onto the lower center of the Head Base, slightly overlapping the eye patches. Sew in place.
- Embroidered Details: With Color D yarn, embroider two sleepy eyes onto the eye patches (as pictured), a small nose on the muzzle, and a curved smile below the nose.
- Arms/Legs: Pin the two sloth arms/legs to the lower sides of the main bag body, ensuring they hang down symmetrically. Sew securely in place.
- Drawstring & Straps: Find the midpoint of your long braided cord. Starting from the back center (or any point on the back), weave one half of the cord through the ch-2 spaces of the drawstring casing, going all the way around until it emerges at the front center of the bag. Weave the other half of the cord through the casing in the opposite direction, also emerging at the front center. The two ends will now be at the front, forming the drawstring cinch, while the loops on either side at the top will serve as the start of your shoulder straps. Guide one end of the cord down one side of the bag. Securely sew this end to the bottom seam of the bag on that side. Repeat with the other end of the cord on the opposite side of the bag. Adjust the length of the straps for comfortable wear before securing them firmly.
- Tassels: Cut multiple strands of Color A, B, and C yarn (approx. 4-6 inches long). Gather a small bundle, fold in half, and attach to the two front-facing ends of the braided cord using a lark’s head knot to create tassels. Trim evenly.