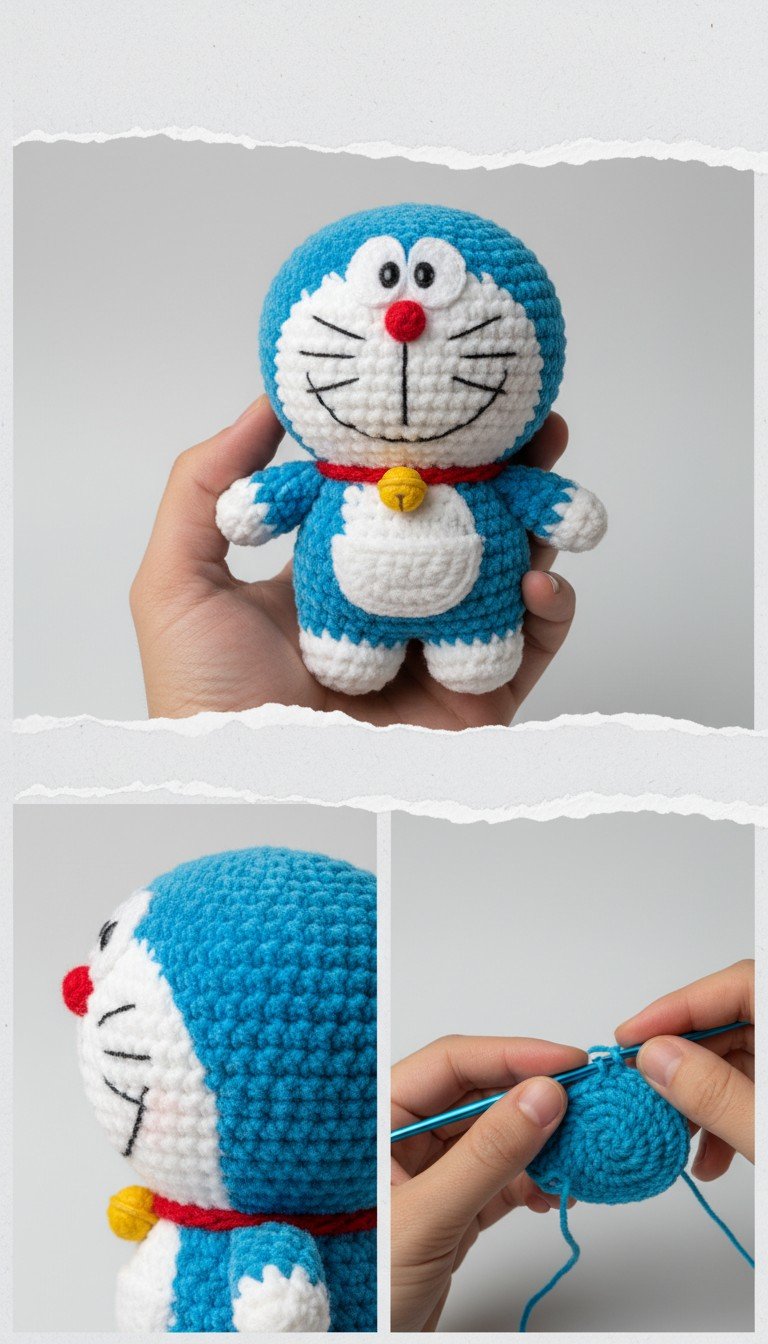
Dive into the whimsical world of Doraemon with this adorable amigurumi crochet pattern! Whether you’re a long-time fan or looking for a charming handmade gift, this pattern guides you through creating your very own robot cat companion. Easy to follow and incredibly rewarding, you’ll love watching Doraemon come to life, stitch by stitch.
Bring Nostalgia to Life with a Handmade Doraemon
There’s something truly special about crafting a beloved character with your own hands. This Doraemon amigurumi isn’t just a toy; it’s a piece of childhood nostalgia, a charming decor item, or a heartfelt gift that will bring smiles. Experience the joy of creating a unique, huggable tribute to everyone’s favorite time-traveling robot cat.
Crochet Pattern: Doraemon Amigurumi Crochet Pattern: Craft Your Own Iconic Robot Cat!
Materials
Blue yarn (DK or worsted weight)
White yarn (DK or worsted weight)
Red yarn (DK or worsted weight)
Yellow yarn (DK or worsted weight)
Black yarn (for embroidery)
2.5mm or 3.0mm crochet hook (or size suitable for your yarn)
Polyester fiberfill for stuffing
Tapestry needle
Stitch markers (optional)
Small yellow bell
Abbreviations
MR: Magic Ring
sc: Single Crochet
inc: Increase (2 sc in one stitch)
dec: Decrease (single crochet two stitches together)
sl st: Slip Stitch
ch: Chain
FO: Fasten Off
(X): Number of stitches at the end of the round/row
Instructions
This pattern is worked in continuous rounds unless otherwise stated. Use a stitch marker to keep track of your first stitch.
Head (Blue and White Yarn)
Start with Blue yarn.
R1: 6sc in MR (6)
R2: 6inc (12)
R3: (sc, inc) x6 (18)
R4: (2sc, inc) x6 (24)
R5: (3sc, inc) x6 (30)
R6: (4sc, inc) x6 (36)
R7: (5sc, inc) x6 (42)
R8: (6sc, inc) x6 (48)
R9-R16: sc around (48) (8 rounds)
R17: (6sc, dec) x6 (42)
R18: (5sc, dec) x6 (36)
R19: (4sc, dec) x6 (30)
Stuff head firmly.
R20: (3sc, dec) x6 (24)
R21: (2sc, dec) x6 (18)
R22: (sc, dec) x6 (12)
R23: 6dec (6)
FO, weave in ends.
Face (White Yarn)
Using White yarn.
Ch 6.
R1: Sc in 2nd ch from hook, 3sc, 3sc in last ch. Continue on other side of chain: 4sc, inc (12)
Sl st, FO, leaving a long tail for sewing to the head.
Arms (Make 2 – Blue and White Yarn)
Start with Blue yarn.
R1: 6sc in MR (6)
R2: 6inc (12)
R3-R4: sc around (12) (2 rounds)
Change to White yarn.
R5-R7: sc around (12) (3 rounds)
Stuff lightly.
FO, leaving a long tail for sewing. Flatten opening and sc through both sides to close.
Legs (Make 2 – Blue and White Yarn)
Start with Blue yarn.
R1: 6sc in MR (6)
R2: 6inc (12)
R3: (sc, inc) x6 (18)
R4-R5: sc around (18) (2 rounds)
Change to White yarn.
R6-R8: sc around (18) (3 rounds)
Stuff firmly.
FO, leaving a long tail for sewing. Flatten opening and sc through both sides to close.
Collar (Red Yarn)
Using Red yarn.
Ch 20 (adjust length as needed to fit around the neck).
R1: Sc in 2nd ch from hook, 18sc. (19)
FO, leaving a long tail for sewing.
Bell (Yellow Yarn)
Using Yellow yarn.
R1: 6sc in MR (6)
R2: 6inc (12)
R3-R4: sc around (12) (2 rounds)
R5: 6dec (6)
Stuff lightly.
FO, leaving a long tail for sewing.
Nose (Red Yarn)
Using Red yarn.
R1: 6sc in MR (6)
Sl st, FO, leaving a long tail for sewing.
Eyes (Make 2 – White Yarn)
Using White yarn.
R1: 6sc in MR (6)
R2: 6inc (12)
Sl st, FO, leaving a long tail for sewing.
Pocket (White Yarn)
Using White yarn.
Ch 10.
R1: Sc in 2nd ch from hook, 7sc, 3sc in last ch. Continue on other side of chain: 8sc. (19)
R2: Inc, 7sc, 3inc, 7sc, 2inc. (25)
Sl st, FO, leaving a long tail for sewing.
Assembly
Attach Face: Sew the white face oval to the front of the blue head.
Attach Eyes: Sew the white eye circles onto the upper part of the white face. Embroider small black pupils using black yarn.
Attach Nose: Sew the red nose onto the center of the face, just below the eyes.
Embroider Mouth & Whiskers: Using black yarn, embroider a curved mouth line from below the nose. Embroider three whiskers on each side of the face.
Attach Head to Body: Sew the head to the body.
Attach Collar & Bell: Wrap the red collar around the neck and sew the ends together or to the body. Sew the yellow bell to the center front of the collar.
Attach Arms: Sew the arms to the sides of the body, just below the neck.
Attach Legs: Sew the legs to the bottom of the body.
Attach Pocket: Sew the white pocket to the front of the body, centered below the collar. Only sew the curved edges, leaving the top open as a functional pocket.