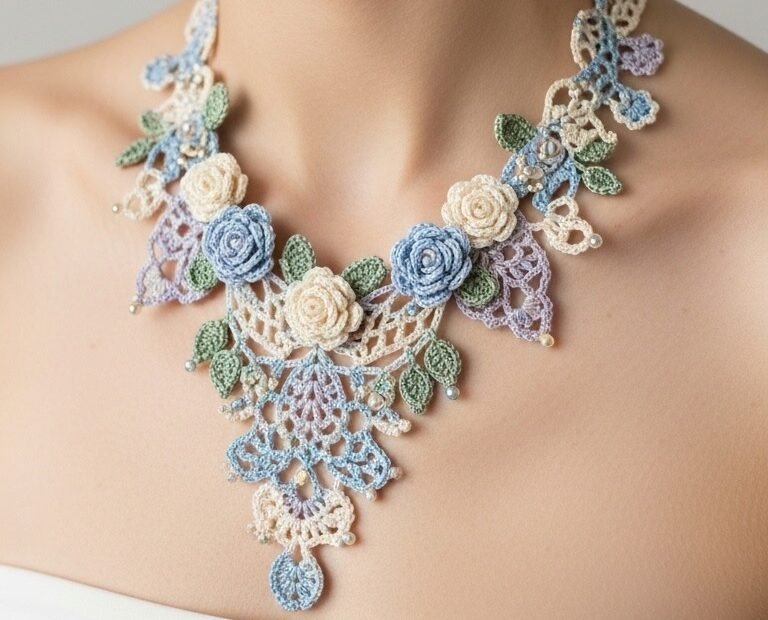
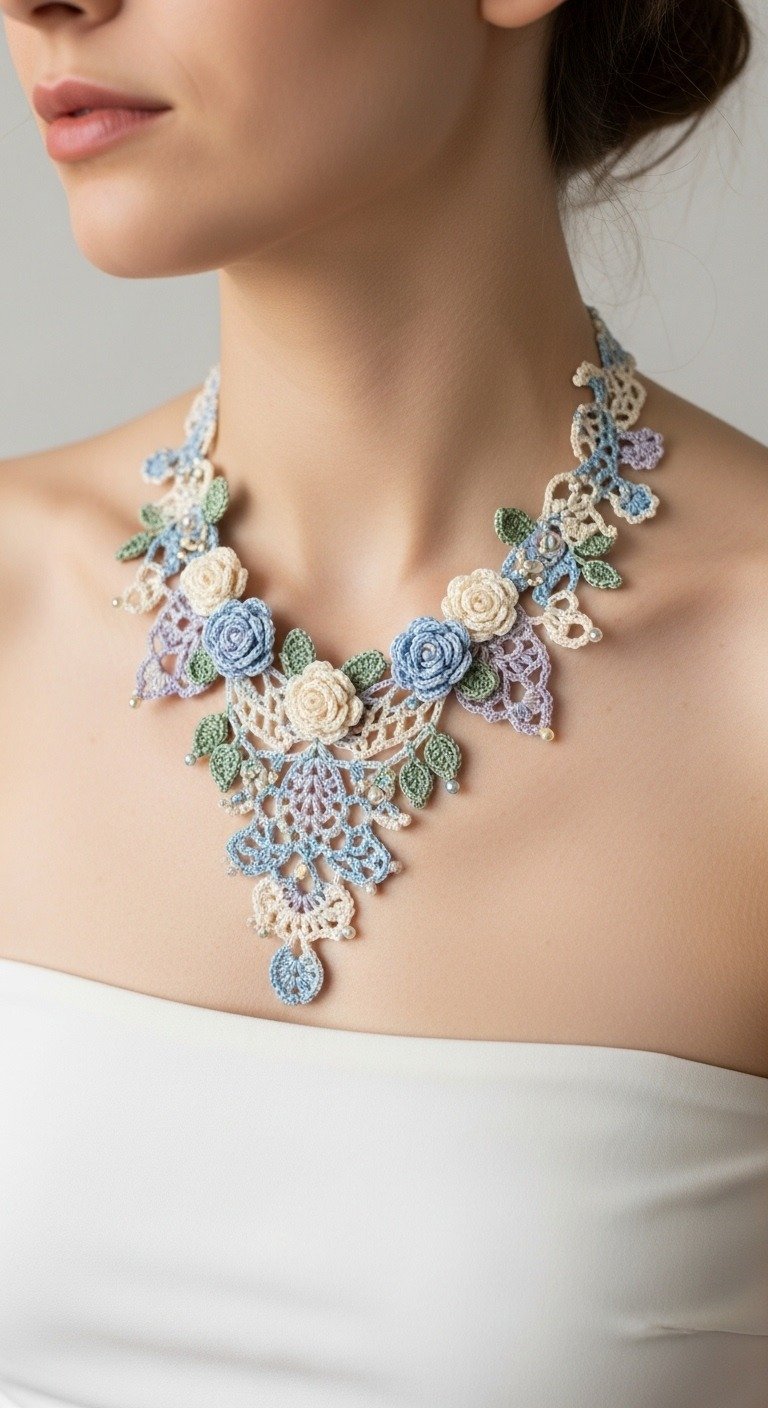
Craft a truly enchanting statement piece with this elegant floral crochet lace necklace pattern. Inspired by delicate antique designs, this project combines charming roses and intricate lace work in soft, romantic hues. Perfect for adding a touch of vintage sophistication to any outfit, this necklace is a wearable work of art that will surely draw compliments.
Embrace Timeless Elegance with Handmade Crochet Jewelry
There’s a unique satisfaction in creating something beautiful with your own hands, and this crochet necklace embodies that sentiment. Its intricate design, featuring delicate roses and an ethereal lace foundation, offers a rewarding challenge for intermediate crocheters. The finished piece is not just an accessory; it’s a testament to your skill and a stunning addition to your handmade wardrobe or a thoughtful gift.
Crochet Thread, Size 10 (or similar fine weight) in: Light Blue (approx 50 yards), Light Beige/Cream (approx 50 yards), Light Green (approx 30 yards), Light Lavender (approx 40 yards)
Steel Crochet Hook, 1.5mm (or size to achieve desired drape)
Small pearl beads (approx 20-30, 3-4mm diameter)
Tapestry needle
Small jewelry clasp (e.g., lobster claw with jump ring)
Abbreviations
ch – chain
sl st – slip stitch
sc – single crochet
hdc – half double crochet
dc – double crochet
tr – treble crochet
picot – ch 3, sl st into first ch
st(s) – stitch(es)
sk – skip
sp – space
rnd – round
Instructions
Difficulty: Intermediate
Finished Size: Approximately 16-18 inches (40-45 cm) total length, 3-4 inches (7-10 cm) width at widest point.
Motifs
Small Rose Motif (Make 4 in Light Blue, 4 in Light Beige/Cream)
Ch 30.
Row 1: Sc in 2nd ch from hook, *sk 1 ch, 5 dc in next ch, sk 1 ch, sc in next ch; repeat from * across to end. (approx 7 shell stitches)
Row 2: Ch 1, turn. Work (sc, ch 1, dc, ch 1, sc) in each dc of previous row, working around each ‘shell’. Alternatively, work 2 sc, 3 hdc, 2 sc into the back loop of each dc to create more ruffles.
Fasten off, leaving a long tail for sewing.
Roll the strip tightly from one end, coiling it into a rose shape. Secure the base with a tapestry needle and the long tail, stitching through all layers.
Small Leaf Motif (Make 15-20 in Light Green)
Ch 7.
Row 1: Sl st in 2nd ch from hook, sc in next ch, hdc in next ch, dc in next ch, hdc in next ch, sc in next ch.
Row 2: Ch 1, turn. Sl st into the side of the last sc worked, then continue working along the opposite side of the initial chain: sc in next ch, hdc in next ch, dc in next ch, hdc in next ch, sc in next ch, sl st into base.
Fasten off, leaving a tail for sewing.
Small Lace Connector Motif (Make approx. 6-8 each in Light Lavender, Light Blue, and Cream/Beige)
These are small, simple elements to fill gaps and connect larger motifs. You can vary these.
Small Arc: Ch 5, sl st into first ch to form a ring. Ch 1, 6 sc into ring. Fasten off.
Mini Fan: Ch 3, (dc, ch 1, dc) into 3rd ch from hook (or magic ring), ch 3, sl st into same st/ring. Fasten off.
Picot Cluster: Ch 4, (dc, picot) 3 times into 4th ch from hook. Fasten off.
Assembly
The necklace is assembled by arranging motifs and then crocheting a lace network around and between them.
Step 1: Lay Out Your Design
Arrange your roses and leaves on a flat surface, mirroring the shape seen in the image. There will be a central lower point and the design will arc upwards towards the neck. Mix the blue and beige roses for visual interest, placing green leaves around them. Place the small lace connector motifs in the gaps.
Step 2: Connecting the Central Elements
Using a contrasting or coordinating color (e.g., Light Lavender or Light Blue), begin to connect the main roses and leaves. Start with the central motifs and work outwards. Use sl sts, sc sts, and ch-3 or ch-5 loops to join motifs. For example, attach yarn to a rose, ch 5, sl st to a leaf, ch 3, sc to another rose, etc. Don’t worry about perfection; aim for a natural, flowing connection.
Step 3: Building the Lace Foundation
Continue to build the lace foundation, working in short rows or rounds around the connected motifs. Use various colors as desired. Incorporate different lace stitches:
Chain loops: Ch 3, sc in next connection/space. Ch 5, sc in next.
Picots: (Sc, picot, sc) in a ch-sp, or attach a picot to a ch loop.
Small Shells: (2 dc, ch 1, 2 dc) in a ch-sp.
Focus on creating an open, airy fabric that flows from one motif to the next, gradually filling in the entire shape of the necklace. The design should get wider at the center front and taper towards the back.
Step 4: Adding Beads
As you crochet the lace, incorporate the pearl beads. You can do this by stringing a bead onto your working yarn before you start, then sliding it up when needed and crocheting a stitch (like an sc or sl st) around it to secure. Or, simply sew them on strategically after the lace work is complete, attaching them at the points of picots or intersections of chain loops.
Step 5: Finishing the Neckline
Once the main body of the necklace is complete and has the desired shape and width, work a simple edging along the top edge of the necklace (where it will sit on the neck). This can be a row of sc, or a ch-3, sc across. Ensure this edge is even and provides a stable base for the clasp.
Step 6: Attach Clasp
Sew one half of the jewelry clasp to one end of the neckline edging and the other half to the opposite end. Weave in all remaining loose ends securely with your tapestry needle.