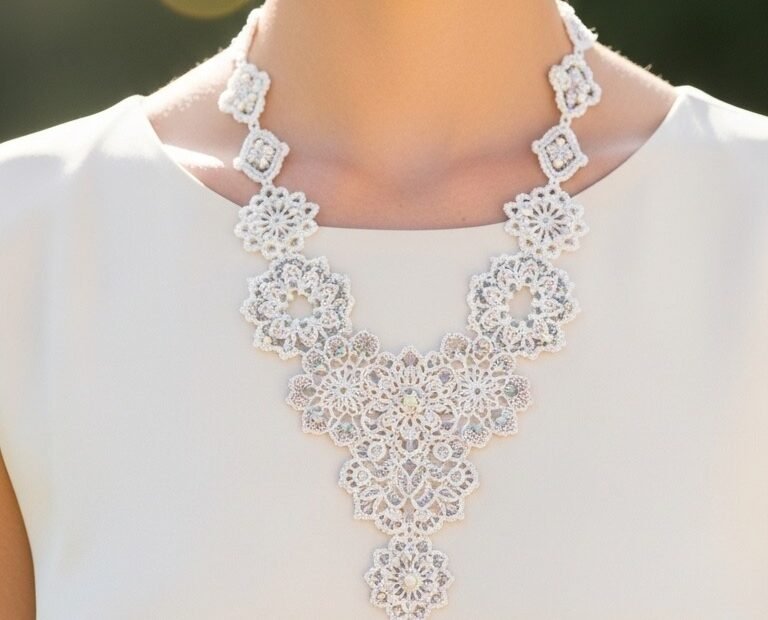
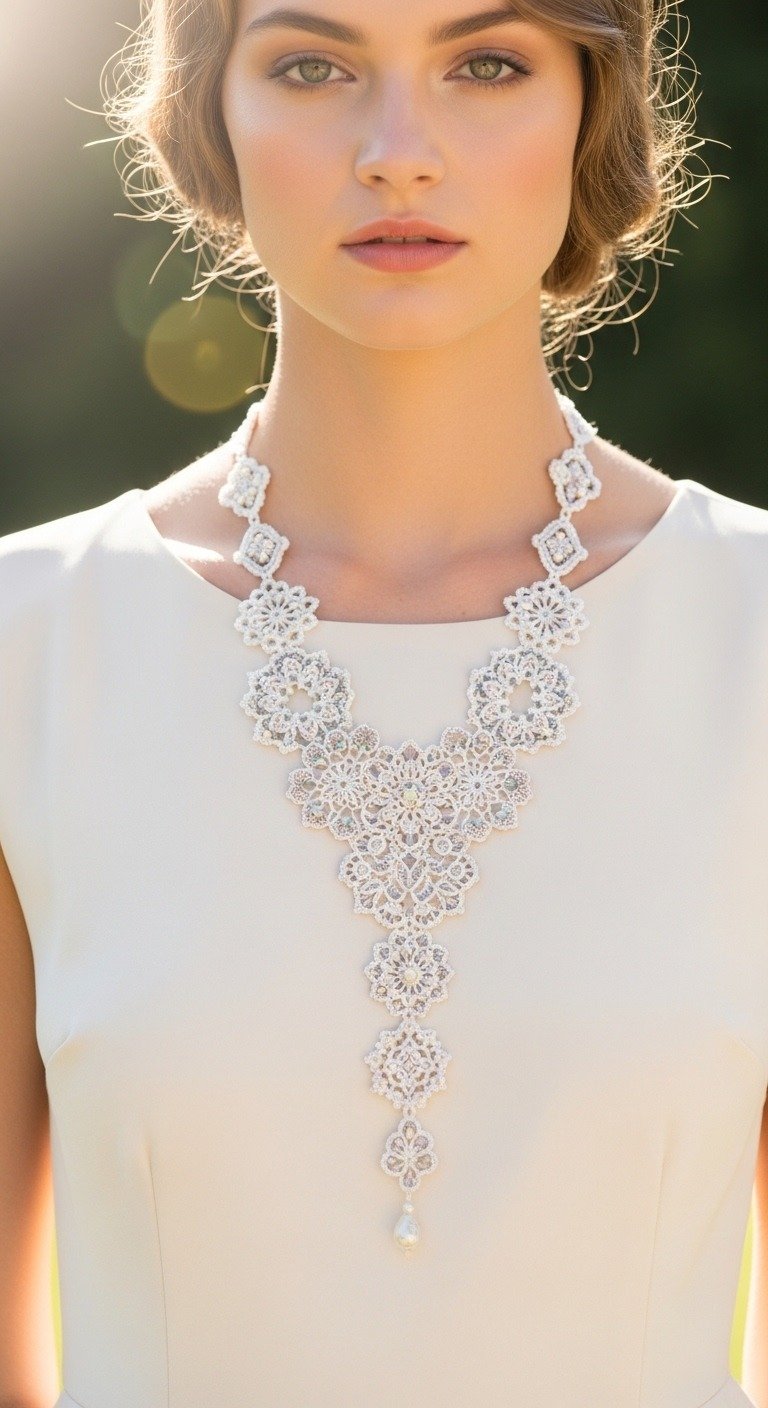
Discover the art of micro crochet with this stunning lace necklace pattern, perfect for brides, special occasions, or as an exquisite handmade gift. This pattern guides you through creating delicate medallions adorned with subtle beads, assembling them into an elegant, Y-shaped statement piece that exudes vintage charm and timeless beauty. Craft your own wearable work of art today.
Crafting an Heirloom: The Beauty of Crochet Lace Jewelry
There’s a unique satisfaction in creating a piece of jewelry that is not only beautiful but also holds the intricate artistry of handmade lace. This micro crochet necklace isn’t just an accessory; it’s a potential heirloom, a testament to skill and patience. Its delicate design and sparkling beadwork make it a treasured item, destined to be admired for years to come and perhaps passed down through generations.
White/Off-White Mercerized Crochet Thread (Size 40 or 80)
Steel Crochet Hook (0.75mm – 1.0mm)
Clear or Iridescent Seed Beads (approx. 1.5mm – 2mm)
One Teardrop Pearl (approx. 10-12mm)
Small Jump Rings and Clasp
Tapestry Needle (for weaving in ends)
Sewing Needle and Thread (for attaching beads if not strung)
Abbreviations
ch: chain
sl st: slip stitch
sc: single crochet
dc: double crochet
tr: treble crochet
picot: ch 3, sl st in 3rd ch from hook
yo: yarn over
Instructions
This pattern creates a delicate lace necklace. Work with a very fine thread and a small hook for best results. Beads are typically strung onto the working thread before starting or sewn on at the end.
Motif 1: Small Square Medallion (SQM) – Make 4
Ch 4, join with sl st to form a ring.
Round 1: Ch 1, 8 sc in ring. Sl st to first sc.
Round 2: Ch 1, *(sc, picot, sc) in first sc, ch 2, skip next sc*. Repeat * to * 3 more times. Sl st to join. (4 picot corners formed)
Fasten off, weave in ends.
Motif 2: Petal Medallion (PM) – Make 10
Ch 5, join with sl st to form a ring.
Round 1: Ch 1, 16 sc in ring. Sl st to first sc.
Round 2: Ch 1, *(sc, picot, sc) in first sc, ch 1, skip next sc*. Repeat * to * 7 more times. Sl st to join. (8 picot petals formed)
Fasten off, weave in ends.
Motif 3: Central Ornate Medallion (COM) – Make 1
This motif incorporates seed beads. String about 50-70 seed beads onto your working thread before you begin.
Ch 8, join with sl st to form a ring.
Round 1: Ch 1, 24 sc in ring. Sl st to first sc.
Round 2: Ch 1, *(sc, picot, sc) in first sc, ch 2, skip 2 sc*. Repeat * to * 7 more times. Sl st to join. (8 picot points formed, with ch-2 spaces between)
Round 3: Sl st into first ch-2 space. Ch 1, *(sc, 3 beads (push up from thread), sc) in ch-2 space, ch 3, sc in next picot point, ch 3*. Repeat * to * 7 more times, ending with sl st to first sc.
Round 4: Ch 1, *(sc in bead group, ch 3, picot, ch 3, sc in next sc in picot point)*. Repeat around 8 times. (This forms a denser, lacy edge with picots).
Fasten off, weave in ends.
Motif 4: Teardrop Pendant (TDP) – Make 1
Ch 8. Sl st into 4th ch from hook to form a small loop (base of the teardrop).
Round 1 (working around remaining ch and loop): Ch 1, 2 sc in small loop, hdc, dc, 2 tr in next ch, dc, hdc, 2 sc in next ch. Working along the other side of the initial chain: 2 sc in next ch, hdc, dc, 2 tr in next ch, dc, hdc, 2 sc in the small loop. Sl st to first sc. (Approx. 20-22 stitches)
Round 2: Ch 1, sc around, making 3 picots evenly spaced around the bottom curve. Sl st to join.
Attach the large teardrop pearl to the bottom point of the pendant using a small jump ring or by sewing.
Fasten off, weave in ends.
Assembly
Neck Strap: Create a chain of alternating SQM and PM motifs. For a typical necklace length, use 2 SQM and 3 PM on each side of the central part (total 4 SQM, 6 PM). Join motifs by working a sl st into a picot of an adjacent motif while making the last ch of a picot, or by sewing small picot points together. (e.g., PM – SQM – PM – SQM – PM)
Central Y-Section:
Join the COM to the bottom picot of one of the middle PM motifs from the neck strap.
Attach 2 PM motifs to the sides of the COM, angled upwards.
Attach 2 more PM motifs further up the COM, forming the “Y” shape.
The image shows a symmetrical design, so carefully observe the placement of motifs for joining. The COM is the anchor point.
Lower Drop:
Attach a PM motif to the bottom of the COM.
Attach an SQM motif to the bottom of that PM.
Attach another PM motif to the bottom of the SQM.
Finally, attach the TDP to the bottom point of the last PM.
Finishing: Sew any remaining loose ends. Attach a clasp to the ends of the neck strap using small jump rings.