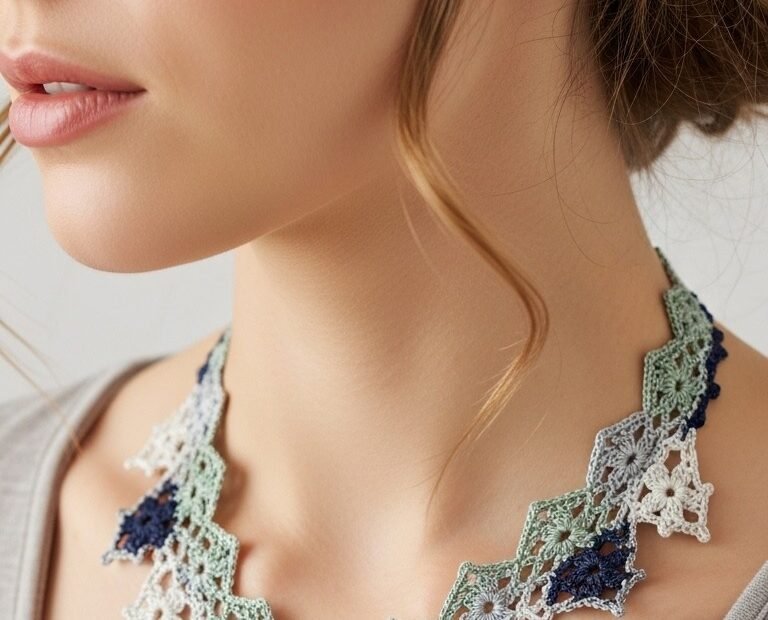
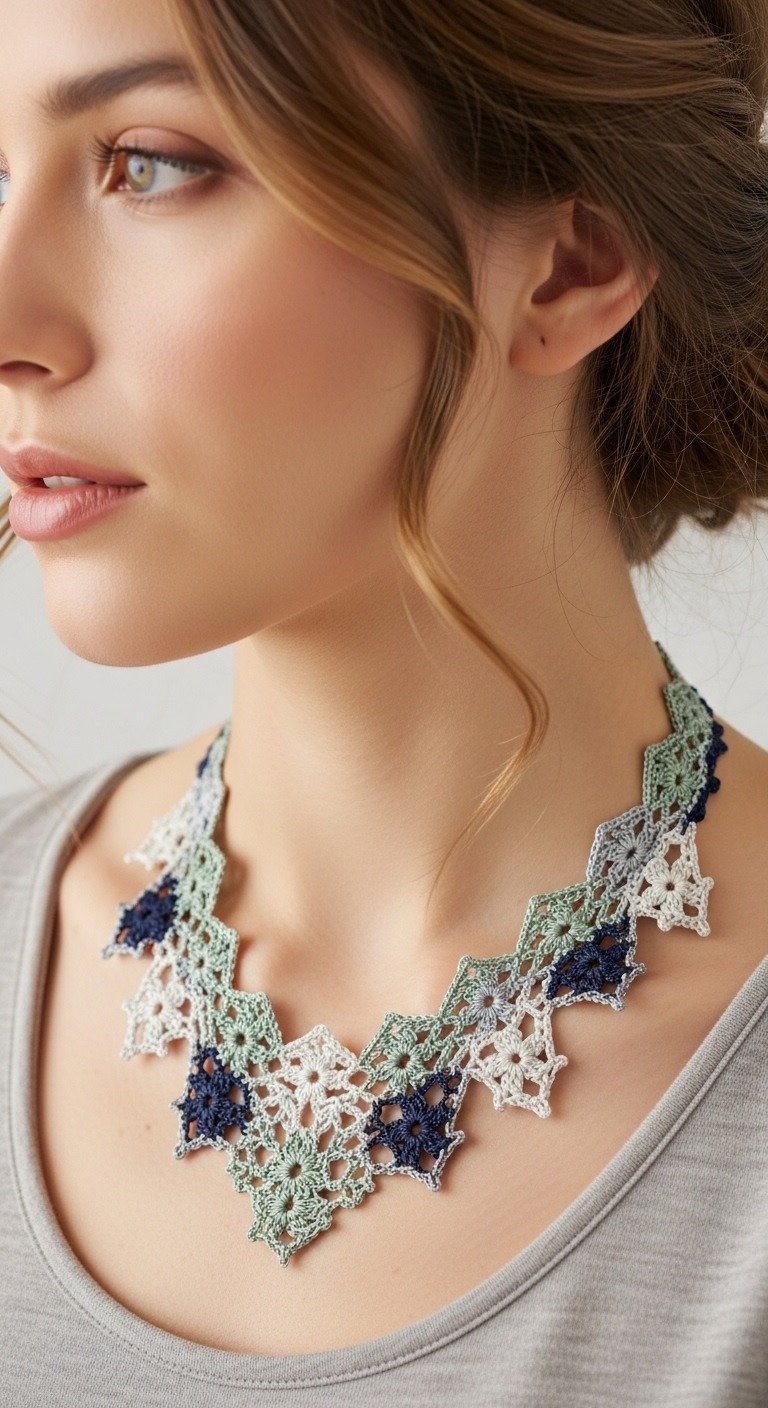
Elevate your style with this stunning zigzag crochet statement necklace! Featuring a captivating interplay of colors and delicate floral motifs, this accessory is perfect for adding a touch of handmade elegance to any outfit. Follow our detailed pattern to create your own unique piece or craft a thoughtful gift for a loved one. It’s a truly rewarding project for any crocheter!
Craft Your Own Chic Crochet Accessory
Unleash your creativity and personalize your wardrobe with a handcrafted necklace. This pattern allows you to experiment with various color combinations, making each piece uniquely yours. It’s not just a beautiful accessory; it’s a statement of personal style and a testament to the joy of making. Perfect for adding a sophisticated touch to both casual and formal wear.
2.0mm Crochet Hook (or hook suitable for chosen yarn)
Tapestry Needle
Scissors
Small jewelry clasp (e.g., lobster clasp or magnetic clasp)
Abbreviations
ch: chain
sl st: slip stitch
sc: single crochet
hdc: half double crochet
dc: double crochet
MR: Magic Ring
st(s): stitch(es)
sk: skip
FO: Fasten off
rep: repeat
Instructions
This stunning necklace is made by creating individual Floral Square Motifs and then joining them together to form a beautiful zigzag pattern. You’ll need approximately 24-26 motifs for a standard necklace length, evenly divided among your chosen colors.
Yarn Colors: Navy (N), Sage Green (G), Light Grey (Y), Off-White (W)
Floral Square Motif (Make 24-26 total, approx. 6-7 of each color)
Using chosen color yarn:
R1 (Center): Ch 4, sl st to first ch to form ring. Ch 2 (counts as hdc), 7 hdc into ring. Sl st to top of beg ch 2. (8 hdc)
R2 (Petal Round): Ch 1, sc in first hdc. *Ch 3, skip 1 hdc, sc in next hdc*. Repeat from * 3 more times. (4 ch3 loops). Sl st to first sc.
R3 (Squaring Round): Sl st into first ch3 loop. Ch 3 (counts as dc), (2dc, ch 2, 3dc) in same ch3 loop (first corner). *Ch 1, (3dc, ch 2, 3dc) in next ch3 loop (corner)*. Repeat from * 2 more times. Ch 1. Sl st to top of beg ch 3. FO.
Assembly
Lay out your motifs to visualize the zigzag pattern. The necklace is formed by connecting motifs such that their corners and sides interlock, creating a continuous, wavy strip. Each inner motif will typically be joined to three other motifs.
Step 1: Create the First Row: Take a motif (e.g., Navy). This will be your starting point.
Step 2: Joining the Second Motif: Take another motif (e.g., Sage). Position it next to the first motif to begin forming the zigzag. Using a tapestry needle and matching yarn, carefully sew the corresponding corners and sides together with small, neat stitches. For a strong join, connect one full side (the 3dc cluster and adjacent ch1 space) and one corner (the ch2 space) of the second motif to the corresponding sections of the first.
Step 3: Continuing the Zigzag: Continue adding motifs in your desired color sequence (e.g., Grey, White, Navy, Sage, etc.). Each new motif will typically connect to two previous motifs to maintain the interlocking zigzag shape. For example, a "valley" motif will connect to two "peak" motifs above it, and a "peak" motif will connect to two "valley" motifs below it. Ensure consistent tension for a neat finish.
Step 4: Finishing the Edges: Once all motifs are joined to form the desired length, you may wish to add a simple border along the top edge for a smoother finish. A row of single crochet or slip stitches can work well. The bottom edge can be left as is, showcasing the natural points of the joined motifs.
Step 5: Attach Clasp: Sew a small jewelry clasp to each end of the necklace using matching yarn or thread, ensuring it is securely fastened.