Step into a world of magic and create your very own enchanting Amigurumi Ice Princess Doll! This delightful crochet pattern lets you bring a beloved character to life with your hook and yarn. Perfect for fans of fairy tales, this doll makes a cherished gift or a wonderful addition to any collection. Get ready to embark on a frosty crafting adventure and make a truly special handmade treasure.
Crafting Royal Charm: Your Handmade Ice Princess
There’s nothing quite like the joy of creating a favorite character with your own hands. This Amigurumi Ice Princess doll captures all the charm and elegance of a beloved royal, making it an ideal present for birthdays, holidays, or just because. Imagine the delight on a child’s face, or the proud display in your own home, knowing every stitch was made with love and care. This pattern guides you through each step to ensure a magical result.
Crochet Pattern: Enchanting Amigurumi Ice Princess: A Crochet Doll Pattern
Materials
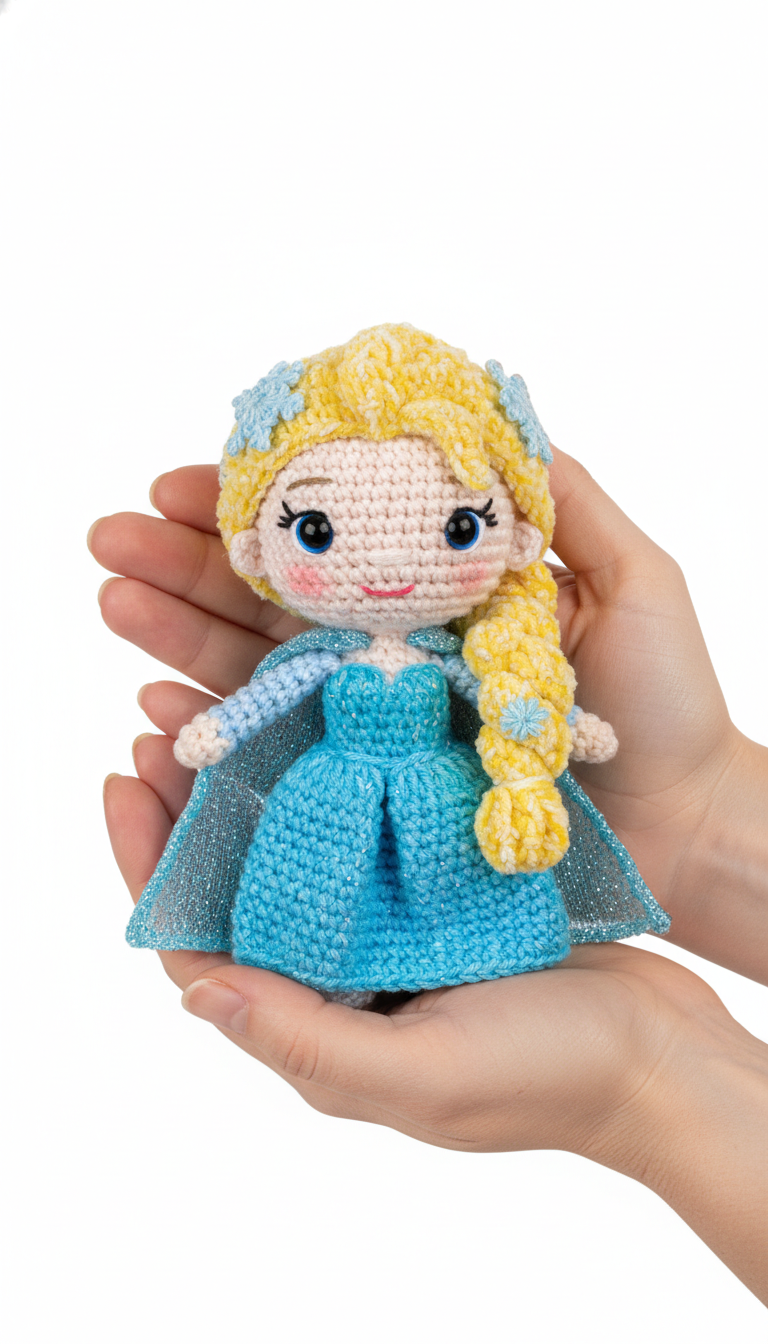
Worsted weight yarn in Bright Blue (main dress)
Worsted weight yarn in Light Blue (bodice, sleeves, small hair flowers)
Worsted weight yarn in Skin Tone (head, hands)
Worsted weight yarn in Yellow (hair)
Small amount of Pink embroidery floss (mouth, blush)
Small amount of Black embroidery floss (eyelashes, eyebrows)
2.5mm or 3.0mm crochet hook (or size to achieve tight stitches)
8mm safety eyes
Polyester fiberfill for stuffing
Tapestry needle
Stitch markers
Scissors
Sheer glittery blue fabric (for cape, approx. 6×10 inches)
Fabric glue or hot glue gun (for cape attachment)
Abbreviations
MR – Magic Ring
ch – chain
sc – single crochet
inc – increase (2 sc in one stitch)
dec – decrease (single crochet 2 together)
sl st – slip stitch
st(s) – stitch(es)
R – Round
FO – Fasten Off
Instructions
Welcome to your enchanting crochet journey! Follow these steps carefully to bring your Amigurumi Ice Princess to life.
Head, Body & Dress (Continuous Piece):
Start with Bright Blue yarn.
R1: In a MR, 6 sc (6)
R2: 6 inc (12)
R3: (1 sc, inc) x6 (18)
R4: (2 sc, inc) x6 (24)
R5: (3 sc, inc) x6 (30)
R6: (4 sc, inc) x6 (36)
R7-R10: 36 sc (4 rounds)
R11: (4 sc, dec) x6 (30)
R12-R13: 30 sc (2 rounds)
R14: (3 sc, dec) x6 (24)
R15-R16: 24 sc (2 rounds)
R17: (2 sc, dec) x6 (18)
R18: 18 sc. Stuff the bottom part of the dress firmly.
Change to Light Blue yarn.
R19: (1 sc, dec) x6 (12)
R20: 12 sc (1 round)
Change to Skin Tone yarn.
R21: 12 inc (24)
R22: (3 sc, inc) x6 (30)
R23: (4 sc, inc) x6 (36)
R24: (5 sc, inc) x6 (42)
R25-R32: 42 sc (8 rounds). Insert 8mm safety eyes between R28 and R29, approximately 7-8 stitches apart.
R33: (5 sc, dec) x6 (36)
R34: (4 sc, dec) x6 (30)
R35: (3 sc, dec) x6 (24). Begin stuffing the head firmly, shaping as you go.
R36: (2 sc, dec) x6 (18)
R37: (1 sc, dec) x6 (12)
R38: 6 dec (6)
FO, weave in the end to close the hole.
Arms (Make 2):
Start with Skin Tone yarn.
R1: In a MR, 5 sc (5)
R2-R3: 5 sc (2 rounds)
Change to Light Blue yarn.
R4-R10: 5 sc (7 rounds)
FO, leave a long tail for sewing. Lightly stuff the hands. Flatten the arm opening and sew to the sides of the body around R18-R19 (Light Blue bodice section).
Hair Cap (Yellow):
Using Yellow yarn.
R1: In a MR, 6 sc (6)
R2: 6 inc (12)
R3: (1 sc, inc) x6 (18)
R4: (2 sc, inc) x6 (24)
R5: (3 sc, inc) x6 (30)
R6: (4 sc, inc) x6 (36)
R7: (5 sc, inc) x6 (42)
R8-R13: 42 sc (6 rounds)
FO, leave a long tail for sewing. Place the hair cap on the head and sew securely.
Hair Strands & Braid (Yellow):
Cut many lengths of yellow yarn (about 15-20 inches each).
Using your crochet hook, loop individual strands through stitches on the hair cap, especially around the face and the back where the braid will be.
Gather a significant portion of the back strands (e.g., about 30-40 strands), divide into three sections, and braid them. Secure the end with a small piece of yarn.
Trim and style some shorter strands around the face for bangs, if desired.
Small Flowers (Light Blue – Make 3-5):
Using Light Blue yarn.
In a MR, (ch 2, 2 dc, ch 2, sl st) x5 in ring.
Pull tight to close the ring. FO, leave a tail for sewing.
Sew these small flowers onto the hair cap, near the bangs and on the braid, as seen in the image.
Facial Features:
Using black embroidery floss, embroider delicate eyebrows above the safety eyes.
Embroider small eyelashes at the outer corners of the eyes.
Using pink embroidery floss, embroider a small ‘V’ shape for the mouth directly below the eyes.
Apply pink pastel or blush lightly to the cheeks for a gentle rosy glow.
Cape:
Cut a rectangle of the sheer glittery blue fabric, approximately 5-6 inches wide and 8-10 inches long.
Fold the top edge slightly and gather it to fit around the doll’s neck/shoulders.
Carefully attach the gathered edge to the back of the doll’s neck/upper bodice using fabric glue or a hot glue gun. Ensure it drapes elegantly.