
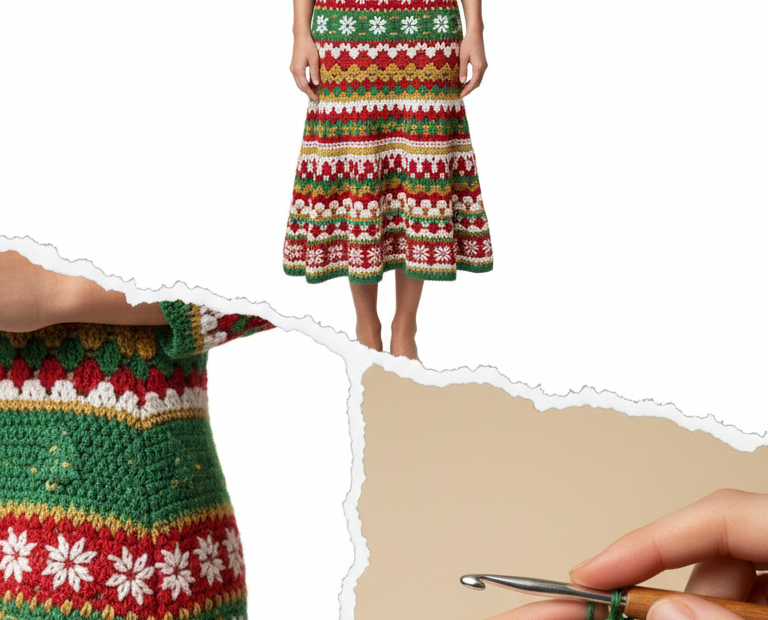
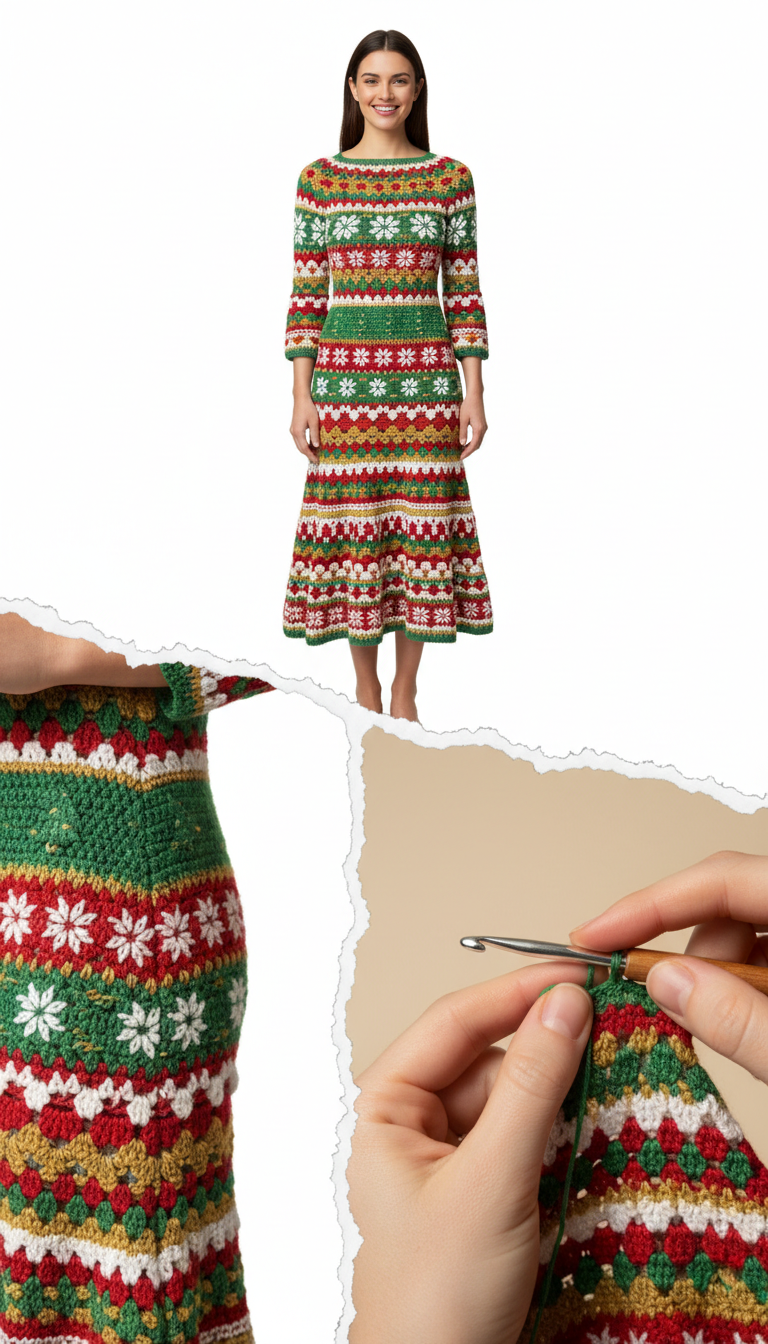
Step into the holiday spirit with our stunning Festive Crochet Christmas Dress Pattern! This unique design features a beautiful array of classic Christmas colors and intricate stitch patterns, making it the perfect showstopper for any festive gathering. Get ready to impress with a handmade garment that radiates warmth and seasonal cheer.
Embrace the Joy of Handmade Holiday Fashion
There’s nothing quite like the personal touch of a handmade outfit, especially during the holidays. This crochet dress allows you to express your creativity and wear a one-of-a-kind piece that embodies the magic of Christmas. It’s more than just a dress; it’s a labor of love that will bring joy to both the maker and the wearer for years to come.
Crochet Pattern: Festive Crochet Christmas Dress Pattern: Craft Your Own Holiday Masterpiece!
Materials
- Worsted weight yarn in Christmas Green (MC)
- Worsted weight yarn in Bright Red (CC1)
- Worsted weight yarn in Snow White (CC2)
- Worsted weight yarn in Gold/Mustard Yellow (CC3)
- 4.0mm (G/6) crochet hook
- Yarn needle
- Scissors
- Stitch markers (optional)
Abbreviations
- ch – chain
- sl st – slip stitch
- sc – single crochet
- hdc – half double crochet
- dc – double crochet
- tr – treble crochet
- sk – skip
- sp – space
- st(s) – stitch(es)
- rep – repeat
- rnd – round
- MC – Main Color (Green)
- CC1 – Contrasting Color 1 (Red)
- CC2 – Contrasting Color 2 (White)
- CC3 – Contrasting Color 3 (Gold/Mustard Yellow)
- Bbl st – Bobble Stitch: *Yo, insert hook into st, yo, pull up a loop, yo, pull through 2 loops* 4 times in the same st, yo, pull through all 5 loops on hook.
Instructions
Important Note: This pattern is designed for an intermediate to advanced crocheter, involving colorwork and shaping. Gauge is crucial for sizing. Work in continuous rounds unless otherwise specified. Adjust initial chain multiples and increase/decrease rates to fit your desired size.
SKIRT
Starting at the bottom hem, work in rounds.
- Rnd 1 (MC): Ch a multiple of 12 (or desired circumference for hem), sl st to join to first ch, being careful not to twist. Ch 1, sc in each ch around. Join with sl st to first sc.
- Pattern Band 1 (CC1, CC2, MC): Ripple/Shell Pattern
Change to CC1.
Rnd 2: Ch 3 (counts as first dc), dc in next st. *sk 1 st, (2 dc, ch 1, 2 dc) in next st (shell made), sk 1 st, dc in next 4 sts*. Rep around, ending with dc in remaining sts. Join with sl st to top of ch 3.
Repeat this pattern with color changes for 2-3 inches, alternating between CC1, CC2, and MC to create the striped ripple effect visible in the image. - Pattern Band 2 (CC3, CC1, CC2): Bobble Stitch Band
Change to CC3.
Rnd 1: Ch 1, sc in each st around. Join with sl st.
Rnd 2: Ch 1, *sc in next 3 sts, [CC1] Bbl st in next st, [CC3] sc in next 3 sts, [CC2] Bbl st in next st*. Rep around, adjusting sc count to maintain stitch count. Join with sl st.
Repeat for 1-2 inches. - Pattern Band 3 (MC, CC2): Snowflake Motif Band
Change to MC. Work in sc stitches. Follow a colorwork chart (not provided, but assume a 6-pointed snowflake design) or create simple ‘X’ or ‘+’ shapes using CC2 (white) sc stitches on a MC (green) sc background. This band should be approximately 3-4 inches tall. - Pattern Band 4 (CC2, CC1, CC3): Wave Pattern
Change to CC2.
Rnd 1: Ch 1, sc in each st around. Join with sl st.
Rnd 2: Ch 1, *sc in next st, hdc in next st, dc in next st, tr in next st, dc in next st, hdc in next st, sc in next st, sl st in next st*. Rep across, changing colors as seen in the image to create the red and gold accents in the waves. Repeat for 2-3 inches. - Transition to Bodice (MC): Work several rounds of sc in MC, gradually decreasing evenly in each round to shape the skirt towards the waist. For example, decrease 4-6 stitches every 2-3 rounds. Continue until the circumference reaches your waist measurement.
BODICE
Continue from the skirt without breaking yarn, adjusting stitch patterns for a closer fit.
- Waist Pattern Bands: Continue incorporating Pattern Band 1 and Pattern Band 3 (Snowflake) on the bodice, adapting the stitch count to the smaller circumference. Work straight for several inches without increases or decreases for the torso.
- Armhole Shaping: When reaching underarm height, split work for front and back panels. Create armholes by chaining a few stitches and skipping a section of stitches on either side. Continue working each panel separately for the desired armhole depth, decreasing stitches at the armhole edge for shaping.
- Neckline Shaping: For the boat neck, begin decreasing stitches at the center front and back after sufficient armhole depth. Work shoulders separately, then join using sl st or sc seam.
SLEEVES
Work in the round, attaching yarn at the armhole.
- Sleeve Top (MC): Attach MC yarn at the underarm. Ch 1, sc evenly around the armhole opening. Join with sl st.
Work several rounds of sc, decreasing every few rounds to gently taper the sleeve. - Sleeve Pattern Bands: Incorporate sections of Pattern Band 1 (Ripple/Shell) and Pattern Band 3 (Snowflake) onto the sleeves, matching the sections on the main dress. Continue decreasing periodically to taper the sleeve towards the wrist.
- Cuff (MC): Work 2-3 rounds of sc in MC at the end of the sleeve for a neat finish. Fasten off.
FINISHING
- Weave in all loose ends using a yarn needle.
- Block the dress gently to even out stitches and enhance drape.
- Wear your beautiful, festive crochet dress and enjoy the holidays!