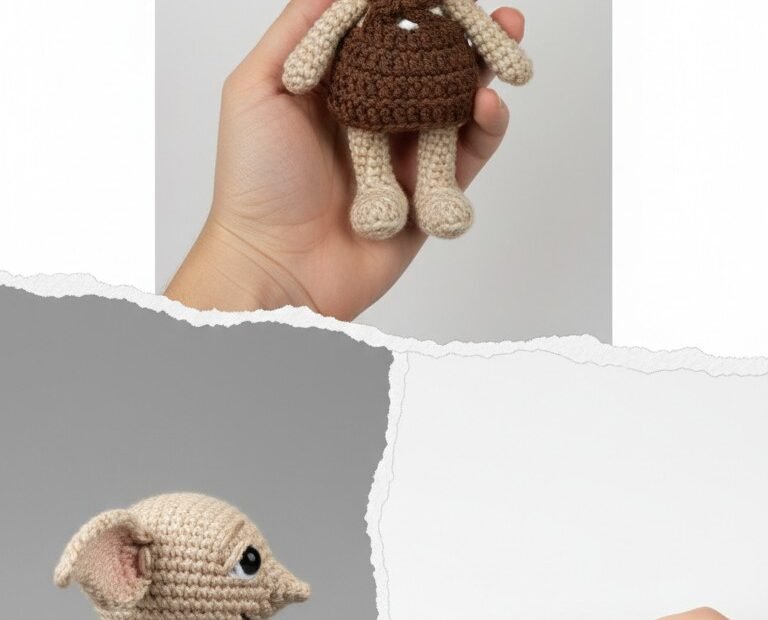
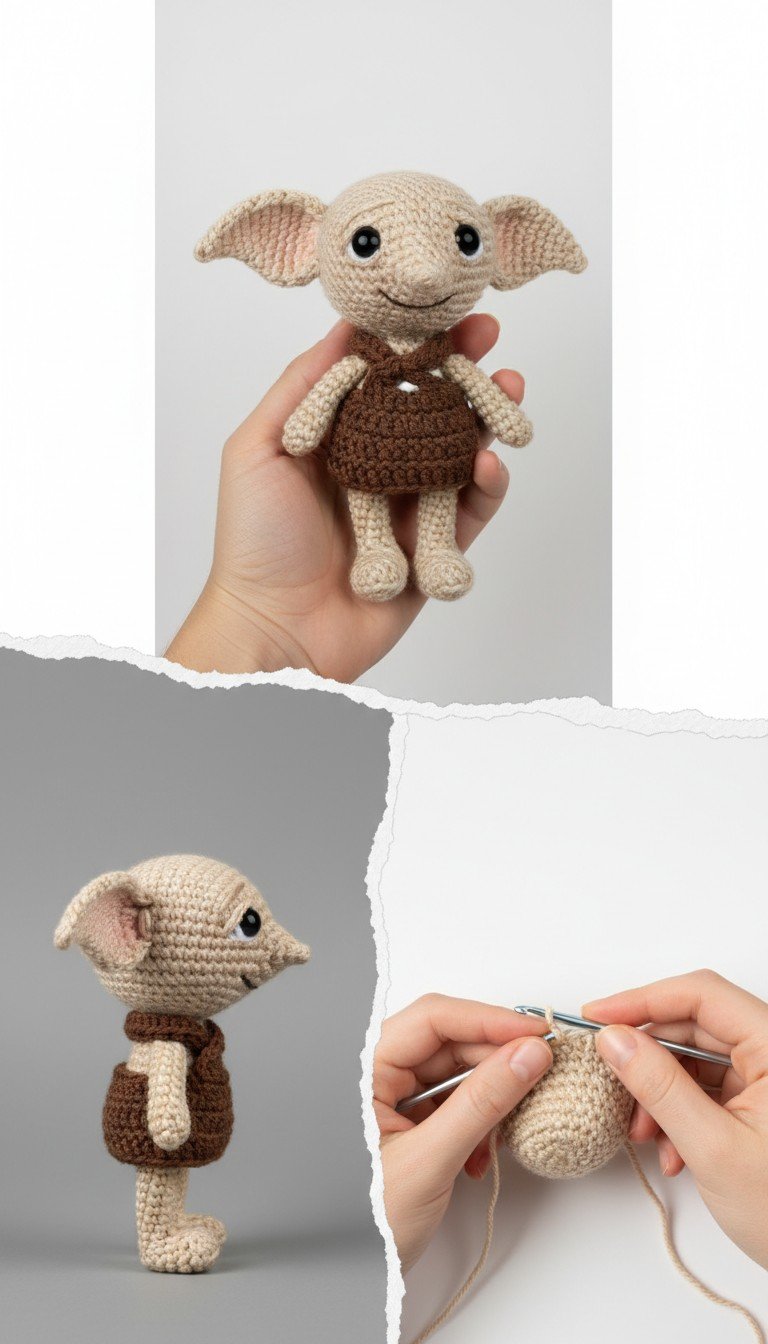
Bring a touch of magic into your home with this free Dobby amigurumi pattern! Perfect for Harry Potter fans, this loyal house-elf is surprisingly simple to crochet. Whether you’re making a gift for a loved one or adding to your own collection, this pattern will guide you step-by-step to create an adorable Dobby that’s truly free.
Craft a Magical Friend: The Joy of Crocheting Dobby
There’s something uniquely rewarding about crafting a character as iconic as Dobby. This pattern is designed to be accessible for intermediate crocheters, offering clear instructions to capture his endearing features – from his big, expressive eyes to his signature tunic. Imagine the delight of seeing your very own Dobby come to life, ready to protect and charm all who meet him.
Crochet Pattern: Free Dobby Amigurumi Pattern: Crochet Your Own Beloved House-Elf
Materials
Worsted weight yarn in Light Beige (skin)
Worsted weight yarn in Dark Brown (tunic)
Worsted weight yarn in Light Pink (inner ears)
2.5mm crochet hook
8mm black safety eyes
Fiberfill for stuffing
Yarn needle
Scissors
Stitch marker
Abbreviations
MR = Magic Ring
ch = chain
sc = single crochet
inc = increase (2 sc in next stitch)
dec = decrease (sc2tog)
sl st = slip stitch
FO = Fasten off
() = repeat instructions in parentheses
[] = total number of stitches at the end of the round
Instructions
Head (Light Beige):
R1: MR 6 sc [6]
R2: 6 inc [12]
R3: (sc, inc) x 6 [18]
R4: (2 sc, inc) x 6 [24]
R5: (3 sc, inc) x 6 [30]
R6: (4 sc, inc) x 6 [36]
R7: (5 sc, inc) x 6 [42]
R8-14: Sc in each st around (7 rounds) [42]
Place 8mm safety eyes between rounds 11 and 12, approximately 7-8 stitches apart.
R15: (5 sc, dec) x 6 [36]
R16: (4 sc, dec) x 6 [30]
R17: (3 sc, dec) x 6 [24]
Start stuffing firmly, shaping the head.
R18: (2 sc, dec) x 6 [18]
R19: (sc, dec) x 6 [12]
R20: 6 dec [6]
FO, leaving a long tail for sewing. Finish stuffing and close the hole.
Body (Light Beige):
R1: MR 6 sc [6]
R2: 6 inc [12]
R3: (sc, inc) x 6 [18]
R4: (2 sc, inc) x 6 [24]
R5: (3 sc, inc) x 6 [30]
R6-10: Sc in each st around (5 rounds) [30]
R11: (3 sc, dec) x 6 [24]
R12-14: Sc in each st around (3 rounds) [24]
Stuff firmly. FO, leaving a long tail for sewing.
Arms (Make 2, Light Beige):
R1: MR 6 sc [6]
R2: (sc, inc) x 3 [9]
R3-10: Sc in each st around (8 rounds) [9]
Stuff lightly. FO, leaving a long tail for sewing.
Legs (Make 2, Light Beige):
R1: MR 6 sc [6]
R2: 6 inc [12]
R3: (sc, inc) x 6 [18]
R4-5: Sc in each st around (2 rounds) [18]
R6: (sc, dec) x 6 [12]
R7-10: Sc in each st around (4 rounds) [12]
Stuff lightly. FO, leaving a long tail for sewing.
R1: Ch 10. Sc in 2nd ch from hook and next 8 ch [9 sc].
R2: Ch 1, turn. 2 sc in first st, sc in next 7 st, 2 sc in last st [11 sc].
R3: Ch 1, turn. Sc in each st across [11 sc].
R4: Ch 1, turn. 2 sc in first st, sc in next 9 st, 2 sc in last st [13 sc].
R5: Ch 1, turn. Sc in each st across [13 sc].
R6: Ch 1, turn. Dec, sc in next 9 st, dec [11 sc].
R7: Ch 1, turn. Dec, sc in next 7 st, dec [9 sc].
R8: Ch 1, turn. Dec, sc in next 5 st, dec [7 sc].
R9: Ch 1, turn. Dec, sc in next 3 st, dec [5 sc].
R10: Ch 1, turn. Dec, sc in next st, dec [3 sc].
R11: Ch 1, turn. Dec, sc in next st [2 sc].
Sc around the entire edge of the ear to give it a neat finish. FO, leaving a long tail for sewing.
Inner Ear (Light Pink):
R1: Ch 8. Sc in 2nd ch from hook and next 6 ch [7 sc].
R2: Ch 1, turn. 2 sc in first st, sc in next 5 st, 2 sc in last st [9 sc].
R3: Ch 1, turn. Sc in each st across [9 sc].
R4: Ch 1, turn. 2 sc in first st, sc in next 7 st, 2 sc in last st [11 sc].
R5: Ch 1, turn. Sc in each st across [11 sc].
R6: Ch 1, turn. Dec, sc in next 7 st, dec [9 sc].
R7: Ch 1, turn. Dec, sc in next 5 st, dec [7 sc].
R8: Ch 1, turn. Dec, sc in next 3 st, dec [5 sc].
FO, leaving a short tail.
Tunic (Dark Brown):
R1: Ch 25.
R2: Sc in 2nd ch from hook and in each ch across [24 sc].
R3-15: Ch 1, turn. Sc in each st across (13 more rows, total of 14 rows) [24 sc].
FO, weave in ends. This creates a flat rectangular piece.
Assembly:
Sew the Head to the top of the Body.
Sew the Arms to the sides of the Body, just below the neck.
Sew the Legs to the bottom of the Body.
For the Ears: Place the pink inner ear on top of the beige outer ear. Using the long tail from the beige ear, sew them together around the edge, then attach them to the sides of the Head, positioning them as seen in the image.
Embroider Dobby’s smile using a thin strand of black yarn.
Wrap the brown Tunic around Dobby’s body. The top edges will form armholes, and the front can be overlapped slightly and secured with a few discreet stitches to replicate the look from the image.