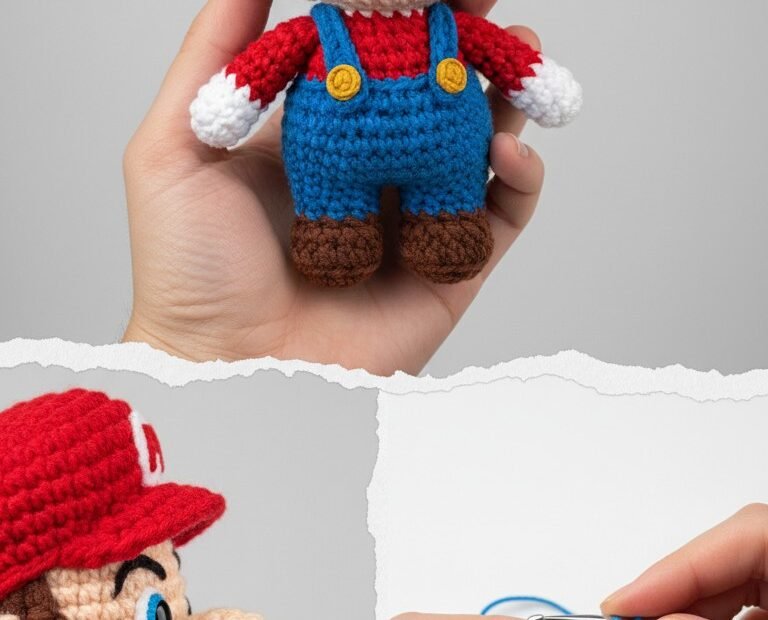
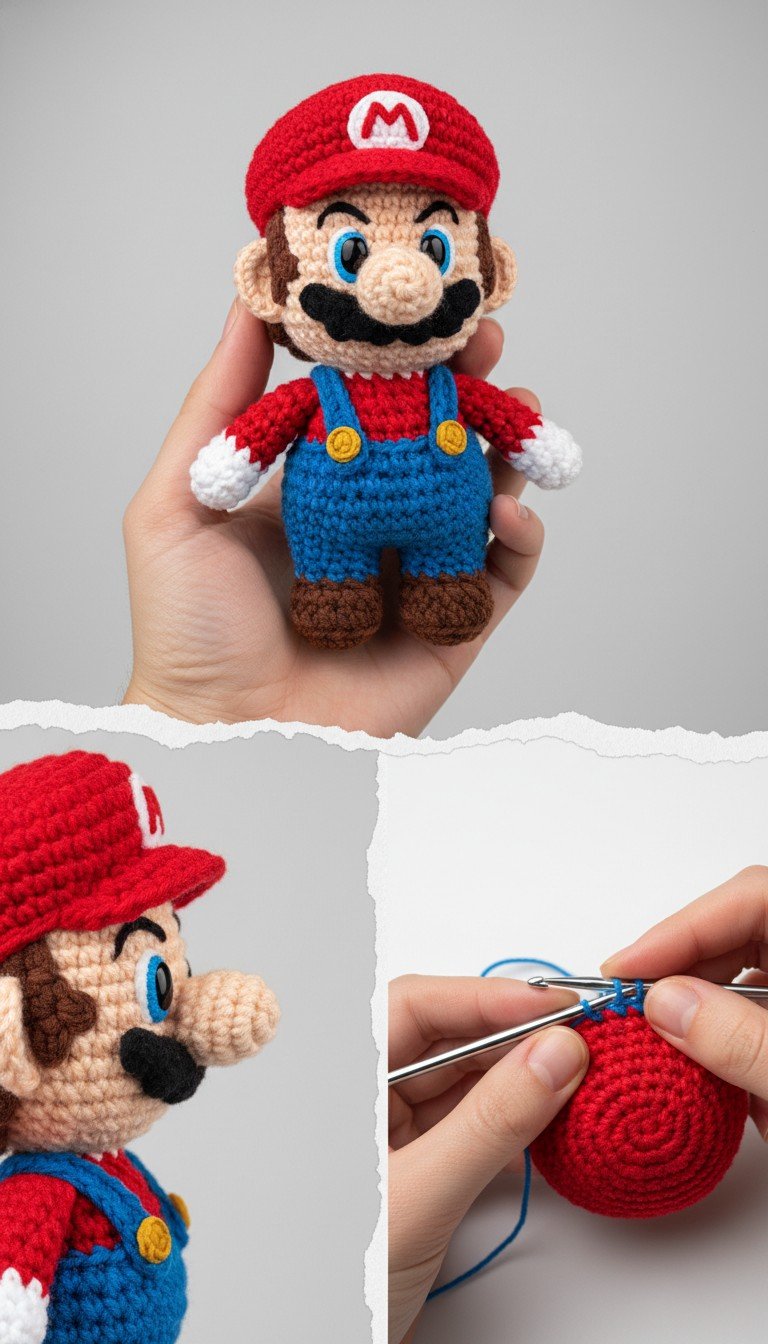
Embark on a nostalgic crafting adventure with our meticulously designed Crochet Mario Amigurumi Pattern! Bring the iconic plumber from the Mushroom Kingdom to life with your own hands. This detailed guide ensures a fun and rewarding experience, perfect for gifting to a Nintendo fan or adding a playful touch to your own collection. Get ready to crochet your way to a super cute Mario!
Craft Your Own Super Star: Why You’ll Love This Mario Project
There’s something magical about creating beloved characters in yarn, and this Mario Amigurumi is no exception. It’s more than just a toy; it’s a handcrafted piece of gaming history you can hold. Whether you’re a seasoned crocheter looking for a fun challenge or an enthusiastic beginner eager to try amigurumi, this pattern provides clear instructions to help you succeed, making it a perfect gift or collectible.
Crochet Pattern: Level Up Your Craft: The Ultimate Crochet Mario Amigurumi Pattern!
Materials
Red Yarn (Worsted Weight or DK)
Blue Yarn (Worsted Weight or DK)
Tan/Skin Tone Yarn (Worsted Weight or DK)
Brown Yarn (Worsted Weight or DK)
White Yarn (Worsted Weight or DK)
Black Yarn (for embroidery)
Light Blue Yarn (for embroidery)
Yellow Yarn (for buttons)
2.5mm or 3.0mm Crochet Hook (or size to achieve tight stitches)
Polyester Fiberfill for stuffing
Yarn needle
Stitch markers
Scissors
White felt (for ‘M’ on hat, optional)
Abbreviations
MR: Magic Ring
ch: chain
sc: single crochet
inc: increase (2 sc in one stitch)
dec: decrease (sc2tog)
sl st: slip stitch
FO: Fasten off
rnd: round
(X): stitch count at the end of the round/row
Instructions
Head (Tan Yarn)
Rnd 1: 6 sc in MR (6)
Rnd 2: (inc) x6 (12)
Rnd 3: (sc, inc) x6 (18)
Rnd 4: (2sc, inc) x6 (24)
Rnd 5: (3sc, inc) x6 (30)
Rnd 6: (4sc, inc) x6 (36)
Rnd 7-12: sc around (36) (6 rounds)
Rnd 13: (4sc, dec) x6 (30)
Rnd 14: (3sc, dec) x6 (24)
Rnd 15: (2sc, dec) x6 (18)
Stuff head firmly.
Rnd 16: (sc, dec) x6 (12)
Rnd 17: (dec) x6 (6)
FO, weave in end.
Body (Start Red Yarn)
Rnd 1: 6 sc in MR (6)
Rnd 2: (inc) x6 (12)
Rnd 3: (sc, inc) x6 (18)
Rnd 4: (2sc, inc) x6 (24)
Rnd 5: (3sc, inc) x6 (30)
Rnd 6-9: sc around (30) (4 rounds)
Change to Blue Yarn.
Rnd 10-14: sc around (30) (5 rounds)
Rnd 15: (3sc, dec) x6 (24)
Rnd 16: (2sc, dec) x6 (18)
Stuff body. FO, leave long tail for sewing.
Legs (Make 2 – Start Brown Yarn)
Rnd 1: 6 sc in MR (6)
Rnd 2: (inc) x6 (12)
Rnd 3: (sc, inc) x6 (18)
Rnd 4: sc around (18)
Change to Blue Yarn.
Rnd 5-10: sc around (18) (6 rounds)
Stuff lightly. FO, leave long tail for sewing.
Arms (Make 2 – Start Tan Yarn)
Rnd 1: 6 sc in MR (6)
Rnd 2-3: sc around (6) (2 rounds)
Change to White Yarn.
Rnd 4-5: sc around (6) (2 rounds)
Change to Red Yarn.
Rnd 6-9: sc around (6) (4 rounds)
Stuff lightly. FO, leave long tail for sewing.
Hat (Red Yarn)
Cap:
Rnd 1: 6 sc in MR (6)
Rnd 2: (inc) x6 (12)
Rnd 3: (sc, inc) x6 (18)
Rnd 4: (2sc, inc) x6 (24)
Rnd 5: (3sc, inc) x6 (30)
Rnd 6: (4sc, inc) x6 (36)
Rnd 7-10: sc around (36)
Sl st, FO.
Brim:
Ch 12.
Row 1: Sc in 2nd ch from hook, sc 10 (11)
Row 2: Ch 1, turn, sc 11 (11)
Row 3: Ch 1, turn, dec, sc 7, dec (9)
Row 4: Ch 1, turn, sc 9 (9)
FO, leave tail for sewing to the cap.
Ears (Make 2 – Tan Yarn)
Rnd 1: 6 sc in MR (6)
FO, leave tail for sewing.
Moustache (Black Yarn)
Ch 6.
Row 1: Sc in 2nd ch from hook, sc 4 (5)
Row 2: Ch 1, turn, sc 5 (5)
FO, leave tail for sewing. Shape as desired.
Buttons (Make 2 – Yellow Yarn)
Rnd 1: 6 sc in MR (6)
Sl st to first sc, FO, leave tail for sewing.
Assembly
1. Sew the Head to the Body.
2. Sew the Legs to the bottom of the Body.
3. Sew the Arms to the sides of the Body.
4. Sew the Ears to the sides of the Head, slightly above the middle.
5. Embroider Eyes: With white yarn, create an oval base for each eye. With light blue yarn, embroider a smaller oval inside for the iris. With black yarn, embroider a small dot for the pupil and a thin line for the eyebrow/eyelash area. Add a tiny white French knot or stitch for the eye highlight.
6. Sew the Moustache below the nose area of the head.
7. Sew the Hat Cap to the top of the Head. Then sew the Hat Brim to the front of the cap.
8. Cut a small white ‘M’ shape from felt and glue/sew it onto the hat, or embroider it with white yarn.
9. Sew the Yellow Buttons onto the blue overalls part of the Body, approximately where suspenders would be.